I know that Multi Channel software can help you work smarter, save you time and help make your business grow.
However… Do you find Multi Channel Software confusing too?
One of the challenges that I have had and I’m sure you’ve struggled with over the past few years is working how which Multi Channel software is right for you and your business.
So I’ve written the Ultimate Guide to Multi Channel software especially for you.
If you already know myself & that any such book is going to be worth the read, click here to download your free +70 page copy.
If not, here’s an insight into the book you can currently download for free and have in your hands in seconds.
Use the form below to download your +70 page, Plain English guide to Multi Channel software:
The Ultimate Guide to Multi Channel Software
The book is broken up into 12 chapters and first five chapters explain everything you need to know about Multi Channel software.
In chapter 1 you’ll learn:
What is Multi Channel software
The typical path that businesses follow to using software
The “Be Everywhere” strategy (more on this shortly)
What is the “Best” Multi Channel software
And how Multi Channel software can help your business
This entire book assumes no prior knowledge to Multi Channel software and I don’t stop at just an overview, you’ll also learn that:
You need a key, aka the Stock Number to keep stock levels in-sync
There are risks to being everywhere & that these can be reduced by using rules
An inventory management system can help you manage small & large numbers of products
Templates will great speed up the listing process and add “quality” for each and every listing
By combining orders into a single screen can help you process orders in bulk, saving you time
Couriers can be integrated and you can apply business rules to orders to change the delivery method
I’m keeping this brief as there are over 70 pages explaining how Multi Channel software can help you, how this software works and how it can help your business in 100% “Plain English”
Then together we’ll look at the different generations of Multi Channel software and I’ve included two simple to use tools that you can use for your business to help you work out which Multi Channel software is right for your business today and in a years time.
The “Be-Everywhere” strategy is the other side to this, this is being everywhere where your customers are when they’re in buying mode.
So this isn’t social media marketing on Facebook, Twitter, Instagram etc… where your customers are in “social mode”, this is on eBay, on Amazon and on your own eCommerce website where your customer is in “buying mode“.
The math here is really simple:
More sales channels
= More eyeballs looking at your products
= A higher chance of selling
= More sales
= More profit
It helps you “be everywhere” your customers are and manage the processes in the background to help you work smarter each day.
Be there with them too.
Grow Your Business
I know that that Multi Channel software can appear confusing to begin. However, Multi Channel software can help you and your business grow.
It’s a decision that I personally put off for several months and it cost me thousands. Ask anyone in this industry and they’ll tell you immediately that the businesses, that employ the tools that you find in Multi Channel software will help you and your business grow.
With Multi Channel software you can:
Create better quality listings
Leverage templates to expedite the listing process
Open your business to cheaper resources, such as outsourcing
Sell on eBay, Sell on Amazon
Sell on your own website(s)
Manage orders from ALL your sales channels
Keep stock levels correct across them all
Work smarter each day
And I’m only scratching the surface here for everything you’re about to learn in your copy of this book.
Which Software is Right for You?
The simple to use tools in this book will help you work out the true cost of how much Multi Channel software is going to cost you.
You can compare one provider against the other and while it will take you a couple of weeks to fully leverage the tools you’ll find in Multi Channel software, it doesn’t need to be expensive anymore. You can start on a tiny budget of just £302 for an entire year (or £25.17, 31.36€, $42.09 USD or $45.07 AUD if worked out monthly).
I’ve also included a tool that you can use to compare the features by giving you all the questions you need the answers to and compare any 2nd Generation Multi Channel software this includes Linnworks, Seller Express, StoreFeeder, ChannelGrabber, BrightPearl, ChannelAdvisor, eSellerPro, Cascade, ChannelUnity, Seller Dynamics and the 3rd Generation too.
Download Your Copy Right Now
Use the form below to download your +70 page, Plain English guide to Multi Channel software:
You can start reading this book immediately and I’ll also email a copy over to as well so that you can read it at anytime you wish to.
I want your business to be a success too and I’ll be in touch a few days after you have downloaded the book to see how you’re getting on and including some extra tips & suggestions to accompany the book.
This really is the “Ultimate” guide to Multi Channel software, nothing like this has been written before and with that said,
To your success!
Matthew Ogborne Author of The Ultimate Guide to Multi Channel Software
https://lastdropofink.co.uk/wp-content/uploads/2014/08/The-Ultimate-Guide-to-Multi-Channel-Software-Book.png476846Matthew Ogbornehttps://lastdropofink.co.uk/wp-content/uploads/2015/01/lastdropofink-logo-340-v2.pngMatthew Ogborne2014-08-19 07:49:392023-03-07 14:40:05The Ultimate Guide to Multi Channel Software Book
Below is the recording in full HD of the webinar held on Friday.
We show you how easy it is to sell on eBay using Magento & the eBay endorsed extension called M2E Pro in just 60 minutes.
There were over 200 questions asked and while we did our best to answer them all live, sadly many were missed. So if you go here http://understandinge.com/ebay-magento-webinar-recording/ you’ll be able to read every single answer to the questions asked.
If you’re tight on time and want to get to the meat of the webinar, skip the fluffy starter stuff and get stuck in at 16 minutes in or follow this link.
Enjoy :)
We’ll show you:
How to install Magento live with you ( takes 2 minutes and 5 or so clicks )
A tour of Magento for the first time
How to create your first product in Magento
How to install the M2E Pro extension
How to configure M2E pro following their advanced setup wizard
List a product live on to eBay
Revise the item live on eBay
Purchase the product
Process the order
Confirm that the shipping details have been updated on eBay
All in 60 minutes without a “degree in nerd” being required.
And remember:
No sales person will call you
You pick & choose what you need “off the shelf”
M2EPro is the only eBay endorsed extension for Magento
Magento is Open Source & there are thousands of extensions available, this is just one of them
There is a community of over 1,000 business owners just like you on UnderstandingE to help you out ( if needed )
And of course, over 70 full HD video tutorials right here to show the how and the why to setup your own multichannel software
Matt
https://lastdropofink.co.uk/wp-content/uploads/2014/04/sell-on-ebay-using-magento-webinar.jpg373931Matthew Ogbornehttps://lastdropofink.co.uk/wp-content/uploads/2015/01/lastdropofink-logo-340-v2.pngMatthew Ogborne2014-05-06 12:22:392023-03-07 14:40:09How to Sell on eBay using Magento Webinar Recording
What I’ve been really surprised by over the past few weeks is the number of sites that don’t actually have this turned on and it’s just not limited to self-builds even the really expensive Magento builds are missing this out this as a step.
Turning on the PayPal Instant Payment Notification (IPN for short) is an excellent idea as means that when a customer pays for an item using PayPal then the payment information will be updated on the Magento order details in the administration panel.
It only takes a few moments to enable and I’ll show you how to enable IPN for your Magento site below. This will mean that when you receive an order via PayPal Express for example, you can actually see the transaction details in Magento and if you’re using eSellerPro and have the eSellerPro Connector enabled for sales order processing, your order & payment details will match up automatically.
How to Enable PayPal IPN
Setting this up won’t take more than a few moments and here are 6 simple steps to do this:
#1 Login to PayPal
#2 Hover on “Profile” and select “My Selling Preferences”
#3 Halfway down the page, click on “Update” next to “Instant payment notifications”
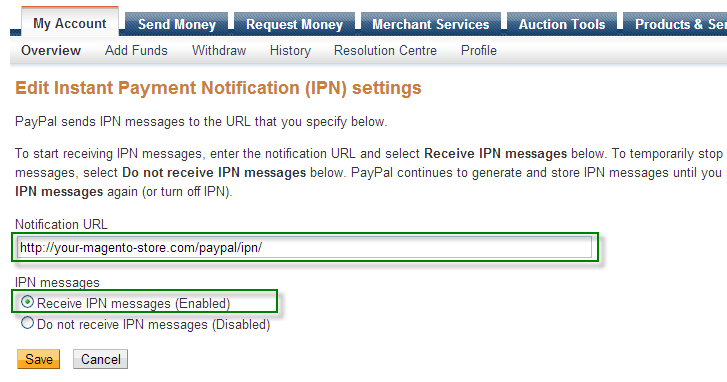
#4 You’ll now be presented with a page similar to this, press “Choose IPN Settings”
#5 Now enter the following details:
Notification URL – This is simply http://your-magento-store.com/paypal/ipn/ replacing “your-magento-store.com” with your website address. <=This is the part that normally trips everyone up as they’re not sure what to enter here.
IPN messages – Set this to “Receive IPN messages (Enabled)”
#6 Press Save
That’s it job done.
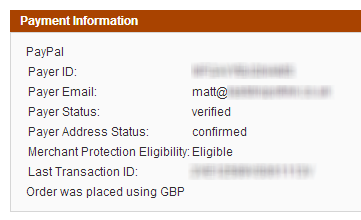
To test whether IPN is working or not is dead simple, just make a test transaction through your website (you will need a secondary PayPal account for this) and a few minutes later, check on the order in your Magento admin panel has been updated with the PayPal transaction details.
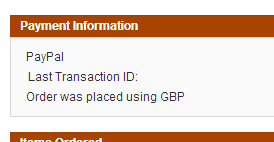
To help you, I have put to images below, the image on the left has no IPN details, the image on the right does.
Paypal IPN Not Working
Paypal IPN Has Worked
If you’re seeing the extra information similar to the right image, congratulations PayPal Instant Payment Notifications are working for you, yay!
Did your Magento Design Company go the extra Mile?
Anyone can make a pretty website, however, did your design company go the extra mile and suggest you set up Paypal IPN for your site? Or has this caught you out too? Let me know in the comments box below.
https://lastdropofink.co.uk/wp-content/uploads/2013/07/Setting-Up-PayPal-IPN-and-Magento.png476846Matthew Ogbornehttps://lastdropofink.co.uk/wp-content/uploads/2015/01/lastdropofink-logo-340-v2.pngMatthew Ogborne2013-07-01 15:29:292023-03-07 14:40:34How to Turn on PayPal IPN When Using Magento & PayPal
If you’re using Magento, then it’s highly likely that you’re using PayPal and other payment methods on your site, the challenge is that by default customers can leave comments at PayPal etc… after the transaction, but those comments are not brought back into Magento and onto your order.
In this article I’ll show you how to add an extension that allows you to accept order comments, turn of comments at PayPal and what to do edit if this extension doesn’t work out of the box for you.
Annoying eh? So what can we do?
We’re left with two options, the easy option and the hard option.
Let’s start with the hard option first.
For this option we would need to extend the PayPal extension so it collects the message left by a buyer on the final stage, this is going to need a developer and it’s not something I have done personally, so I don’t have any code for you to do this. This would mean we have a bespoke version of the PayPal extension and also if we want order comments from other payment methods it would mean we’d have to do bespoke work for each of them, not easy to maintain, so we need a easier option, which I’ll show you next.
Now for the easy option
What we’re going to do is disable the ability for buyers to leave comments at PayPal and set up order notes in Magento, then add a free extension that allows order comments from buyers in the checkout.
Note #1: If you’re using another payment method that has a comments section that a buyer can add notes in and these notes don’t come back into Magento after the payment is made, then ask the payment provider for the steps needed to be followed to disable that option.
Note #2: If you’re selling on eBay, this will not affect your eBay transactions.
Disabling PayPal order comments
First let’s disable the ability for buyers to leave comments on PayPal website payments, to do this follow either the steps below or the direct link is here:
Login to PayPal
Along the top click on “Profile”
On the “My Profile” page, select the bottom left option called “My selling preference”
In the second section down, click the “update” link to the right of “Block Payments”
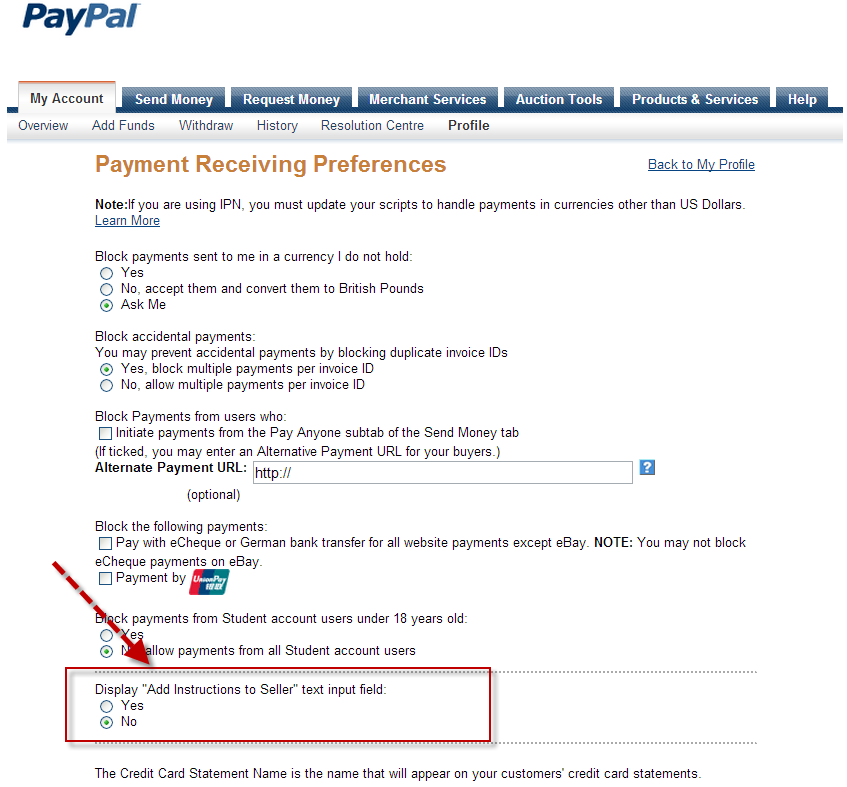
For the option called “Display “Add Instructions to Seller” text input field:” set this to “No”
Press Save
Tip: While you are on this page, there are several other options that you should consider reviewing, such as the ability to block currencies that you do not hold, stop duplicate payments and also the name that appears on your buyers card statements too.
The image below highlights this option:
Now what if we want customers to leave us notes on orders?
Well that’s easy, there is a FREE extension that does this for us :)
It appears that Magento doesn’t have the option to accept customer comments or order notes for a whole order, we have gift options (in System > Configuration > Sales > Gift Options) which is way more complicated, but basic order notes, nope…
So the easiest way of having this is to use a free extension and I’ll show you how to add this extension in the steps below:
Sign in if needed and press the “Install Now” button
Agree to the terms and copy the Magento Connect 2.0 URL
Go to your Magento administration panel Special Note: If your Magento is compiled, disable this before continuing. If you have no idea what I just said, ignore this :)
Along the top select “System > Magento Connect > Magento Connect Manager”
You’re likely to be asked to sign in again on this page
Under “Install New Extensions” paste in the URL we just copied from the Magento Connect site:
Now press install and in the section that appears, press proceed.
Leave the extension to install and once you see the message “Cache cleared successfully” we know the extension has been installed as shown below:
Go back to the Magento admin panel and log out and login again (good practice after you install any extension)
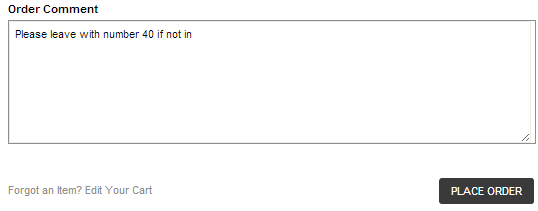
Now create a test order and on the final stage of your checkout called “Order Review” you should have a order comment box like this:
TADA!
If the order comment is not showing in your checkout flow
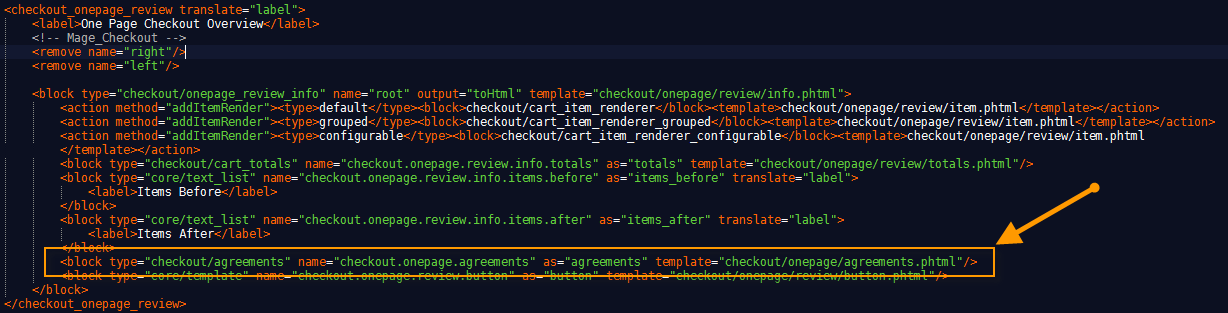
If we’re not seeing this order comment box at the final stage of the checkout flow before you press the “Place Order” button, then we need to update one of the layout xml files. Sounds scary, but it’s dead easy and the steps are below:
We need to edit one of your theme files called “checkout.xml”.
Open up your favourite FTP program and login, now go to this path:/app/design/frontend/default/<your theme>/layoutReplacing ‘<your theme>’ with the theme that you are using on the site and look for the file called “checkout.xml” and open it.
Note: If you do not see a “checkout.xml” in this directory, copy the default “checkout.xml” file from the “/app/design/frontend/base/default/layout” directory and put it into your theme directory.
Open up this file and search for “onepage_review_info”Tip: Pressing Ctrl+F in any good text editor will show you the find tool
We should see a block similar to the screen shot below and add in the highlighted line below:
I’ve tested this with the current latest version of Magento which is 1.7.0.2 and it works fine and without the need to edit the checkout.xml file. If you’ve followed the instructions above, you now allow customers to leave comments in your checkout process and have no hacked payment extensions. Sweet!
Did you find this article helpful?
If so leave a comment below or press one of the sharing buttons to the left :)
Enjoy,
Matt
https://lastdropofink.co.uk/wp-content/uploads/2013/03/Magento-Order-Comments.png350620Matthew Ogbornehttps://lastdropofink.co.uk/wp-content/uploads/2015/01/lastdropofink-logo-340-v2.pngMatthew Ogborne2013-03-14 07:05:102013-03-14 07:05:10How to Enable Order Comments for Magento
Aggregating orders from multiples sales channels is one of the main features in 3rd party software, but what are the benefits of doing this and how can it help your business?
I delve deeply into order aggregation in this article and explain how this can help your business tackle multiple sales channels and still leave you with (some) hair.
I’ve also included a video accompany this article and I would value any feedback you have in relation to the aggregation of orders from multiple sales channels, maybe this is something you take for granted through your current provider or maybe it’s something you’re pulling your hair out with right now. Let me know in the comments box at the bottom, I’d love to hear from you.
Order Aggregation Video Overview
What is Order Aggregation?
This is a process that collects orders from more than one source and aggregates them into a single location, this could be into your own system or that of a 3rd party.
Simply put, while you may be able to manage one, even two sales channels and even possibly three with a low velocity of sales and/or inventory, the moment you try to scale the business or add any increase in sales or inventory you’re going to run into a brick wall.
Order aggregation at any level of complexity can help you and your business deal with sales orders from one or more sales channels in a structured manner.
Winding Back to the Order Life Cycle
Let’s consider the typical life cycle of an order before we dig any deeper into this subject. We make one or more products available on one or more sales channels for customers to buy, this could be eBay, Amazon, your website(s) and maybe even a trade counter or retail store or may be many stores.
A customer commits to purchase one or more items and an order is formed. We may take payment straight away (cash over the counter or electronically) or the payment could be delayed (think eBay here) and some common details are taken and we then need to process the order.
For orders taken over the counter in a store or trade counter are orders that require little packaging in most instances, however for orders that need to be fulfilled by a delivery process you will likely need to create any documentation to pick & pack the line items and then possibly bespoke courier labels to prepare the order for despatch.
Once the order has been despatched, then typically with most online order sources, we need to update the channel source with common details, such marking the order as despatched and some other luxury data, such as the method, time of despatch and tracking details. We may also desire to email the customer to let them know that their order has been processed and despatched.
In the background, for the line items on the order, we need to keep track of their quantities, which is super important when dealing with multiple sales channels, so we can notify the other sales channels of stock updates or maybe to identify that the stock level for one or more products has fallen below a set level and a re-ordering process needs to be triggered.
Typically when you first started your business with one of the online channels, keeping just one channel up to date is relatively straight forwards for low volumes of orders, however as soon as we mix in multiple sales channels, a high velocity of orders and/or large inventory base, keeping everything in-tow can be an impossible task to complete manually.
Locating software that can solve all or part of this process can be hugely beneficial to the efficiency of the business, resulting in costs savings and sanity of the staff & business owners. It’s these benefits that I delve into for the rest of the article.
Benefits of Order Aggregation
Even if we just had two eBay accounts, logging out of one account and then into the other is cumbersome and time-consuming, as we’re duplicating the effort placed to process orders. It’s amplified when we have many order sources, in some cases to the point it would be almost impossible to do so.
Single Interface to All Orders
If we imagine that you have several order sources, these could be two eBay accounts, Amazon Seller Central or Marketplace, two websites and the desire to take manual orders in a retail or trade store aggregating the orders together for unified processing can by hugely beneficial and even if you have just one sales channel.
However, if we mix in the other features of the software providers offer, making use of a single orders screen can be an added feature to gain efficiency.
Customer Services
By bringing in orders from two or more sources into a single location can be hugely beneficial. Not only for ease of processing orders in mass, but also as a single reference point for all processes relating to orders, thus lowering the time spent by customer services in resolving order-related issues.
Some applications also include the ability to process payments & refunds from the orders screen. besides the obvious of not having to jump to a different system to conduct such an action(s), a by-product is that you are easily able to administer this and keep a history of the transactions have been made (such as who, when, why and for what amount in a refund).
Platform Specific Functions & Marketplace Integrations
If the order system that you use also has direct integrations back to the order sources, such as eBay, Amazon or Magento, then payment processing issues can be tackled from a single interface. For example if we need to check a PayPal payment or to make a refund, instead of giving all the members of staff the login details, it can be controlled in the orders system so that this is no longer needed and depending upon the system used, an audit history can be maintained for referencing later if needed.
If we pick on eBay for a few moments (as this marketplace certainly has some platform specific functions!), just because we received an order, this doesn’t mean we were actually paid for the order.
eBay have the disputes process that is unique to eBay and when processing large amounts of orders, the amount of unpaid orders can become a concern to your business (turning on immediate payments doesn’t suit all businesses). Some software applications allow the automatic processing of disputes back to eBay, so that stock that isn’t going to be paid for, can be released with the minimum amount of effort of you or your staff and with minimal time lag. So that the order can either be committed to that customer (after payment) or released back onto the sales channels for resale.
Amazon is not without its quirks, specifically around the fact that unless you mark an order as shipped you don’t have the funds released for that order. So being able to mark multiple orders as despatched from multiple locations and then the system going back to update the different sales channels to confirm they’ve been shipped can not only keep customer service communications down to a minimum (especially if you include the despatch method, time and tracking information), but to also to get paid for those orders.
Amazon also keep track on how quickly you despatch orders, remember Amazon only cares about ITS customers, then if you consistently ensure that your orders are processed ASAP for this channel and keep within their allowed levels (and far higher than these are strongly suggested) then you will ultimately benefit from a stronger relationship from them.
Here are some examples of what such an integrations could offer you:
Leaving feedback when orders are shipped
eBay dispute integration for unpaid orders
Marking orders as shipped when marked as shipped in the orders screen. In the case of Amazon this means getting paid for the order.
Updating the sales channels with the despatch method and tracking number, so the customer can see these details within their marketplace account
Business Rules
A by-product of being able to collect the orders from multiple channels is that you are able to process business rules on the orders. You might become confused here with these, this is not as simple as matching the delivery method chosen by the customer to the right order, that’s just matching, I’m talking about business rules and I’ll explain these now.
Business rules might be as simple as if an order arrives and is over 2Kg, then a courier should be used as the despatch method. Maybe if an order has an order value over £30 and as such its deemed by the business that it would be safer to send via a courier or a recorded method of delivery. Not just the shipping method that the customer chose at the time of checkout.
Also couriers are renowned for having exceptions to their services and typically there is either a delay in posting to certain locations or an extra charge. By applying a business rule (or several) to your orders, you could create an exceptions list of postcodes and select a different despatch option.
An excellent example of this is Northern Ireland, almost all couriers charge a premium for delivery to this location. Lets say we receive an order from Amazon and there is two line items and normally these would be sent via a courier, however because the courier wants $10 more to this location, using a service such as Royal Mail tracked would be more suitable. Its still relatively quick and it’s a traceable method, but works out cheaper than the main courier and has the attributes not found with normal Royal mail offerings.
Here are some of the attributes of orders that you may want to apply business rules to when processing them:
Order Source
Shipping service selected by the customer
The value of the shipping selected by the customer
Order value
Weight
Quantity
The destination of the order (postcode/zipcode, state, region and/or country)
Another benefit of aggregating orders is that all the orders can be processed in the same process, so that could be the same (or similar) despatch documents, thus saving an array of custom documents to each order source and standardising the entire pick, pack and despatch process.
Obviously I’m guessing that you would desire customisation to the despatch documents, as if we have one part of our business branded in a certain fashion and another part to another, ensuring that the documentation is either universal or customised to the sale source would highly beneficial.
Depending upon the software being used, some allow you to fully customise each document, this could be the picking slip, shipping document and invoices. These documents could also be depending on the shipping method set by the business rules be customised paper stock, for example if the order has been allocated to Royal Mail 1st or 2nd class, then the document printed could include the PPI label, so there is no need to stamp or add a stock for this.
The paper stock could also include an integrated label, so that once the contents of the order have been checked, you peel off the label, pop it on the front of the package and then spike the sheet or pop the rest of the sheet into the package itself for the customers reference.
Going beyond the paper documents, we must not forget email notifications. It’s quite possible to include a PDF version of the invoice for the order in the order despatched email and also for the email notifications to be tailored to each business identity and order source. Of course if you have the courier details from a courier integration to the orders aggregation software, then including the tracking information (and ideally links to track the order) could be a huge win for your business.
Despatch Process
If you can imagine that you have your orders in a single place of reference and have control over the documentation and business rules being applied to your orders, then we shouldn’t forget the ability to find a process of despatching orders that works well for your business.
Some businesses have really simple despatch processes, this could be a single document that fulfils multiple roles, such as invoice, picking slip and shipping list. Whereas another business may require barcode scanning of orders and products to ensure the accuracy of the despatched orders.
Whereas others may be required to enter or scan a serial number of the product being shipped in the order, for security or tracking. Having a software product where the despatch process can be altered, either globally for all orders or specific order parts can be hugely beneficial when working out a despatch process that works for you.
To add an extra dimension here, it’s not uncommon for a business to be looking at the despatch process and idealising other people’s businesses when it comes to order efficiency. The biggest eye-opener for me personally was during a visit to Expeditors in Avonmouth, Bristol.
This company specialises in warehousing and despatch of orders for 3rd party companies (amongst several other services). When I queried the team over despatch process and whether they used a unified process, the eye-opener was that for each business they worked with, they each had a tailored despatch process. Some had barcode scanning, some had picking lists for later processing and some just had a single sheet for all the despatch functions.
Stock Control
If your orders are being collected to a single location, then if we know what your stock level was before the order was received and the amount sold. We know what your true stock level is and this can be uesed to update the other sales channels where you are selling the same inventory.
This process varies from system to system, but the crux of this process is exactly the same, we know what we had to begin with, we know we have X number less and where from and where the item is being sold to, thus we know where we need to update with the latest stock level, so that we still achieve maximum market exposure of our products, but minimise the risk of overselling.
Note: See this article relating to the eSellerPro Channel Profile which is a process that does just this.
Accepting Manual Orders
One order source that we shouldn’t overlook is manual orders, these could be orders taken over the phone or trade orders. By allowing these to enter the normal despatch process can also be a huge win. Taking an order over the phone, checking stock levels and taking payment can be a tricky task when using multiple sales channels and without this basic information to hand, it can be impossible.
By having ALL the information about your inventory in a single place and being able to process an order with this information at your (or your staff’s) finger tips can make a call with a customer into a few minutes rather than 10’s of minutes and saving awkward situations of taking an order and not actually having the stock available to fulfil the order.
External Fulfilment
Not every company fulfils their orders internally, with the process of fulfilment becoming cheaper and cheaper and whole host of specialised companies out there that are capable of dealing with both stocked and just in time despatch (ProFS and Expeditors are two good examples of these).
With such orders, you can either allow the 3rd party company access to your orders or even in some cases integrate to their EDI or API systems for automated exchanges of the order data for them to fulfil the orders for you.
How Can it Help Your Business?
Bringing orders from multiple sources to a single orders screen will give you an exceptional business advantage. You can see your orders, process them in-mass, most likely be able to integrate with couriers, expedite the time it takes to process issues in customer services, apply business rules to the orders and have a clear picture of what is happening in your business, right now.
Going to the extreme, any and I mean any! order aggregation software will help your business become more efficient.
The processes in even less ‘evolved’ applications will allow you to process your orders more effectively and apply one or more processes to your despatch process. Some applications will go much, much deeper and allow for the full customisation of the processes, documentation and integrations involved with collecting orders from multiple sources.
Your Feedback
Maybe this is something you take for granted through your current software or maybe it’s something you’re pulling your hair out with right now. Let me know in the comments box at the bottom, I’d love to hear from you.
https://lastdropofink.co.uk/wp-content/uploads/2013/02/what-is-order-aggregation.png476846Matthew Ogbornehttps://lastdropofink.co.uk/wp-content/uploads/2015/01/lastdropofink-logo-340-v2.pngMatthew Ogborne2013-02-06 08:15:142023-03-07 14:40:47What is Order Aggregation & How Can it Help Your Business?
Magento comes with a lot of features out of the box, one of those is a HTML editor to allow easy adding and editing of HTML in almost all content areas.
However for advanced users, it’s more of a nuisance and you can disable it if you prefer, in this video I show you how.
There it’s that easy and super handy for HTML editing in Magento for advanced users.
https://lastdropofink.co.uk/wp-content/uploads/2013/01/how-to-disable-wysiwyg-editor.png476846Matthew Ogbornehttps://lastdropofink.co.uk/wp-content/uploads/2015/01/lastdropofink-logo-340-v2.pngMatthew Ogborne2013-01-08 13:04:132015-01-21 09:59:22How to Disable the Magento WYSIWYG Editor
The corporate version of dating & relationships, Trade Shows can be brilliant places to locate new suppliers and re-enforce existing relationships with suppliers and their staff.
However, there is a huge difference between just attending a Trade Show and making the event super productive, leaving with new supply leads and your existing suppliers thinking you’re fab!
This how-to-guide gives you five practical topics and plenty of tips that you can use when you visit your next trade show to make it truly rock!
Tip #1 – Be Prepared
Nope no scout badges here, dib-dib-dob-dob… but the saying is true, “be prepared” before you attend.
This is not just the day before, this is two weeks before.
Almost all trade shows now have online sites which include exhibitor lists. Print them off or copy them to excel and identify which ones you wish to visit and speak with and which ones are existing suppliers.
Similar to the exhibitors list, it’s very common for there to be a floor plan available too, after all the exhibitors pay good money to speak with you and they are assigned blocks of land rented for the duration of the show.
Print the floor plan out and work out where each supplier is going to be based, put stars on the suppliers on your print out, one colour for existing and one colour for new suppliers.
Your Check List:
Follow these tips to prepare before the event so you know where you are going and who you need to see while you’re there.
Print out the exhibitors list
Print out the exhibitors floor plan
Identify which exhibitors you need to visit
Mark them on your floor plan with stars one colour existing suppliers and one colour for new suppliers
Matt’s Note:
If this is a new trade show for you and don’t have any existing suppliers, that’s OK, you’ll just have one colour of stars on your floor plan print our and take special note of special section that follows shortly for doing your homework with new suppliers.
Tip #2 Use the Cafe Area as a “Base Point”
It’s important to locate where the cafe/rest areas are too. This isn’t because of my obsession with coffee, this is is because you’ll need a base to work from.
After working through a couple of suppliers, take a break for a few minutes. This allows you to be composed for the next meeting, take notes from previous meetings and just take a break from all that chatting.
Trade shows can be really busy events and if you can help a sales rep or account manager break away from the stand for a few minutes, they’ll drop their guard down and move partially away from their business mode and move into social mode.
Don’t be afraid to ask others to meet you at the cafe area for a soft drink.
We want the buyer-seller relationship to be a personal one, the moment you can turn it into a social one too, even if it is a few minutes over a drink, you’ve just broken the normal “business cycle” on the stand and helped them escape, all for the price of a cup of tea or a bottle of coke.
Your Check List
On your floor plan, circle the cafe area
Use this circle to invite an existing account manager or sales rep to join you, if not straight away, later at a set time.
Try and keep the meeting’s as one on one, two at most.
If you are a smoker, take chewing gum!
Matt’s Note:
If it’s just one or two people on the stand, do them a favour, go get them a drink and bring it back to their stand.
Favours are repaid with favours (see this book for why), this is something I do at every public event I go to, try it and they’ll remember you for it.
Tip #3 Existing Suppliers First, Then New Suppliers
If you’re anything like me then talking to new people can be scary, so instead, stick your toes in the water by speaking to existing suppliers first.
“Oh I just saw the new products X at lunch/over coffee with Supplier XYZ”
You already have relationships with them so it’s much easier to speak with them and remember your sales rep or account manager is going to be in the same situation, they’ll prefer talking to existing clients for short periods of time because you’re familiar to them.
As a bonus of not only getting you warmed up, if planned correctly, arrange lunch or coffee with an existing sales person or account manager for later that morning, so that you can use this as a reference point in conversation with a new supplier.
Your Check List
Arrange at least one meeting in the cafe area with a known supplier representative, even if it is for 2 minutes
With your print out of your existing suppliers, work around these first and tick them off as you go
Matt’s Note:
Make sure the supplier you are visting knows that you are going to speaking with their prime competition. If you have just visited their competitor(s), then ensure that you have one of their flyers, catalogues or business cards right on the top of you clipboard.
Tip #4 – Go to Meet People, Not Companies
Let’s put the corporate facade to one side for a moment. All business is conducted between individuals, granted they may be groups of individuals, but they are single people none the less and what do such individuals like the most in the world? Themselves!
All we now need to do is locate the right people in their team to meet
So let’s say you’ve done your research in the previous tip’s and know exactly which companies you wish to approach, that was the ground work. What we now need to do is locate the right people in the team to meet.
We need to know their name, their history and what they’re role is within the company and we don’t need to know just one person, we need to know at least two.
The first person is going to be our primary contact, this person should be the one that you connect with before the meeting, however we should not let “chance” ruin what is going to be an excellent day or few days out of the office, so we need a backup contact person too.
“Turning up on their suppliers stand, whether a new supplier or an existing one and asking for a person by name, is far superior than saying I’m interested in X, even if that person is not free.”
You can use the relationship that you may not even have made yet with the contact person to form a new relationship with the person you’ve just met, they know the original contact name and because you’ve mentioned them by name, they expect you know that person in some shape or form.
Much better than turning up and stammering, like I have done in the past, don’t you agree?
Your Check List
For each supplier, existing or new, make contact with them before the event.
Tell them that you are attending and ask for a name of a representative that is attending so you can meet them on that day.
With this name, find them on LinkedIn, Facebook and/or Twitter. As these sites have profile pictures, see what they look like and find out their work history.
Now find out who they work with and see if you can have at least one other name from the same department as your primary contact.
Matt’s Note:
If you find that the contact name you have been given has moved from one supplier to another, this is an excellent question to ask them at the meeting.
“I saw on LinkedIn that you moved from company X to company Z, what happened there, was it just time for a move?”
We’re not trying to put them on the stand or appear as a stalker, phrase it in a conversational way and where you found that information to. You never know you might find out the real reason why they moved or maybe a contact name of someone there who they’re friends with. Even more leverage for you on that meeting!
Tip #5 – Remember They NEED Your Business
It’s never been better or easier to find new suppliers
Times are apparently tough (they always are though!), leverage this to your advantage and remember that they need your business.
Don’t let red tape or visual appearance of suits get the way, having already worked out which person to speak to, on the day and a back up person just in case the other person is not available or not attending you are primed to start up a relationship with the company right from the beginning.
You don’t have to place an order there and then, speak to contact person, see if you like the person you’re dealing with and what the products and pricing is like. Use the personal relationship you are making with them to get around any awkward topics such as opening new accounts, maybe on a cash only basis to begin with is more suitable.
If applicable, just be upfront about not wanting a credit account and that you can see potential in thier products and want to start small and build up.
Make it easier for your sales rep by not asking for a “credit” account
Creating credit accounts can be a barrier for some companies and ironically you could be making it much easier for the sales rep to create an account for you, by not asking for credit. But make sure you do your homework on the companies you are meeting and check over any account types they offer by checking their website, asking or reading any application forms.
Matt’s Note:
Make it as easy as possible for the sales rep to make you an account. They not only want your business, they need your business never forget that.
And Finally….
Remember to follow up the meetings with a email or call to the person you met at the trade show. Even if you don’t intend to buy from them, open the account anyway, you can use it as a leverage point for another reference to another supplier.
Step away from the freebies!!!
Avoid picking up tat from stands and end up carrying around bags and bags of corporate junk. It looks much better for anyone and everyone that you do intend to be working with, resist and you’ll not be instantly dismissed as a tat-junkie.
To summarise what we’ve covered:
Be Prepared
Be prepared and do your homework on the trade show before attending, know who you are going to be meeting, where they are and what their history is.
Set Your “home” for the Day
You’re in a different environment for the day and we need somewhere familiar. As soon as you’ve checked in, make the cafe your base point and the moment you need a break, escape to the base point and take a rest for a few minutes.
Make it Easier For Yourself
Meet with existing suppliers first, it makes making new relationships with new people (notice how I’m not saying “suppliers” here) later in the day as you’re warmed up.
Remember You’re Meeting Real “People”
If have a decent relationship formed, ask if they’d like to join you for a coffee or soft drink in the cafe area, make the relationship a personal one, not a corporate facade.
They Need You!
You know how customers make your business tick. Guess what, in the buyer-seller relationship, you’re the buyer and you are more important.
These simple, yet effective tips to making the most of the next Trade Show that you attend can make the difference between attending a trade show and a trade show that rocks for you and your business.
If you have any other suggestions or comments on how I can improve this guide, let me know in the comments box below.
https://lastdropofink.co.uk/wp-content/uploads/2012/08/what-is-order-aggregation.png476846Matthew Ogbornehttps://lastdropofink.co.uk/wp-content/uploads/2015/01/lastdropofink-logo-340-v2.pngMatthew Ogborne2012-08-19 10:05:162023-03-07 14:41:155 Tips to Make Attending a Trade Show a Success
Over the past few years eBay’s JavaScript policy has become quite lapse, this has enabled some extremely “slick” options to start appearing on eBay in both eBay Stores and in eBay Listings.
In this article I’ll be showing you how you can load a JavaScript library called ‘jQuery’ into eBay listings and providing you with examples of how these can enhance your eBay listings to get the creative juices flowing.
Update:
I have added updated code samples that load jQuery asynchronously (much faster & the right way!), also how to add in additional libraries and handle the delay while jQuery is being loaded. These can be found at the bottom of the page here.
Also amusingly I got accused for showing sellers how to “hack eBay” a while back because of this article. Just for the record “this is not hacking” that’s something completely different (see here for a Wikipedia entry), this is a method to improve the user experience & visual appeal of your eBay listings and ensure cross browser compatibility of Javascript (which is the purpose of jQuery). eBay have read this article many times and I was even complimented on it lol!
So What are these “Slick” Options & What is “jQuery”?
Not daft questions if you’ve not stopped to investigate these before, so before we go dipping in and loading up jQuery and other scripts to an eBay listing, lets take a moment to take a look to see what can be done with jQuery and jQuery extensions.
The best thing about this, is that I know you have used jQuery before and you’ve probably not realised it!
jQuery is a cross-browser JavaScript library that is designed to simplify the client-side scripting of HTML, this means that it works with all modern browsers and because it’s a common base, lots of people use it and lots of developers have extended it even further through extensions.
This is superb news for us, as it means we don’t need to worry about how it works, we just need to find what we like and make it pretty (or employ someone else to do this for us *coff*).
So lets take a look at an example, I’m sure you have used something similar before, but just not put the label of “oh that’s jQuery” on it, as you’ll soon realise jQuery is everywhere.
Grab any product on ASOS.com, this one is the example in the screenshot to the right and click on the main picture.
A new layer appears with the main image and any additional images.
Did you notice that the image resizes to your screen size?
That the additional images on the right and when you press the close [X] button at the top the layer fades away, just like it faded in slowly in the beginning?
That is…. jQuery!
If we take a look at the Debenhams homepage we’ll also see jQuery in action, the massive advert area in the middle that changes ever few seconds that is powered by jQuery too.
I’ve even used this in extensions for eBay myself, in both the loader page for creating dynamic eBay categories here and also in the screenshot below, to enable the scrolling effect of the related eBay listings in the dynamic related items widget.
Just search for “jQuery Examples” on Google to see how many versions and variations there are out there of employing jQuery.
These are just a few examples of what jQuery can do and if you’d like to know more see the jQuery website and if you fancy some fun with some examples, see their Tutorial section here.
So… jQuery on eBay Examples
So we’ve seen two neat examples, the first where the product images appeared is called a “lightbox” and the second & third is a “scroller” styled extension. Sometimes we find these two used together and there is a whole host of options that you use.
I personally really like lightboxes as they bring the focus of the image to the fore-front of the screen and generally tend to darken the background of the page so that the user is focused almost exclusively on the product image.
Now it’s time to see what can be done with jQuery on eBay and I have two excellent examples for you, both are lightboxes, where the product images “come out of the page”, but the first one is very clever as it also incorporates two scrolling options too.
In this first example, we can see that the Seller Refuby is using jQuery with a lightbox addon to make the main image appear to come out of the page.
This is just like what we saw on ASOS earlier in this article.
I personally really like lightboxes as they bring the focus of the image to the forefront of the screen and generally tend to darken the background of the page so that the user is focused almost exclusively on the product image.
That to me, has to be a good thing!
Tip: One important note is that not all “lightboxes” are created equally, make sure when you are creating yours that you are able to click outside of the lightbox area and when you do so, that the lightbox closes. Some do not and that is really annoying :)
In the second example, we’ll be treated to a combination of both a scrolling gallery and a lightbox which just so happens to a scroller inside that too!
Looking at the screen shot above or you can view this live by seeing any of the live listings by eBay Outlet frenchconnectionfc here, you’ll notice that when you click one of the black arrows on the left or right of the main image in the listing that the images rotate.
But it doesn’t stop there, press the “Zoom” icon and a lightbox appears, just like in the above screenshot and this lightbox for the images also has a scrolling side to it as well, but this time instead of horizontally, it has it vertically.
How cool is that!
How to Load jQuery into eBay Listings
I won’t be showing how to use jQuery once it’s been loaded in this article due to time restraints, you’ll need your own design professional to do this for you.
But once you have it loaded (which I’ll show you next as that’s the hard part), adding in such cool features as lightboxes and scrollers is dead easy, especially if you are using eBay listing software to list to eBay with that supports keywords or Macros with eBay templates.
So if you just load up the default jQuery script line below
In your eBay listing or template system, eBay will tell you that “Your listing cannot contain javascript (“.cookie”, “cookie(“, “replace(“, IFRAME, META, or includes), cookies or base href.” in an attractive red box:
Booooooooo
But how did the other two eBay businesses get jQuery loaded into their eBay listings?
Simple they used a “loader”.
Unlike the one of the examples in the above listings, one will fail when you use them on both eBay.com and eBay.co.uk because eBay.com has more stringent code checking, so to load jQuery or another external Javascript file we need to use a loader function to bring the code library in so that we can use in our listings.
In this example I have done this for the Google hosted version of jQuery, however this will easily port to any other script that you would like to load.
[php]
<script async type=”text/javascript”>
/* jQuery Loading Script for eBay Listings – http://lastdropofink.co.uk/?p=5945*/
var az = “SC”;var bz = “RI”;var cz = “PT”;var dz = “SR”;var ez = “C=”;var fz = “htt”;var gz = “p://”;var hz = “.com”;var jz = “ajax.googleapis”+hz+”/”;
var resource = document.createElement(“script”);
resource.src = fz+gz+jz+”ajax/libs/jquery/1.10.2/jquery.min.js”;
var script = document.getElementsByTagName(“script”)[0];
script.parentNode.insertBefore(resource, script);
</script>
[/php]
Let’s say for example that you wish to include the fancybox libary for those stunning pop up boxes for images that we saw earlier on in this article. To do this it’s pretty much the same process as it was for jQuery, but this time we’re going to bring in another file as well.
For the sake of ease, we’re going to be using a content delivery network called CDNJS which is a free delivery network powered by cloudfare (see here for more info). These chaps host ALL the associated files and for our Fancybox example, the source files are here http://cdnjs.com/libraries/fancybox/.
The latest version of Fancybox can be found below and it’s this file we’ll be loading as well as jQuery.
[php]
http://cdnjs.cloudflare.com/ajax/libs/fancybox/2.1.5/jquery.fancybox.js
[/php]
Now let’s jump to straight to the code:
[php]
<script async type=”text/javascript”>
/* jQuery Loading Script for eBay Listings – http://lastdropofink.co.uk/?p=5945 */
var az = “SC”;var bz = “RI”;var cz = “PT”;var dz = “SR”;var ez = “C=”;var fz = “htt”;var gz = “p://”;
/* Fancybox – Set tld & domain */
var hz = “.com”;
var jz = “cdnjs.cloudflare”+hz+”/”;
var resource = document.createElement(“script”);
resource.src = fz+gz+jz+”ajax/libs/fancybox/2.1.5/jquery.fancybox.js”;
var script = document.getElementsByTagName(“script”)[0];
script.parentNode.insertBefore(resource, script);
/* jQuery – Now Add in jQuery */
var hz = “.com”;
var jz = “ajax.googleapis”+hz+”/”;
var resource = document.createElement(“script”);
resource.src = fz+gz+jz+”ajax/libs/jquery/1.10.2/jquery.min.js”;
var script = document.getElementsByTagName(“script”)[0];
script.parentNode.insertBefore(resource, script);
</script>
[/php]
As we can now see this is pretty much the same as what we had before, but with a slight tweak, we changed the values of the two variables var hz and var jz to the tld “.com” and “cdnjs.cloudflare”+hz+”/” respectively.
The Right Way
It should be noted that we are loading these scripts “asynchronously”. Let me explain this a little for you as it’s a funky word you may not have come across before :)
If you use Javascript’s document.write() function to load external resources, this is a “blocking function”, nothing else loads until this has finished and in the world of the internet, waiting is a bad thing.
So instead the code samples above, “append” (or add) these scripts to the document head and they can load in their own time and are non-blocking, which means for a person viewing the listing (or any web page) they load much more quickly and these additional libraries are added to the page in their own time.
The Side Effect
Because we’re now loading in jQuery goodness in it’s own time, that means that when the page loads for the viewing customer, that jQuery may not have loaded yet and we need to be able to handle this, as addressing $() or jQuery() too early on will cause an error and your scripts won’t run and we can’t have that can we :)
So all we need to do is check to see if jQuery is defined or not and when it is defined, then run our additional scripts. We can do this by using this code below in the listing (preferably near the bottom):
[php]
<script async type=”text/javascript”>
function jQueryLoaded() {
//yay loaded! Now do stuff
jQuery(document).ready(function(){
And tada! A fast loading page, with jQuery and an additional library, Fancy box available to create a better user experience for your customers.
Summary
jQuery can really improve the richness and functionality of a webpage
jQuery, as we’ve just realised it’s everywhere and as we have seen jQuery can really improve the richness and functionality of a webpage.
Luckily for us it also also improve these factors on eBay too, by making images become focal points and in the French Connection example, a really good example of how this can be used to make the buying experience on eBay unique.
Have you see this before on eBay? Did you like it? Let me know in the comments box below.
https://lastdropofink.co.uk/wp-content/uploads/2012/08/jQuery-Example-on-ASOS1.jpg314835Matthew Ogbornehttps://lastdropofink.co.uk/wp-content/uploads/2015/01/lastdropofink-logo-340-v2.pngMatthew Ogborne2012-08-13 11:58:502023-03-07 14:41:17How to Load jQuery into eBay Listings With Live Examples
Would you like to be sporting the social icons that you at the top of every eBay listing, in your listings?
You know the ones the links that take your products to the sites below and are in the screen shot to the right?
Facebook
Pinterest
Twitter
The button to email a friend
And for good measure, the “Add to Watchlist” link too.
You do? Sweet, I’ve got some sick copy & paste code for you below :)
They do come with a warning though…. Even though they are a direct replication of what eBay has on the top of each listing and the code provided in this article is based of what eBay use’s (it even uses their image for the icons and part of their CSS), this still can be classed as a links policy violation and it’s to be used at your own discretion.
How To Use
In the next part of this article I’m going to be referring to “keywords”, you may also know these as tags or macros and are used by third-party tools to list to eBay with.
If you have no idea what these are then either you’re not using a 3rd party eBay listing tool or you’ll find these two articles super useful Part 1 & Part 2.
If you are not using any of these or a tool that does support keywords, for example if you are manually listing items on eBay or using TurboLister, but still want the icons, then follow the steps for “WITHOUT” a 3rd party tool below.
For Users WITH 3rd Party eBay Listing Software
If you have 3rd party software that supports keywords, it’s going to be two edits for you and I’ve included the keywords for:
If you tool have different keywords, then just change them over by following the instructions below.
If you’re using any of the tools above or a similar product that has keywords (tags, macros or whatever you’d like to call them), then it’s a simple case of copying the code later on in this article and swapping over the keywords for s_ItemTitle and s_ItemImage at line 59 and 60.
For ChannelAdvisor your keywords are: {{ITEMTITLE}} and {{IMAGE(ITEMIMAGEURL1)}}
For eSellerPro your keywords are: {{Title}} and {{Image(ItemImageURL1)}}
For ChannelGrabber your keywords are: {{title}} and {{image1}}
Swap these keywords over as appropriate for text between the quotes in var s_ItemTitle = “{{Title}}“; and var s_ItemImage = “{{Image(ItemImageURL1)}}“; and then paste the code into your listing template section and press save.
Tip: If you’re a little lost, see the next section for users without 3rd party tools for a colour coded guide.
For Users WITHOUT 3rd Party eBay Listing Software
This isn’t a biggy, you can still use this script. However it requires you to edit a little bit of HTML, but it’s really easy and if you get stuck, let me know in the forums, I’d be happy to help you (registration is of course free).
Copy and paste the code in the section below into your listing, where you would like the buttons to show, in the code there two variables that you need to set, these are:
var s_ItemTitle = “{{Title}}“;
This is at line 59 below and
var s_ItemImage = “{{Image(ItemImageURL1)}}“;
Which is at line 60.
In between the quotes for each line you need firstly change the text {{Title}} (as shown above in red) to your eBay listing title. For example, if you’re listing with an title called “LOVELY TOWN & COUNTRY ** WELLINGTONS”you’d pop this between the quotes so it now reads like this:
var s_ItemTitle = “LOVELY TOWN & COUNTRY ** WELLINGTONS“;
If you know how to find the URL (link) for an image then you can also update the text between the quotes for the s_ItemImage setting too, if you don’t then just set this to:
var s_ItemTitle = “”;
But if you do, pop the image URL between the quotes and Pinterest will work for you :)
Now copy and paste the entire code into your listing, on the HTML tab where you would like the buttons to appear and remember if you get stuck, let me know in the forums, I’d be happy to help you.
The Social Buttons Code for eBay Listings
Below is the code you’ll need to copy and paste for your social buttons to appear, remember to set your keywords to the title and image links as appropriate. Then revise or list an eBay to ensure it’s working, noting that it has to be live on eBay to work, in a preview screen the icons will not show.
Customised, Automatic Integrated Version
On a side note: If you are not using a third party tool or have to/get fed up of manually adding the title and image URL’s each time, it would take about ~1.5 hours for me to write a PHP version that connects to the eBay API and finds the listing title and main image so that this can be automated.
This would remove the need for you to manually add the title and images each time. Plus I’m pretty sure this could be setup to “auto add” to the top or bottom of eBay listings as well. But I don’t have those 1.5 hours right now at the time of posting to do so (and they would need to be paid for hours), so for now, use the above :) If you would an automated method, it can be done see the contact Matt page if this of interest to you.
Once you’ve got it working, let me know by either leaving a comment below or a post in the forums, as you’ll agree the above code is pretty darn cool, enjoy and maybe you’d like to press the tweet or like button at the top of this page share it with your friends too?
Hola! Welcome to the first part of a series of articles on how to run multiple niche websites and really tap into multi-channel eCommerce without eBay & Amazon.
I have been meaning to write this series for quite some time now and it’s going to take me a while to work through the different aspects I’d like to cover, hence breaking it up into multiple parts which will take me a few weeks to cover.
It’s my intention to start from the beginning in this article and cover the theory, then in the following articles work through turning the theory into practice to reach the final goal of you being able to run multiple web stores from a a single installation and really tap into the power of going niche.
I know I’m going to get distracted along the way, this is for good reason, I’m going to be focusing on a single open source eCommerce platform called “OpenCart” to deploy this concept with you and there are a couple of extensions that I’d like to include as part of this guide, this includes a free to use addon that will enable you to sell on eBay from OpenCart and also to delve into an Amazon integration as well.
To be completely up front with you, I have developed a complete integration from eSellerPro to OpenCart and while it would be handy if you have eSellerPro to power multiple websites from, I’d like to stress that this is not a requirement and I’ll be keeping this in mind throughout the series of articles as I delve into the how to power multiple nice websites with OpenCart.
So for now in this first article, let’s focus on the “Why” and start on the “How” parts.
Why?
I’m fully converse with deploying numerous selling persona’s on eBay & Amazon. I’ve done this previously with +15 accounts and I know of one company that has taken this & thrown it to the wall and has over 30 limited companies all specialising in niches just on eBay.
I previously wrote a pair of articles that desperately need a rewrite that covered why using multiple eBay accounts might be a good idea (you can read them here and here). As I mentioned, they need a rewrite and let’s summarise these, as the theory is straight forwards and comes back to a just three key factors, these are:
Timing
Personal choice
External factors
For the vast majority of manufactured goods, you are not the only company selling them, thus every single day, customers choose your competitors over you. There are an infinite number of reasons for this, timing, colour scheme, layout, description, title are a few factors.
Also, an interesting set of factors that I delved into a while ago was that there is a limit to the exposure for a given sales platform on a given day. This was started because I could see no viable reason why eBay sales should stay consistent within a specific window of 20% on a single day.
So let me ask you two specific questions here, if the response is anything like the one I normally receive back, this is exactly why you need to carry on reading this series of articles:
By midday, can you make an estimate within 10% on the total value of sales for that day? (if you’ve not tried this yet, try it)
Look at the sales totals for each day over the past two weeks. Do they stay within a 20% window?
Yep thought so. I’ve found some business owners that use eBay & Amazon can estimate their daily sales figures to the nearest £100 quite accurately just using that morning sales and others that can be well within 1-3% window on daily sales values in excess of £15K per day. The thing is, that’s not natural.
It’s what lead me to write a pair of articles, the first called “Why do eBay Sales Stay Consistent?” and the second to explore a hypothesis, that why I cannot prove, but I’d bet money on it or a subset of what I cover being in place, because its exactly what I would do, the article is here and called “The eBay “Best Match” Position Bias Modifier Hypothesis“.
I know I’ve not fully answered the “why” part just yet, but I need to explore a sub-topic, around choices. That’s next up :)
Choices, Choices, Choices
While timing can be pure fluke (when they find your product) and I’ve already made a case for external factors in the earlier section, the one factor that you can most easily influence is choice.
Buyers like choices, I like choices, but what influences my choice of which company to buy from, especially to what influences my partner to what she buys on eBay can vary greatly. Sometimes its just the way the product data is laid out, sometimes its gallery picture, sometimes it’s the sellers feedback, shipping prices, the colours used, the photographs, the list is almost endless.
The fact is here, is that I, as any of your potential customers may open your product listing and “not like it” and move to the next one. It could ironically be for the same product. It doesn’t matter, the point is, I have personal tastes on what I like and so do your customers.
This is one reason “why” you should consider multiple persona’s for your selling activities. For example you could one persona set up as a full professional looking business and the second the complete inverse, maybe one account that just uses variations, one that does not, one that as separate listings for each product variation and there are a whole host of possibilities, as soon as you break away from the “single business” approach.
And back to “Why?”
I wanted to cover the choices section in some detail, mainly because it’s the easiest to understand, I like black, but you may like blue, that means we will respond differently to different pages, it’s a quirk of being human, we have different tastes.
Going back to the three key points, Timing, Personal choice, External factors. Your product may be overlooked, it might even not be shown for a specific search and being at the right place at the right time can and does play a role in the ultimate goal of the customer buying your product. We’ve looked at personal choice in some depth and I’ve already hinted that when using marketplaces that external factors such as my hypothesis for when it comes to “best match” search results, the worrying part is that is exactly what I would do.
These are just some of the reasons why you should consider a multi-faceted approach to eCommerce and I’m sure you can think of more reasons why this approach makes good sense (if you have any you’d like to share, let me know in the comments box at the bottom).
I’m fully converse with deploying numerous selling persona’s on eBay & Amazon, but for websites, this can also be tough nut to crack, mainly because it can be expensive and the results take time to take effect, hence this article series.
Going Niche of Niche
If you have a wide range of products, then it can be relatively straight forwards to slice your products up into groups and create persona’s for each group.
I’m not going to be covering how to do this with eBay here, but instead focusing on a different way of approaching this through multiple eCommerce websites over a couple of articles.
An excellent example of this is in the real world is WorldStores, take a look at this page. That’s over 70 dedicated websites Each site is niche site to a specific range of products and this is the opportunity & challenge I’m going to be tackling in this series of articles. How to go multi-channel with multiple websites, on a budget.
If you’d like a corporate example see shopdirect.com that are responsible for Littlewoods, Very, Isme (previously Marshall Ward), K&Co (previously Kays) and the other is thehutgroup.com, they have at least a dozen eBay accounts that I know of and if they had 30, I’d not be be surprised, let alone the assortment of highly specialised “Niche” websites.
Which website platform to use?
If we pick on a few examples Magento can be, sorry “is” a resource hog, to run multiple websites off Magento (or even one larger site for that matter) then you’re going to need specialised hosting, which costs, its far from a simple platform to use and as soon as you mention “Magento”, all costs go up a minimum of 60%.
If we look at the bespoke offerings from eSellerPro, then cost, features & time to deploy is a major factor here and if we look at the ASPdotnetStoreFront from ChannelAdvisor, ignoring the setup costs & design fees, the £200 a month is a non-starter for each niche website.
We need cheap, we need ease of use, some snazzy functions that don’t require massive amounts of processing power & can be run on a shared web hosting account, an arsenal of free or inexpensive themes, an extensions & addons base that is varied and equally inexpensive and that’s why I’m picking on one of my favourite open source website platforms called OpenCart.
If you’ve not seen OpenCart before, then I think its about time you did. You can see both the front end of the base installation of OpenCart and the administration panels through their demostration sites here.
For me OpenCart makes an excellent choice, the admin is easy and the front end is feature rich. It’ll happily run on shared hosting accounts, its free, the themes are super cheap and crucially…. get this!! It will run multiple webstores from a single installation!
Summary & Your Feedback Please!
We know that niche works, I’m in a niche, you’re in a niche. But there are so many sub-niches we can get into with a product based business, we just need a cost effective route to do so and that’s exactly what I’ll be digging into in this series of articles using OpenCart as a base.
My closing questions are below and you can let me know your reply in the comments box below.
Have you considered creating niche websites before? What stopped you?
Do you already have niche websites, what has been your experiences so far?
What would you like to see in this series of articles?
I look forward to hearing from you :)
https://lastdropofink.co.uk/wp-content/uploads/2012/04/Multiple-Websites1.jpg314835Matthew Ogbornehttps://lastdropofink.co.uk/wp-content/uploads/2015/01/lastdropofink-logo-340-v2.pngMatthew Ogborne2012-04-15 10:57:112023-03-07 14:41:35Delving into Niches with Multiple Websites – Part 1 Why & How
Update: There is a workable “Work around” in this article.
When viewing an eBay item, sometimes the description area which is now being placed in a IFRAME tag doesn’t render in the browser page correctly, causing your listing details to only be 200-300 pixels tall and a scroll bar appears on the right hand side.
This seems to happen to both FireFox and Chrome quite regularly for me (probably in Internet Explorer, but I never use it) and to visually explain what I’m referring to a screen shot is below, note the scroll bar on the right hand side:
To try and combat this all you need to do is add an style to your style sheet. If you have no idea what a style sheet is, just copy/paste the code below at the very top of your listing in the HTML view and save the changes.
This will force your description to be a minimum of 4000 pixels tall. If this is too long for the majority of your listings, try 3000px, then 2000px and inversely if its not tall enough increase this value.
Its not perfect but will at least tell the majority of modern browsers that the height needs to be at least this value and extend the iframe downwards to limit the scrolling.
Have you see this before on your or another listing? Let me know in the comments box below.
https://lastdropofink.co.uk/wp-content/uploads/2012/05/ebay-listing-scroll-bars.jpg314835Matthew Ogbornehttps://lastdropofink.co.uk/wp-content/uploads/2015/01/lastdropofink-logo-340-v2.pngMatthew Ogborne2012-03-05 10:28:042015-03-09 11:26:22Do you keep seeing scroll bars on your eBay listings?
Since its launch in April 2006, Google Calendar has become a very simple, yet effective tool and also sports some exceptionally powerful features included.
If you’re reading this article in February 2011, this articles inclusion may not make any sense (yet), however if you’re reading this in March or later then I’ve put this video guide together for you so that you’re able to schedule those 10 minute windows in Google Calendar which will drive results for your business.
Google Calendar Introduction & How To Guide
In this video I discuss and show you:
Why use Google Calendar in the first place
How to create an event
How to move an event
How to create a recurring event
And how to share calendars between staff members (this is pretty cool!)
This video is almost exactly 10 minutes long, grab a cuppa & sit back knowing that you’ve taken action today!
Why Use Google Calendar?
It’s Free
As you’ve seen its ‘Matt Proof’ (really easy to use)
You can share calendars with staff by just adding an email address
You can set up email and pop-up reminders in seconds
Tasks can be colour-coded and repeated if necessary
It works on mobile devices, like the iPad, iPhone or Android
It just works!!!
Are there Alternatives?
Yes, in Microsoft Outlook you can schedule recurring events, however for most of you, you’ll be using the standalone version without MS Exchange and the scheduling features don’t run without the actual application being open. The same goes (I believe) for the iMac equivalent, iCal. The application needs to be running (and the device needs to be on in the first place) for notifications to be sent.
If you’re anything like me, then I don’t have the desktop or laptop on all the time, instead I have a combination of devices and that’s why a service like Google Calendar a simple, versatile choice because you can be notified of the events via email, its integrated on the Android devices, can be sync’d on the iPhone/iPad and also to remember the ease of use for calendar sharing between members of your team.
https://lastdropofink.co.uk/wp-content/uploads/2012/02/Google-Calendar-How-To-Set-up-Events-Share-Calendars-1030x5792.jpg316835Matthew Ogbornehttps://lastdropofink.co.uk/wp-content/uploads/2015/01/lastdropofink-logo-340-v2.pngMatthew Ogborne2012-02-08 11:17:242023-03-07 14:41:53An Introduction to Google Calendar & How To Guide
 Howdy,
 The book is broken up into 12 chapters and first five chapters explain everything you need to know about Multi Channel software.
 It’s a decision that I personally put off for several months and it cost me thousands. Ask anyone in this industry and they’ll tell you immediately that the businesses, that employ the tools that you find in Multi Channel software will help you and your business grow.
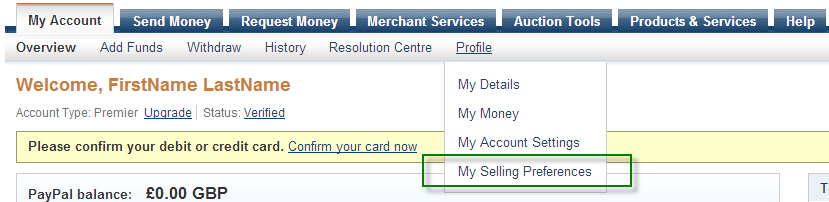


 Aggregating orders from multiples sales channels is one of the main features in 3rd party software, but what are the benefits of doing this and how can it help your business?
 Another benefit of aggregating orders is that all the orders can be processed in the same process, so that could be the same (or similar) despatch documents, thus saving an array of custom documents to each order source and standardising the entire pick, pack and despatch process.
 The corporate version of dating & relationships,
  Nope no scout badges here, dib-dib-dob-dob… but the saying is true, “be prepared” before you attend.
 It’s important to locate where the cafe/rest areas are too. This isn’t because of my obsession with coffee, this is is because you’ll need a base to work from.
 Times are apparently tough (they always are though!), leverage this to your advantage and remember that they need your business.
 So lets take a look at an example, I’m sure you have used something similar before, but just not put the label of “oh that’s jQuery” on it, as you’ll soon realise jQuery is everywhere.

 In this first example, we can see that the Seller


 I have been meaning to write this series for quite some time now and it’s going to take me a while to work through the different aspects I’d like to cover, hence breaking it up into multiple parts which will take me a few weeks to cover.
 While timing can be pure fluke (when they find your product) and I’ve already made a case for external factors in the earlier section, the one factor that you can most easily influence is choice.
 If you have a wide range of products, then it can be relatively straight forwards to slice your products up into groups and create persona’s for each group.
 Since its launch in April 2006, Google Calendar has become a very simple, yet effective tool and also sports some exceptionally powerful features included.