How eSellerPro’s Channel Profile Can Help Your Business

One of eSellerPro’s core features is a function called a ‘Channel Profile’, in this article I’ll be covering the basics to what a ‘Channel Profile’ does and how it can help your business.

Multi-Channel selling is now an assumed practice for eCommerce businesses, unlocking the power to reach a much wider audience than you could ever have imagined, but sensibly. The Channel Profile feature in eSellerPro can enable you to achieve this.

I’ve put together a short video, where I describe the key benefits of using a channel profile and how it could help your business when dealing with multiple sales channels.

What is a Channel Profile?

The purpose of the channel profiler is to maximise the exposure of your inventory exposure across more than one channel, then once an update has happened to let the other channels know of that update to the stock level.

In eSellerPro you can create more than one channel profile (hence ‘profile’ in its name), which you can apply to more than one inventory record and each profile can have different attributes. I’ll cover these later on in this article, but for now the easiest way of explaining what a Channel Profile does is by using  an example.

Let’s say we have 10 of the same mugs in stock and we wish to sell them on:

  • One eBay account
  • Amazon
  • Our website.

For maximum market exposure, we’re going to use the channel profile to list ALL 10 of these mugs onto eBay, Amazon and also show them on our website too. A couple of hours later, a customer called Jane buys one from eBay.

We now only have 9 in stock and the channel profile will now update Amazon to 9 and the website also to 9. Then another customer, Jim buys from the website. Again the channel profile will update the other marketplaces, eBay & Amazon with the new stock level of 8.

The next morning a new delivery of these mugs arrive and we have 10 more, so we now have a stock level of 18 mugs. The Channel profile will now update each of the selling channels where the products are listed with the updated stock level.

In this basic example, we gain maximum market exposure for our products and keep each of the selling channels in-line with the latest stock levels. Neat eh?

The Negatives of Using A Channel Profile

I’m going to note here the negatives you might have already realised are minor in comparison to the positives of exposing your inventory across as many channels as possible. However you need to be aware of them.

In theory if you only have 10 in stock, then you only have 10 to sell. By exposing your inventory across just 3 platforms in the example above, you are actually exposing 30 items and again in theory if they all sold at the same time, you could go to a negative inventory count of 20 (that’s the 30 sold, minus the 10 you had in stock).

The Channel Profiler is a process that runs on eSellerPro’s servers and it does not update the marketplaces instantaneously, there is a time lag on eSellerPro’s side and with the marketplaces themselves. While I now don’t know the exact figures, a period of about 30 minutes would be about right for each passing of an eSellerPro account to make updates to the 3rd party platforms.

We also need to understand that eSellerPro is a 3rd party to the marketplaces and as such there are time delays in the communication to them. Again referencing the earlier example, the orders from eBay & Amazon are not picked up instantaneously, they’re scheduled. Plus we also need to account for time delays in the marketplaces themselves, Amazon orders are not immediate, they tend to sit for 15-30 minutes before being released and also you can only ask for order reports every 30 minutes or so.

So it’s perfectly possible for Jane and Jim to buy on two different marketplaces within a time window of say 10 minutes and eSellerPro is not capable of updating the other channel to let it know there is a deduction of the inventory level, if there was only one left, this could have caused an oversell or back order. Hardly ideal.

It should also be noted that in relation to eBay, eBay auctions and BIN listings of 10 days or less, are regarded as being committed to the eBay marketplaces, thus if you have 10 in stock and 2 of those are in two auctions, then eSellerPro sees an available stock count of 8 and will use this value to keep the platforms updated.

Note: You can use the true stock level of 10 called “Percentage of On-Hand”, however this is where you’re most likely to be caught out, as using this option I strongly advise you never to use this option (although there are situations where it does not matter, such as virtual or limitless stock).

Channel Profile Tolerances

The channel profile process also has “tolerances”, for items over a stock count of 20, there is no compelling reason to keep the selling platforms updated with the latest stock count for each change.

If we had 10,000 of those mugs in stock, then updating them every time we sold one would be silly and slow down the really important updates for other stock items which have much left. As such eSellerPro has different tolerances for different stock levels and they can be found in their Wiki.

A Simple Example of a Channel Profile

A really simple example of a channel profile is the first example, where we were listing all 10 of the mugs on the 3 platforms. In this example we are committing 100% of  the “Available stock” (10) to each of the channels.

An Advanced Example of a Channel Profile

There is likely to be situations where you don’t want to commit all your stock to all of the channels all of the time and this is where the ability to create multiple profiles comes in really handy.

For the first example, we would have named the channel profile something like “List 100% to eBay, Amazon and Our Website” (naming the profiles to what they do is again strongly suggested, it makes them “Matt proof”).

For this second example, we’re going to want to keep two of mugs in stock at all times, this is because they’re end of line and we want to keep safe just in case we get a return of breakage.

Similar to the previous example, we’re going to commit 100% of the “Available Stock” to platforms, but we’re going to add a number 2 to the column called “Min. Qty Avail”. By setting a value of 2 in this column, we’re saying list 100% of our stock, but when we get to our last 2, take them off all the platforms.

We could of course just set this value of 2, to just one platform, so that when we get to our last 2 items, we take it off Amazon, but leave the 2 on eBay and the website. I did say that this was ‘neat’ :)

Further Examples

The abilities of the channel profile doesn’t stop at just listing 100% of items onto marketplaces and keeping their stock levels in-tow and basic stock control. You can also configure a channel profile to use these cool features:

  • Percentage based listing, not just 100%, maybe only 50% to eBay and 100% to Amazon & the website.
  • Force set inventory levels onto one or more marketplaces, that never go out of stock
  • Force set inventory levels onto one or more marketplaces that are removed when the available quantity drops below a specific level
  • Using a “Cost Formula”, dynamically calculable your selling prices for each channel and also the minimum and maximum prices for Amazon & Play.com accounts.
  • Cap the number of listed items on a platform to a maximum number
  • And there are some funky things you can do with sequences and stocked sub skus of products that 99.9% of the people reading this wouldn’t ever use.

It should also be noted that if you have the WebXML interface enabled for up to 10 external channels, the channel profile can also apply inventory update rules to these too and via the new eSellerPro API, the status of the SKU can be checked to see if its been set to list on several of the ‘channels’ in the channel profile.

My eSellerPro Channel Profile Tips

Here are a collection of tips that you may find useful:

  1. Never edit the default profile
    Think of this profile as a off switch, keep it set to manual and use this profile to take items off all the platforms and for new records that are not ready to be listed yet.
  2. Keep calculations to a minimum
    The more you ask for a channel profile to do, the long it will take and the slower it will run. Where ever possible, keep calculations for prices to external tools lke excel or PHP before entering into eSellerPro.
  3. Never use product specific channel profiles
    If you create product specific channel profiles, you’re missing one of the huge benefits of eSellerPro ‘profiles’. If you do have an exception product that needs its own rules, just create another profile and name it accordingly. Then ALL your profiles are in one place and easy to administer.
  4. Name the channel profiles sensibly
    If the profile is listing 100% to eBay, Amazon and the Website, name it that. In the bulk update tool, in the inventory record and in the import/export system you only see the names of the profile, thus name them clearly in relation to what they actually do.
  5. Think through each channel profile thoroughly before creating it
    Take a few moments to write down what you want the profile to do, then once written, use this to guide you to the configuration of the profile.
  6. Use ‘Bulk Update’
    You can use the bulk update tool to update as many records as you would like, remember that naming them clearly will make this task a cinch.
  7. Import/Export with care
    Don’t forget you can import a channel profile name as part of the custom import/export sheets. But use this with care, as you can enable products to be listed from an import sheet, this may not be desired straight away and may cause other issues, especially if you are loading new products and images need to be collected from a 3rd party before listing, the listing may go live and be incomplete!

The Channel Profile Summary

Using a channel profile is not without its risks, as you can in theory oversell heavily if the products which have been assigned a channel profile are in ultra high demand, accounting for the lags of the platforms themselves and giving eSellerPro enough time to react (although in reality this is quite rare, I can only remember of two instances in 3 years of this happening).

Sensible configuration of your channel profiles for different velocity products is key and also keeping them as straight forward and aptly named is strongly advised.

The examples in this article are quite basic, however if you consider you may have thousands of inventory records, numerous eBay accounts more than one Amazon Seller Central account (yes this is possible), multiple websites and maybe 3rd part integrations to other selling platforms, being able to expose your entire inventory across ALL possible channels and keep them updated when items sell and stock deliveries are made, makes the “Channel Profiles” in eSellerPro one of the core parts of the entire system.

Try doing all that manually. You’ll have no hair left like me!

Your Feedback

Do you use the Channel Profile in your eSellerPro account, is this something you could or couldn’t live without? Let me know in the comments box below.

What is eSellerPro & How it Can Help Your Business?

So what is eSellerPro and how can it help your business? To answer these questions effectively, I’ve put together a 3 minute video overview where I discuss the following:

  • The 3 core parts of eSellerPro, these being:
    • Inventory data & stock management
    • Order aggregation
    • The “Channel Profile” to keep the sales channels up to date
  • Suitable business types

Answered in a 3 Minute Video

Before you watch this video it’s important to note that I am a former employee of eSellerPro, clients that I work with use eSellerPro for all or parts of their businesses.

I’m not a sales rep nor do I receive any incentive from eSellerPro to publish this content. I certainly do not believe that eSellerPro is perfect, no solution provider is. What I am motivated to do, is to ensure that you choose the right back-end tool for your business and eSellerPro “could” be one that is most suitable to you.

Your Feedback

I haven’t covered the 3 core elements to eSellerPro in any great detail, the video was only designed to give you a brief overview of what these are and how they could help your business. However, these will follow in the next few days.

However did you find this video useful? Have you or are you using eSellerPro to run part or all of your business? Let me know in the comments box below.

Reverse Engineering an eBay Template from an eBay Listing Part 1

Following on from the article series around eBay listing templates I recently covered in Part 1 and Part 2. In this article, I reverse engineer an eBay listing template from an eBay listing and show you the parts that make up an eBay listing template.

This is again going to be part of a two-part series and in the second part, I’ll be showing you the template that makes up the eBay listing, which is probably a lot like the one used to create the eBay listing we’re dissecting today in this article.

So let’s dive in!

Introduction to Keywords

Wait……………. Before we dive into this, I need to introduce you to something called “Keywords”. Keywords come in many names, macros, variables, shortcuts, custom fields are a few common names, they all mean that they are a placeholder for data to be entered into.

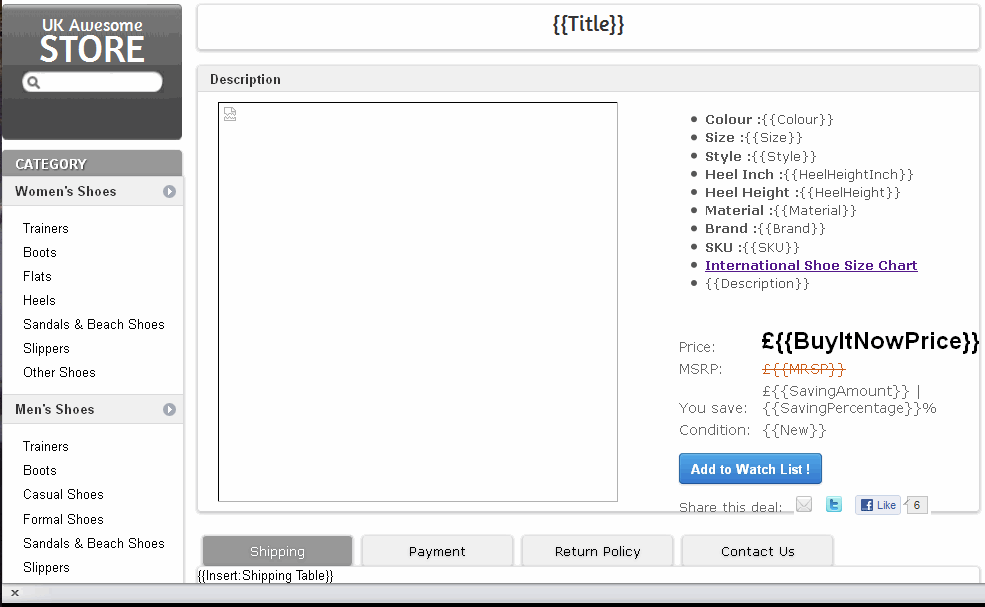
For example, if we had a product whose colour is ‘Black’ and its data field is called ‘Colour’ then it’s quite possible that when we see a listing extract in the image below, that the actual template on the left is using such a keyword, so that when the item is listed, it becomes like the right-hand side.

introduction to template keywords

This is how large sellers on eBay are able to create consistent eBay listings, they’re not making every single listing by hand they’re using tools that are advanced and allow them to focus on each core element of the listing separately.

Note: These ‘Advanced Tools’. You’ll be seeing a few of these over the next few weeks and what they can do.

Reverse Engineering an eBay Listing Template

What I am now about to do could be explained in a couple of thousand written words, but I can do better than that I’m going to show you using video and take you through stage by stage to reverse engineer the template that site beneath an eBay listing.

From the video, I have included the template I reverse engineered as a screen shot below, so that you can see how the sellers listing template could look like in their backend tool.

ebay listing template with keywords

Summary

I remember the first time I was introduced to keywords (or Macros as they were called in MarketWorks), they were quite odd I have to admit and it took me a while to get-my-head around them.

eBay Templates enable businesses that use 3rd party tools to sell on eBay to crucially separate their product data from their eBay templates.

I eluded to the fact that some software tools allow you to template the templates. At eSellerPro, the boundaries of what can be done with templating was pushed to a level I didn’t think was possible (or even needed) and I’ve been known to create some complex structures of product templating & data that have allowed exceptionally slick data input methods for businesses in the background and what the  customer sees as in the eBay listing, looks superb.

This article was designed to introduce you to what an eBay template could look like in a back-end tool, what I didn’t cover was the data that powers the listing in the background and that’s in part 2 of this series.

How to Save eBay Searches and Have the Results Emailed to You

A heavily under-used feature for both buyers and merchants on eBay is the ability to make a search, save it and then to me notified of the results on a daily basis via email.
This is very handy if you’re a buyer and are looking for a rare item, a seller who is conducting Market Research or an intellectual property rights owner (someone who owns a brand name for example) who has a desire to monitor eBay for their products and keep track of merchants that are using the marketplaces to distribute their goods or services upon.

In this article, I’ll take you through how to save a search, how to manage them and how to set up email notifications for them.

So What is a Saved Search?

Each time you make a search on eBay,  there is an option to save the search so that you don’t have to keep looking for the same search terms over and over. You can then manage these searches in your My eBay section of eBay and also set up email notifications for daily updates.

There are several instances where this functionality would be very useful, these are:

  1. You’re looking for a rare item
  2. You want to save the search you’ve made and reuse it at a later date
  3. You want to be notified of the latest listings that match the search criteria

Note: I won’t be covering advanced search techniques in this article, this will be coming soon in the form of an eBook that goes way beyond what I could sensibly fit into a single article.

How to Save an eBay Search

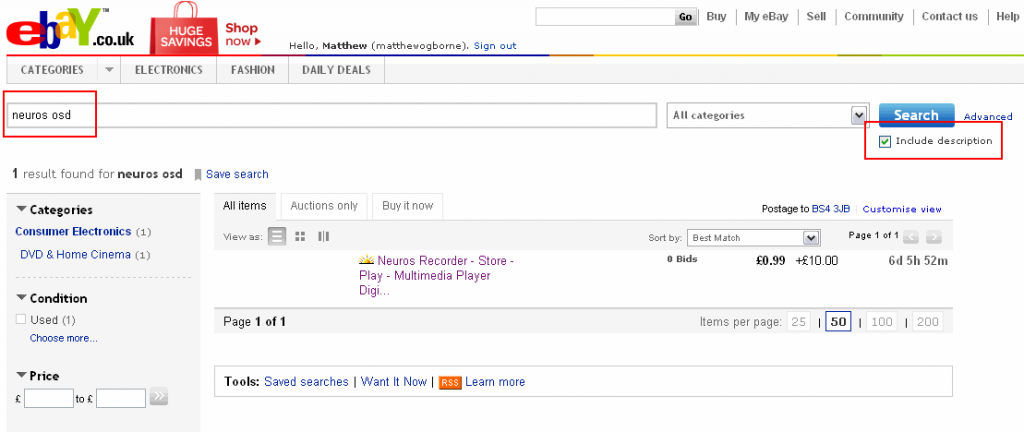
For this example I am going to use a real search that I have saved in my buying account, its for a device called a “Neuros OSD”, it’s a network device that allows me to play media files over a network on a normal TV. They’re very useful, but they’re around £100 new and I’ve picked up 2 so far from eBay sellers for under £20.

#1 Make The Search

First of all you make the search as normal on eBay. The search in this example isn’t particularly advanced, but it is looking in the item title and the items descriptions.

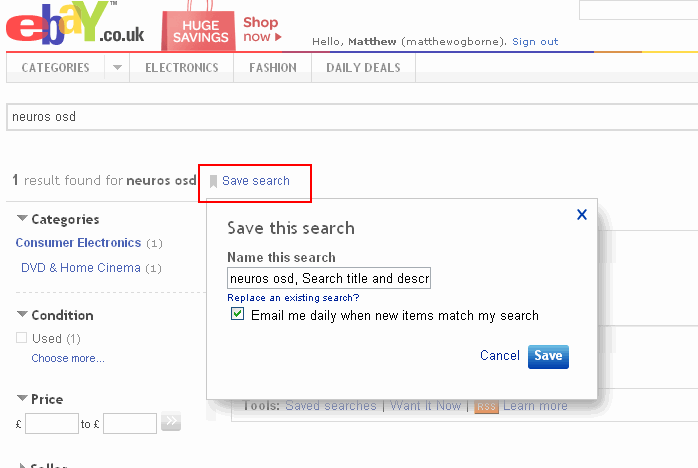
eBay Saved Search 1


#2 Press ‘Save Search’

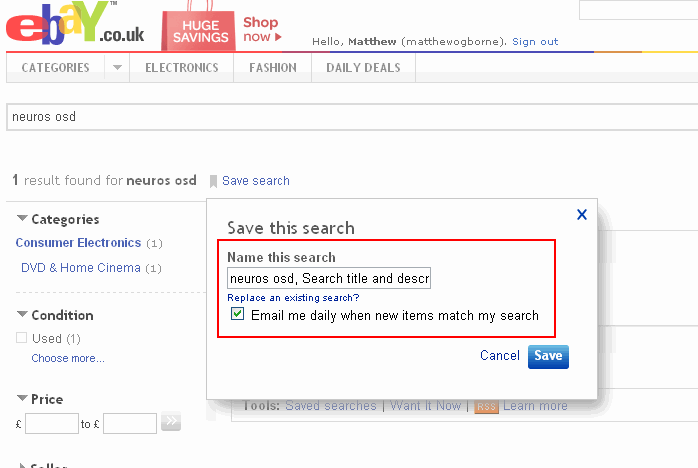
Below the search box there is a “Save search” option, click it and a new window appears as shown in the two screen shot below:

eBay Save this search

#3 Rename & Set Email Options

In the pop-up panel that appears you are now able to save the search. But before doing so, give the search a name that you’ll easily recognise, it makes life so much easier later, especially if you can image that you have 5 or even 50 of these in your account.

Once set, press “Save”.

YAY. Easy-peasy!

eBay Saved Search - Name the Search

Managing Saved Searches

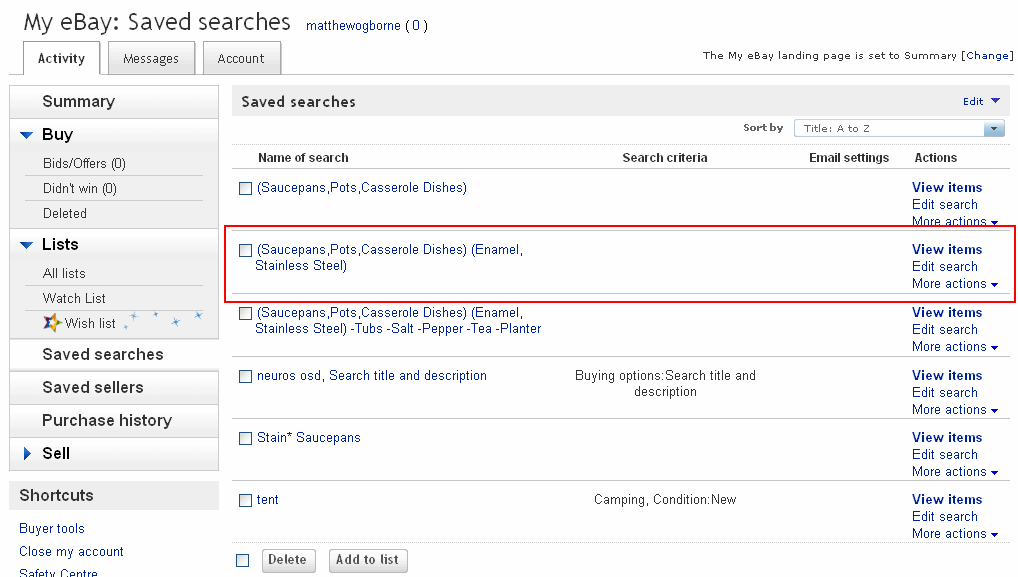
My eBay: Saved searches

You are able to manage your saved searches within My eBay, a direct link to this section of you account is here or you can follow this path:

Got to eBay > Along the top press “My eBay”> On the left click on “Saved Searches”

Obviously you can delete any saved searches you no longer need, this is a simple case of selecting them on the left and then pressing delete at the bottom.

You can manage the options for each of the searches from this page also and crucially redefine or copy searches too. A really handy feature is that you can add notes. A good use for this is if you were drilling down a selection of seller accounts for a specific search or needed to add extra information which is perhaps too long for the search title.

Redefining a Saved eBay Search

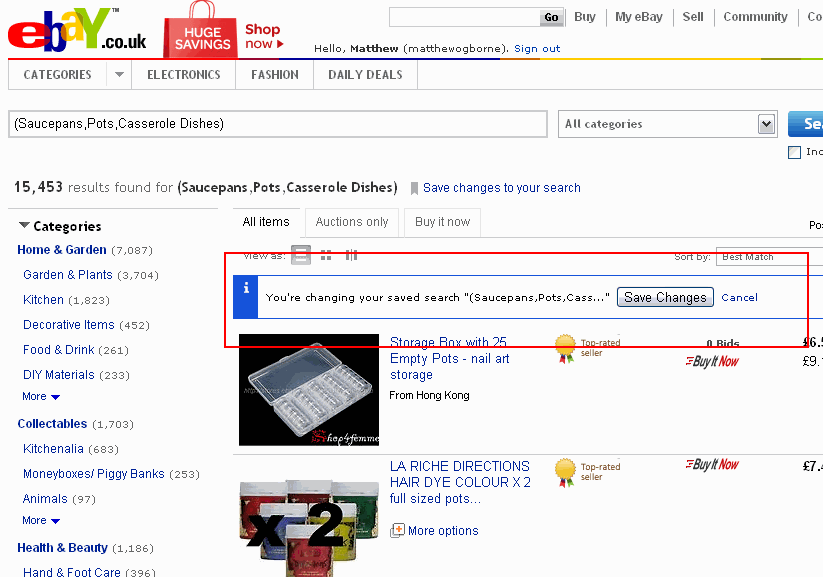
Once you have one or more searches saved, you are able to redefine them. On the right-hand side of each saved search, there is the option to “Edit Search”, if you click this you’re taken to the search results page.

I show this in the screen shot below, take note that there is an extra option in the search results that allows you to save this search as either the same search name or if you’d prefer as a new saved search.

Saving as a new search could allow you to easily separate the different condition of items, such new and used items. If we think back to the example if an intellectual rights owner, they could easily be altered to both new products and also monitor how the second-hand market for their products is shaping up.

Editing a Saved eBay Search

Saved eBay Searches Summary

Saving searches can literally “save” a lot of time, especially if you’re going to be using the same or similar searches over a period of time.

Having them emailed to you is a handy feature, but for power users that are using this functionality to research eBay it’ll prove to be too much information and as eBay only allow a daily email, a summary email for the weeks listings sadly isn’t an option.

My biggest tip for you is to name the well and add notes to the searches. While eBay shows the search criteria, when you’re working with more than 20 searches, adding a note that explains what the search is supposed to return, will speed up your activities.

Have you used the eBay saved searches before? How did you find them? Leave a comment in the comments box below.

Barcodes, GTIN’s,UPC’s, EAN’s, ISBN’s, JAN’s & ASIN’s Explained

Barcodes, these can cause confusion, especially if we account for all the different names they can be referenced as and even the term barcode isn’t technically correct, GTIN is. As such this article aims to dis-spell the myths & confusion around them and give you the 101 on the different variations, what they are and how they’re used.
For the purpose of this article, I’m going to broadly call all GTIN (Global Trade Item Numbers) as ‘barcodes’, this is what you’ll likely to recognise them as from day-to-day items and will help keep things in plain English (which I know you like).

What is a Barcode?

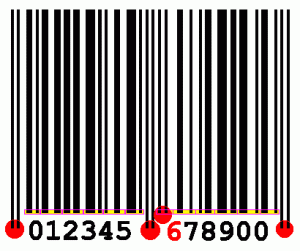
A ‘barcode’ is the visual representation of a set of numbers. In the video below, I show several products and on the back of each of them are images and some numbers, like in the image below:

What is a barcode?The ‘barcode’ is the vertical lines and these are the visual form of the numbers below, ie 012345678900. However for ease, very few people know what GTINs are and the term “barcode” will make more sense to more people as we’ve all seen them on products, like soup. So I’m calling them ‘barcodes’.

A barcode by its correct name is a GTIN or its full name ‘Global Trade Item Number’. These come in various forms and are globally universal indentifies to find product information across databases and differing platforms.

Think of them as an international “postcode” that identifies a single address, but for products.

Video Explaining Barcodes with Examples

This video covers the contents of this article, including examples and where you can obtain your own barcode range for selling on eBay & Amazon.

Note: Before you watch the video, I’m going to quickly add that this was recorded last year, since then I’ve solved the lighting and sound quality issues, plus my office has been re-decorated with the artwork from the children.

Why are Barcodes Important?

When you’re shopping (say in Tesco’s) you’ll see the clerk scan the items through the till, the till is scanning the barcode on the product and then this is being looked up in a database to obtain its price and do some other stuff too.

Barcodes are ‘keys’, this is a term for used in databases and the idea is just like your front door key, the key should only fit one lock, thus that key belongs to that door and ‘ideally’ none others (see the note on this later).

This is why when your items are being scanned in the supermarket, the price is returned and you gain an accurate bill. Also in the background, this key is also used for many other purposes, such as stock control and reporting functions.

In short, one barcode = one product

Barcodes on Amazon

Just like in the supermarket when shopping, Amazon also uses these ‘barcodes’ as unique identifiers for products.

There are some exceptions which are for seeds & plants, furniture and home decoration categories and in such instances approval must be gained from Amazon to do this. However as a general rule you will need a barcode to create a new product on Amazon.

Note: While barcodes used for Amazon should be unique, it’s possible to find products on Amazon that have more than one GTIN used to identify a product. This is caused by two reasons:

  • Expiry
    As I cover in the video above, barcodes are leased, not owned. It’s quite possible for the barcodes to be re-used and thus two different products have the same barcode identifier for them.
  • Duplication bySellers
    It’s quite common for two different businesses to have their own barcode ranges, as such with unbranded goods its quite possible for the same product (say a pair of boots) to be listed more than once on Amazon under different identifiers.

GTIN Variations

There are five main types of GTIN’s that are in use (with regards to Amazon), these are:

  • ISBN
  • UPC
  • EAN
  • JAN
  • GTN-14

ISBN’s

ISBN ExampleThese you’ll find on books, this is because ISBN is short for ‘International Standard Book Number’ and can come in both 13 and 10 digit numbers.
I’ve included a photo of the back of one of the books I’m reading at the moment and you’ll see in the bottom right-hand corner an ISBN both as a number and the visual representation of that number for barcode readers.

UPC’s

These are “Universal Product Code’s” and generally you’ll find them on most USA (American) based items.

The use of these in the UK for products is somewhat limited and you’ll see EAN’s far more more often and you’ll see why in the next section.

EAN’s

EAN is short for ‘European Article Number’, hence this why you’ll see these more frequently in the UK.

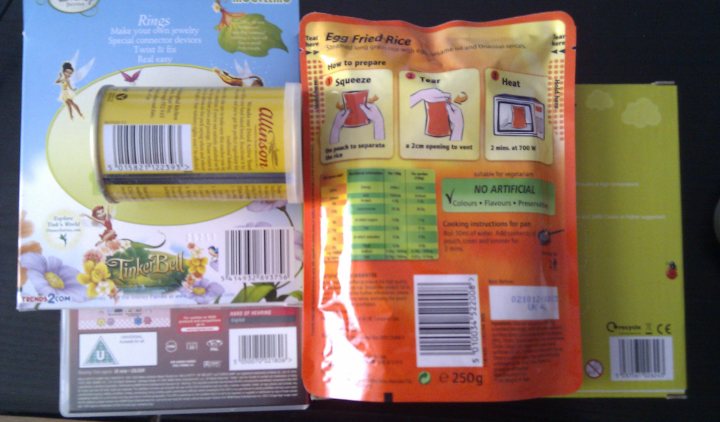
EAN’s are everywhere, some examples are below on some random items I found in my home, if you look around your’s, you’ll find they’re everywhere!

Examples of EAN's from Household Items

JAN’s

These are ‘Japanese Article Number’s and, to be honest, you’re unlikely to come across them in the UK for products listings to Amazon or just about anywhere.

GTIN’s

Global Trade Item Number or GTIN’s have a few names, the first is GTIN-14, UCC14 or ITF-14, ultimately they are 14 digits.

ASIN’s

Amazon LogoAn ASIN is an acronym for ‘Amazon Standard Identification Number’. Once an inventory record has been created on Amazon, Amazon assigns their own version of a barcode, called the ‘ASIN’ and it’s a key that is unique to the Amazon marketplace.

The crucial note here is that ASIN’s are Amazon’s own product identification system and is unique to Amazon.

Note: I am working on a more in-depth description of what ASIN’s are, it’ll be published in the next week or so, if I forget to update this article (quite likely) search for ASIN at the top of this site.

Obtaining a Barcodes

Barcodes are not technically owned by a business owner, instead they are leased for a period of time. You can lease these from numerous companies, however, the source of these is a company called GS1, you can find more information about them here http://www.gs1.org/barcodes or http://www.gs1uk.org/ for the United Kingdom.

Allocation is based upon the companies requirement, for example if you are a small manufacturing firm with only a few products, then you may only be allocated 1000, however if you require hundreds of thousands, then you’ll be allocated many, many more.

The fees for the subscription are based upon company turnover, using the current figures (July 2011) from the UK GS1 site, the joining fee is £107 and the annual company annual subscription fee is £117.

You can contact GS1 at http://www.gs1uk.org/about-us/Pages/Contact-Us.aspx if you have any specific questions regarding pricing and subscriptions.

Summary

Barcodes or should I now say GTIN’s are everywhere and they are a way for businesses to assigned unique product identifiers to their products.

They appear in several common formats and we should also note that while a ASIN is not a true GTIN, its so commonly used in eCommerce for Amazon, it might as well be.

So do you feel more comfortable with ‘barcodes’ now, how and where they’re used? Let me know in the comments box below & if you have any feedback, I’d also love to hear from you.

How to Customise Your eBay Search Results (For Buyers & Power Users)

Basic eBay search results are fine for normal users to a point, however even for normal users customising the search & browse results on eBay pages will allow you to make a more informed decisions on the item before clicking through.

If you are using the search & browse results to conduct Market Research, then you’re definitely going to need some extra information so that you have a truer picture of what the results mean and will save clicking into lots & lots of items, just to get at the core details.

How to Customise Your eBay Search Results Video

I have put a video together to show you how you can customise your eBay search results and the differences it makes to the way the eBay listings are shown to you.

In the latter part of this article, I go through each setting individually and also provide configuration suggestions for both power users and settings for users on low bandwidth/slow internet connections.

Customised eBay Search Options

eBay allow you to change most aspects of the search results on eBay, after making a search for a keyword, in the top right there will be a link called “Customise View” after clicking this option, you are given a pop-up layer/panel in which you can configure different options for the eBay search results.

Its also worth noting that these options also apply to when you’re browsing categories too, not just search results.

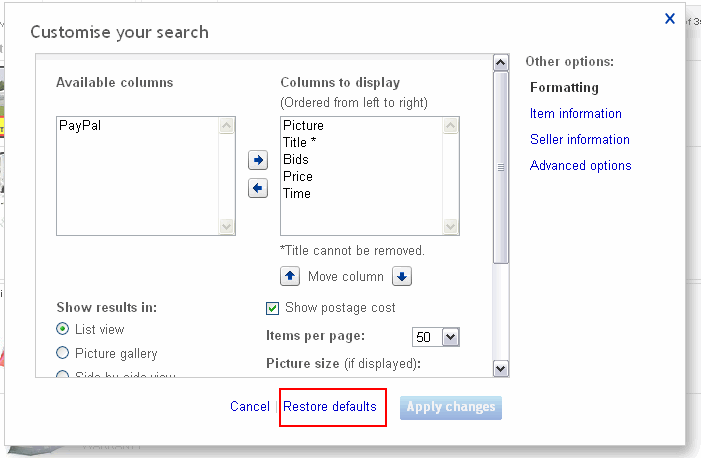
Tip: If at any time you wish to reset the search options you have made back to the defaults, then at the bottom of the “Customise You Search” panel, there is a “Restore Defaults” option, I’ve included a screenshot of this below just in case.

How to restore the eBay search options back to the defaults

Formatting

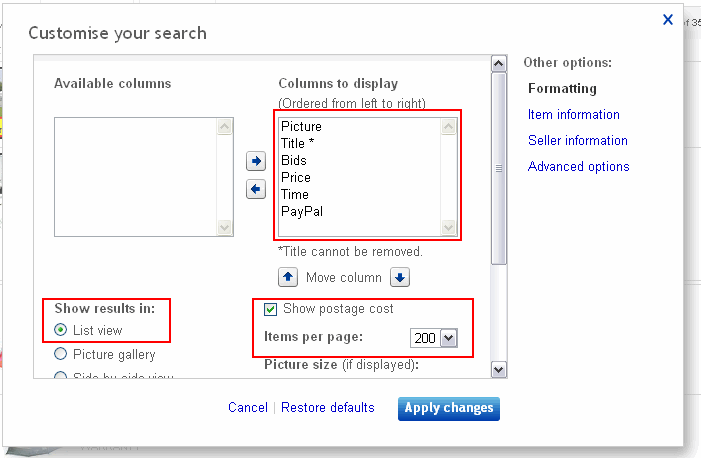
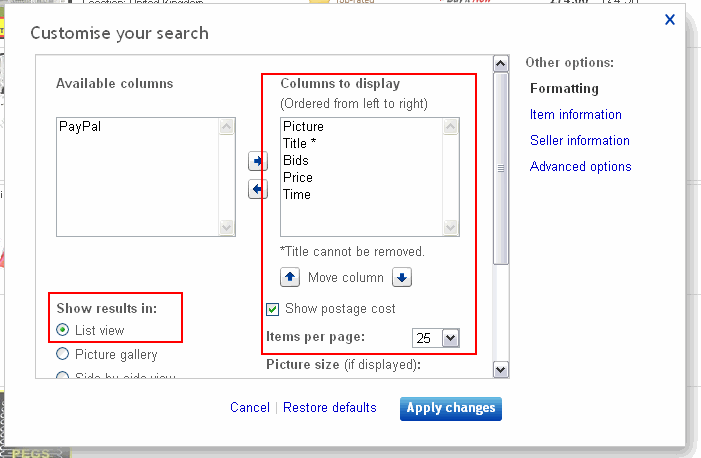
The formatting options allow you change several key data points that are returned in the search results, the biggest one to take note here of is the option to show the listing title on its own line. This is really handy when you’re including lots of extra data in the search/browse results.

Result Columns

While the eBay title must always be shown, you can configure other values to be shown, these include the items picture (if it has one), the number of bids (if an auction), the price, the time left and whether the seller accepts PayPal. You can also change the order in which these are shown using the up and down arrows.

Results Layout

You can change the way the items are displayed back to you, from the traditional list view where every item is in a single column, to a picture gallery view (which is really nice when searching as a buyer for fashion items) to a two column layout where you can see items side by side.

Reset eBay Customised eBay SearchTip: If you do choose to use the “Side-by-side view” or “Picture Gallery” the “customise view” link at the top right disappears. Don’t panic, if you press the button highlighted in the image to the right, it’ll take you back to the original layout and the customise view re-appears.
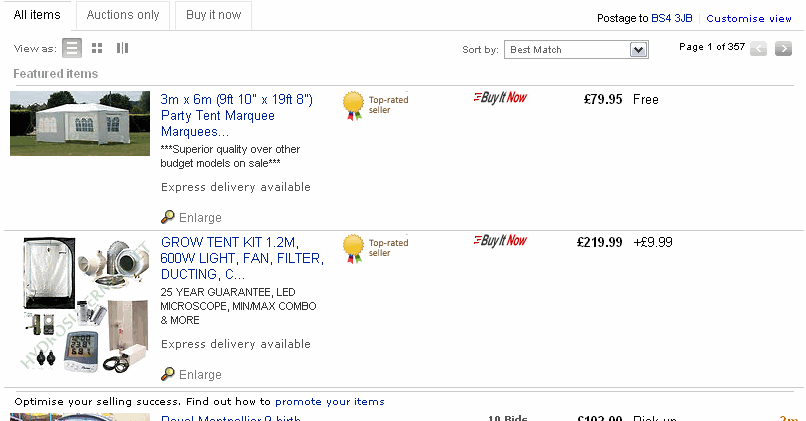
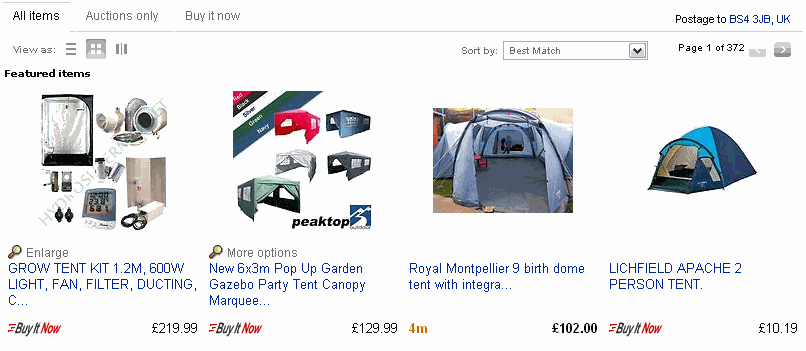
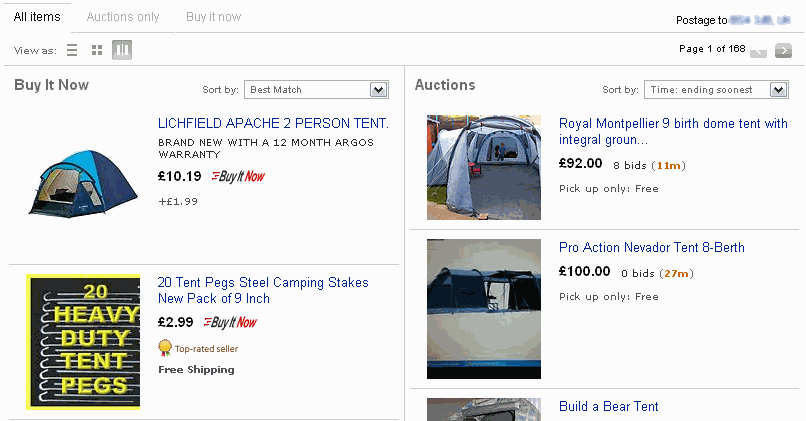
I’ve included screen shots of what the each these options outputs once set below:

Standard List View eBay Search Results

Standard List View of eBay Search Results

Picture Gallery eBay Search Results

Picture Gallery eBay Search Results

Side By Side eBay Search Results

side by side eBay search results

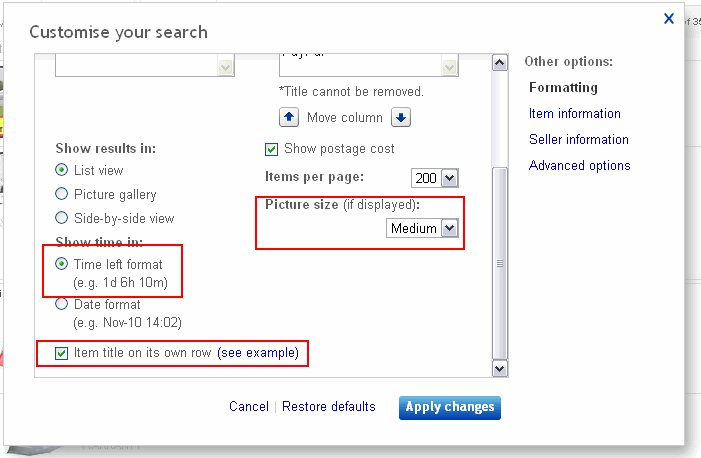
Time/Date Format

You’re able to change the time/date format of the time left on the listings from either 1d 6h 10m or to Nov-10 14:02

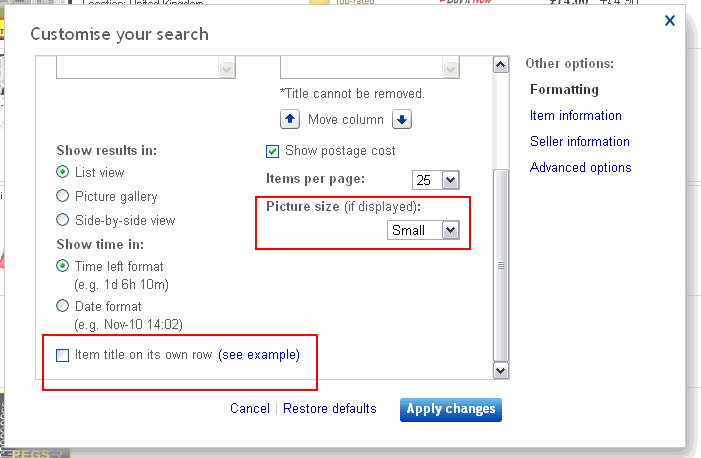
Item Title on its Own Row

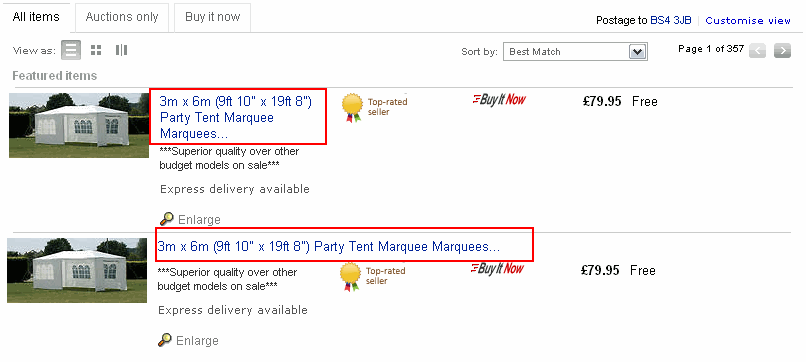
This is a really helpful option to customise the search. By default, the listing title is “squashed up” and by setting the option allows the item title to have its own row. To best explain it I have taken a screen shot of the same item, but one has its own row and the other is the default.

Item Title on its Own Row

Show Postage Cost

Showing the postage cost is enabled by default. To make an informed decision on which items are valid results or not, I’d suggest you leave this option set.

Items Per Page

This is a very useful option, if you’re using the eBay search results to conduct Market Research, then just seeing 50 listings at a time means you have to scroll through lots of pages, however, set this to 200 and it cuts the page views by a quarter.

If you are on a very low bandwidth and you know your searches are always going to return a low number of results or don’t mind scrolling through lots of pages, you can set this to 25 per page and this will make the eBay results return a lot faster for you (as there 75% less listings to return for each page).

Tip: At the bottom of the search results, you are able to quickly change the number of search results being shown. A screen shot of these options are highlighted below:

Number of Results Per Page

Picture Size

Normal users of eBay (buyers) will be quite happy with the large option and also most power users will be too. You can change the image size of the gallery image of the listings in the customise search options, I only see this helpful if you are on a slow internet connection.

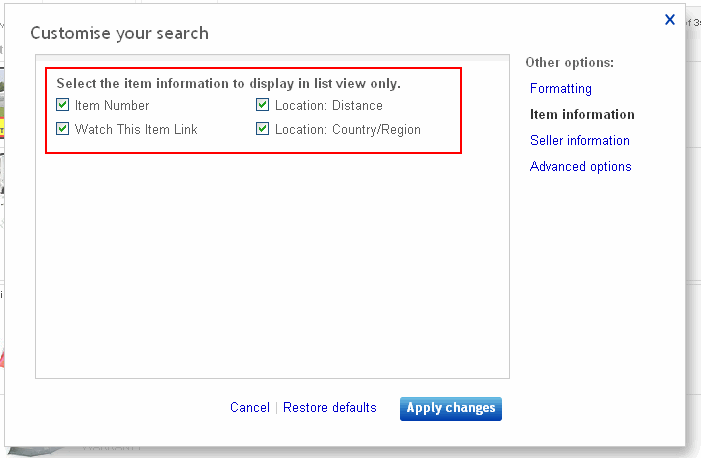
Item Information

The item information settings allow both power users and normal users include four extra handy data points to show with each eBay listing, these are:

Item Number

For normal users, this won’t be of much use, however for power users conducting Market Research on eBay, being able to quickly note the item number will be very helpful.

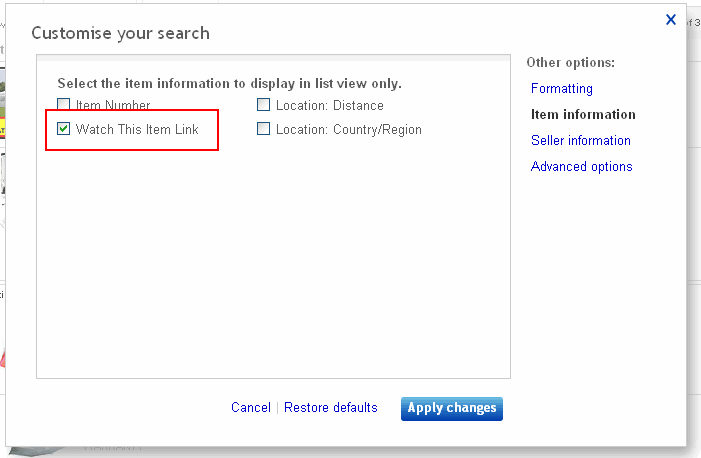
Watch This Item Link

This option adds a “Watch This Item” link to each listing, this can be handy for all users, as you’ll be able to quickly add the listing to your watch list for observation.

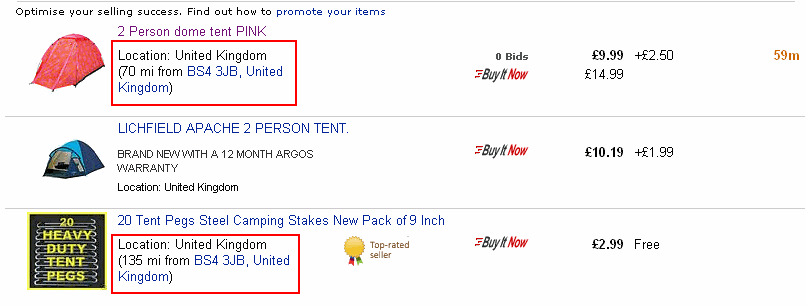
Location: Distance

If you’re logged in, then eBay knows your postcode and for listings that have either a postcode entered or a city that eBay recognises set by the seller, then a distance to you is shown.

This is really handy when looking for products (or services) that are local to you, for example if you are looking for a car and would like to view it before buying, not only sorting by distance, but also showing how far away the item is can be very useful.

Location: Distance

Location: Country/Region

Again for both power users and normal buyers alike, knowing of the listing is in the UK or not can be very helpful. If the item is coming from the other side of the world, you can either allow for extra time for the item to arrive or choose a different item which is closer to you or from a local based seller.

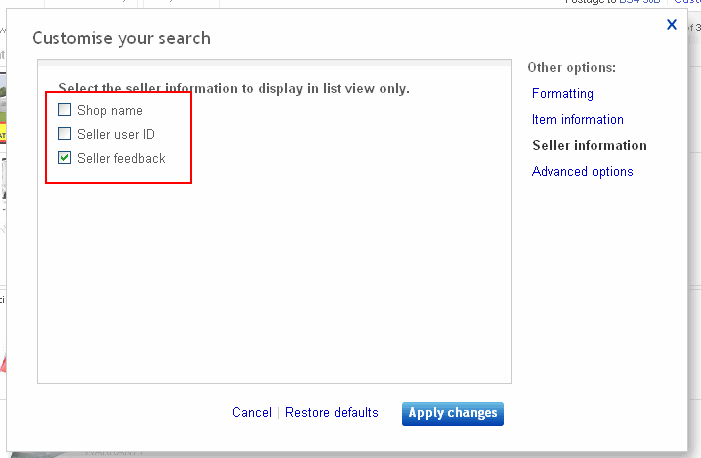
Seller Information

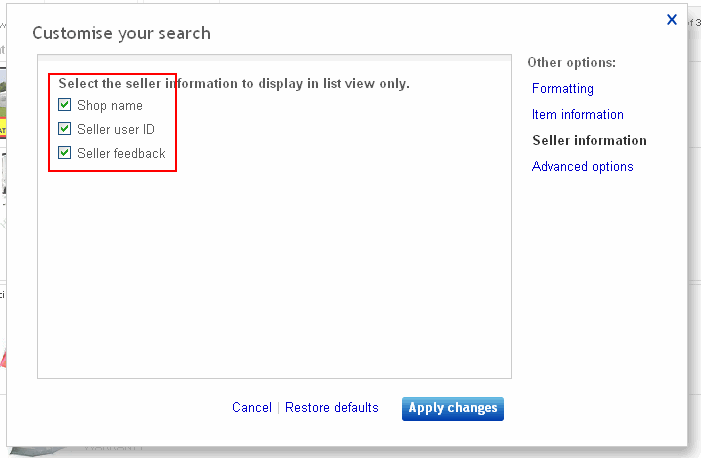
The seller information is again very useful to both power users and normal buyers. If trust is an issue for you, then in these options you can show the sellers feedback count, which may influence your buying decision or whether you click into the listing for further information or not.

Shop Name & Seller User ID

I’ve combined these together as its only really power users that would want to know whom the seller is. Having these options set can allow you to quickly identify the same seller over multiple search results.

Seller Feedback

For buyers, this option can help you influence which items you look into further. For power users this can help you identify larger sellers that have large amounts of feedback and may be worth further investigation.

Advanced Options

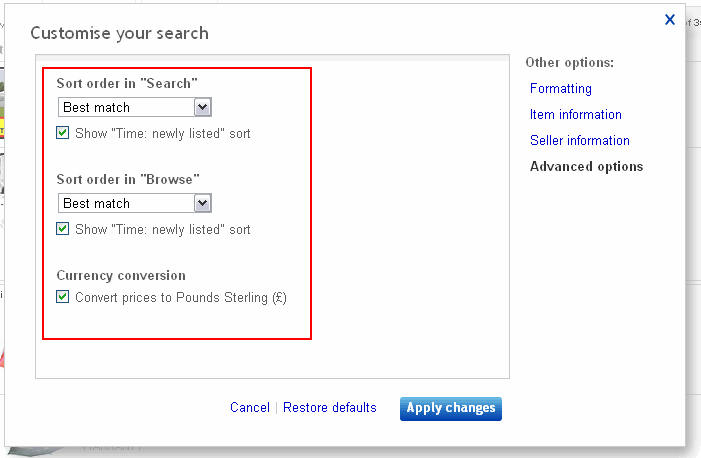
I’m going to combine the options in this section into one section to cover them all in one go. You’re able to change the way the sorting options work for both searches and when browsing categories in this panel.

You can also set to automatically convert the prices to GBP (UK “£” pound sterling), as this option is set by default and also because the original price (for example in dollars (USD or $) is shown, leaving this set is normally advised.

Configuration for Power Users

For power users, I have included screen shots of the settings that I suggest you work from for each panel in the “customise your search” options. I have highlighted the set options, so that you can identify them quickly.

Formatting

power-users-formatting-2

Item Information

power-users-item-information

Seller Information

power-users-seller-information

Advanced Options

power-users-advanced-options


Configuration Low Bandwidth/Slow Connection Speed Users

If you are on a slow internet connection, then removing the details you don’t need and limiting what is show can really speed up your browsing activities. While these are suggestions, as I mentioned earlier in this article, you may find different result layouts better for different categories of products.

These settings are focused on showing you the extra information you need to limit the requirement to click through to the listing to find out more information, while limiting what we can in the results themselves.

Also if you always shop for items on eBay from local sellers, then you can set the defaults in the advanced options to save you filtering the sorting options manually each time.

Formatting

buyers-Formatting-1

buyers-Formatting-2

Item Information

buyers-item-information

Seller Information

Customise Your Search Summary

eBay has allowed users to configure their search and browse results to their own requirements. As a buyer this can help save time by allowing them to scan through lots of listings very quickly and show the extra information they need to know to make informed decisions on which ones to look into further (and hopefully buy!).

For power users that are using the search & browse results to conduct Market Research, the extra options give you a wealth of extra information, cutting down research time and allowing you an more informed overview of what is happening for the search or browse results you’re being shown.

Did you know that this option existed? Even if you did, has the article & video above allowed you to browse eBay much faster? Let me know in the comments box below.

How To: Add a Youtube Video to your eBay Listings in 5 Steps

Video is an exceptionally powerful tool that can be used to allow a buyer to interact with the product before they’ve purchased it. Also making video can be great fun as you’ll see in the example video I used for this guide.

Using video also allows the seller to show that they are an expert in the product area and reassure customers that they know a lot about the product, so that when they buy the item, they know they’re dealing with the expert and reassured that if something goes wrong, that the seller is likely to be there for them.

In this article I’ll be covering the 5 steps simple you need to follow, to add video to your eBay listings and a few tips along the way.

Example Video

Grabbing the nearest item on my desk, which was some insulation tape. I put a quick video together to make a product review. Its only 36 seconds long and I still laugh at it now.

Before we continue, as far as inventory creation goes, using video should be one of the last tools you use to increase sales & conversion. Unless you are already making video for other sales channels or have access to good quality video’s that are provided by the manufacturer, video creation can be slow and as I’m sure you’ve seen from the video’s here, take a while to master.

eBay Policies

There are some explicit rules from eBay on what you cannot do in video content, I’ll summarise them below:

  1. No promotion of websites outside of eBay
  2. No adult content
  3. No naughty software that could harm a clients machine
  4. Video can only be from a small number of providers. The only really two worth noting, YouTube and Vzaar
  5. You must be the owner of the underlying rights, including intellectual property rights, or be authorised to distribute it by the owners of such rights
  6. No violation of any of the other rules (eg, asking for Western Union)

I do suggest that you read the eBay links policy (see lower section on “Using Videos”) and also the Adding Video to Your Listing from eBay, however its lacking, hence this step by step guide. The short version is to use YouTube and a little common sense.

Considerations When Making Video

While I’m not going to cover the how to make video content here (as you can tell from my example, I need to do work on certain aspects, lol), there are some pointers and questions that you might find useful when making video for both eBay and your other channels.

  1. How exactly is the video going to make the interaction with the product better for the customer
  2. Plan the video before hand, even if its three bullet points and discuss these
  3. You don’t have to be in the video, there is nothing wrong with recording your hands while you interact with the product
  4. Keep it short
  5. Explain what the video is about within 5 seconds
  6. Show the product, not you
  7. Show benefits, not features
  8. If possible, include product close ups. If you have a camera that does not have zoom, most video editing software allows you to add pictures and you can voice over them

Hmmmm…. this needs a video & an article on this topic alone….

How To Embed Video in eBay Listings

This video shows you how to embed video in your listings. After you’ve watched this video, continue with the rest of the article as we have the process of adding video to your eBay listings broken down into 5 easy to follow stages.


How to Add a Youtube Video to your eBay Listings in 5 Steps

The following 5 steps will guide you through the stages to adding video to your eBay listings.

Step 1 – Upload the Video

In this example, I’ve made a review of some insulation tape (Yes its REALLY bad, but its a video and serves its purpose for this example.)

  1. Go to http://upload.youtube.com/my_videos_upload
  2. Either drag and drop your video or press the “Upload Video” button
  3. While the video is uploading, complete the extra information like the title and tags

Step 2 – Get the Code

Once the video has been uploaded, view the video on Youtube. Then follow these steps:

  1. Press the “Share” button
  2. Press the “Embed” button
  3. Un-check “Show suggested videos when the video finishes” the option
  4. If available, check the “Play in HD” option
  5. Ensure that “Use old embed code” is checked as this will not work on eBay otherwise.
  6. Specify a size, as mentioned in the video, larger than 1000 is not recommended.
  7. Now in the box above, highlight and copy the HTML

Step 3 – Enter into eBay Listing

In the video, I’m using the eBay “Sell Your Item” (SYI) form and using the code from the previous step, in the description tab, press the HTML tab and enter the code where you would like the video to be shown in the listing. Once located, right click and paste the copied code into the listing.

Tip: When you are writing the description and know where you would like the video to be placed, write VIDEO in the place where you’d like it and then searching for it in the HTML tab is easy. if you flick back to the normal view and don’t see the video, this is normal. You’ll see it in step 4.

Step 4 – Check the Preview

Always before confirming the listing, use the preview to ensure that the video is where you expect the video to be and that its actually working.

Step 5 – Confirm

Once you’ve previewed the listing, save the changes and the listing is now live.

Summary

You should now be able to add a YouTube video to your eBay listings, there are a few areas you could trip-up on, however adding video content to an eBay listing is really quick and very easily done as shown in the video or by following the steps above.

Soo… Have you used Video in your eBay listings before? Was it as easy as the above and what were the results like? Comments in the box below!

Creating Your Very First iMacro – Web Browser Automation

Following on from my earlier article on How to Install Firefox & The iMacros Addon which also included some performance tips, this video shows you how to create your very first iMacro and also a more complicated macro, that performs a useful action.

In the video I add an extra command called “WAIT”. The wait command allows iMacro’s to pause for a period of time for an action to be performed and as with all commands in iMacro’s the command needs to be in UPPERCASE.

Dealing With “Odd” Data Delimiters In Microsoft Excel

In this video I cover the following topics:

  1. What are CSV files
  2. What data inside a CSV files look like
  3. Why the standard comma separator can sometimes not work
  4. An example of a different separator
  5. How to open such files in Microsoft Excel (at 4:00 minutes in)

Updated Amazon Seller Pages & How To Update Yours

Amazon have updated the Seller Details pages, from the old tabbed style to a new universal page.

To show this more graphically to you, I’ve made a quick video that shows the updated page and how you can edit yours.

Updated Amazon Seller Page Video

All the links used in this video are in the resources section below and its also worth noting that you may find this page more product for referring customers to over the category list pages on Amazon, as there are less “exit” points for the customer to follow.

Resources

Below are the links to the pages shown in the video and the links you need to update your seller information on Amazon.co.uk.

If you sell on Amazon.com the URL’s will alter differently and you can locate the section you need by using the “Your Information & Policies” from your Amazon Seller Central dashboard.

How To: Using eBay Shop Keywords to Leverage the Extra eBay Shop Pages

In reviewing several eBay accounts for a client, I noticed that they were not using any of the eBay shop pages to promote niches of their products. Taking note that they were are paying for the anchor stores as well, that comes in at a cool £350 per month, none of the 15 customer pages are currently being used.

What’s an eBay Shop?

eBay ShopsCovering off the ground work first before we progress, as not everyone that reads this blog is professional eBay seller yet.
You may hear me and others mention ‘eBay Shop’ and ‘eBay Store’, this is because the USA have ‘eBay Stores’ and a few years back we ensured (via Jamie Parkins, who then ran the original (and in my opionon better) eBay PowerSeller Program) that the UK version was called ‘eBay Shops’, not ‘Stores’ as we felt ‘stores’ was sooo American.

An eBay shop is brilliant for the following reasons:

  • Its your own slice of eBay
  • Potentially cheaper listing fees
  • It features only your items
  • You can change the way it looks using eBay’s own feature addons or have a store graphically designed to follow the consistent branding from different channels
  • Categorise your items in a manner that makes sense to your customers (not you, I hasten to add) in up to 300 categories that can go three levels deep.
  • You can have a smaller eBay header on the eBay shop for Featured and Anchor levels
  • You can put all your live listings on ‘Hold’ for a holiday or similar time away.
  • Increased promotion, through various means, logo, relating shops etc…
  • Included cross promotion tools for listings
  • Listing frames, to ‘frame’ your listings
  • 5 Custom pages on the basic store, going up to 15 on Anchor level
  • Email Marketing, starting at a minimum of 1000 emails, right up to 5000 on the Anchor shop

There are other features as well, such as RSS feeds, reporting for both traffic and sales. The eBay shop is the most underrated tool available on the entire eBay platform.

I used to run the largest eBay UK group called ‘eBay Shops Making eBay shops work for you’, but someone closed it, to be fair I had not spend much time on it in a fair while, although I would like to find out whom closed it…

Open your eBay shop and watch the sales roll in…

ebay-shops-homepage-navigationWell maybe not, starting off on negative points, the eBay shop has slowly received less and less promotion by eBay. They used to be featured on the homepage header, that ran throughout the entire ebay site, that got dumped for eBay Outlets, its even been dropped from the main category menu and the left hand bar on the homepage. Its still on the homepage, but in a section that is rarely used and is sporting a colour scheme that only the sharpest of eyes could spot. See the picture to the right!
On a positive note, your eBay shop will be promoted in numerous places around the eBay site. However, just like a website, the only person who is going to reallllllllllllly push it is you.

You may also want to read my article called ‘A Previously Unreleased eBay Shop Exposure Tip‘ for a little tip that may help you expose your items to a wider audience than just by yourself. Also this article is one of a series of articles on eBay shops, check the related articles at the bottom of this page.

Custom eBay Shop Pages

Custom pages are the focus of this article and the keywords that you can use in them. For the differing shop subscription levels you receive a set number of pages, these are:

  1. Basic – 5 Pages
  2. Featured – 10 Pages
  3. Anchor – 15 Pages

I’d personally suggest that you do not upgrade your eBay shop purely on the amount of pages you are offered, while what I am explaining here will gain you extra, tarted exposure, a leap of £300 from Featured to Anchor levels are not worth the returns and such a increase should because the number of listings V’s fees dictate this shop level.

Note: I’ll be posting an article shortly that includes an excel file that tells you which level you should be using for the different subscription levels for the differing eBay sites

How to Access Custom Pages

This needs a special mention as I feel eBay do a good job at hiding most things, to navigate to the custom shop pages, follow these steps:

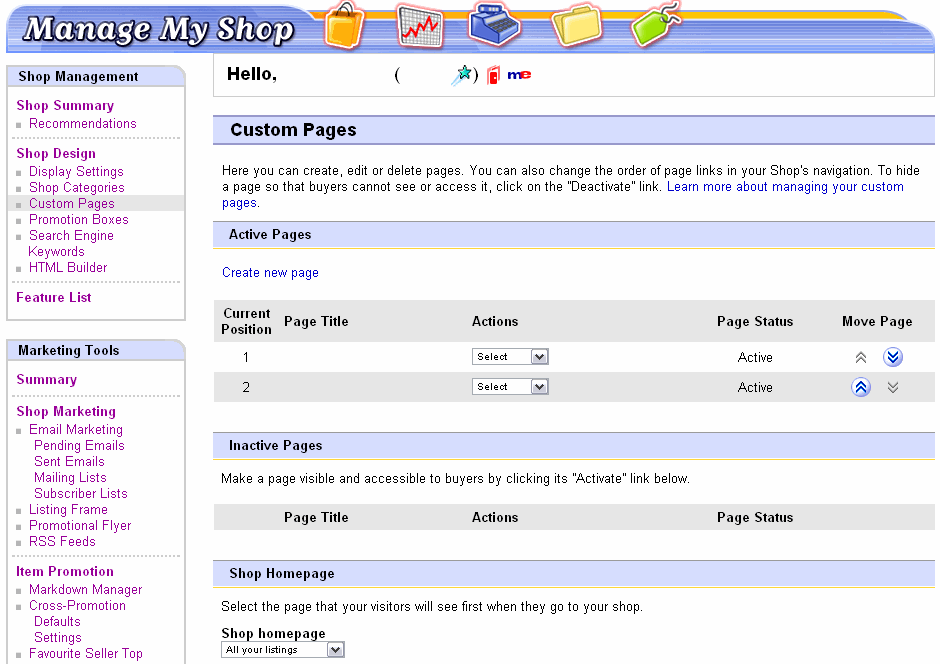
Go to My eBay > Hover on the ‘Account’ tab > Select ‘Manage My Shop’ > Left menu, under ‘Store Design’ select ‘Custom Pages

A direct link is here http://cgi6.ebay.co.uk/ws/eBayISAPI.dll?StoreManageCustomPages

A screen shot of this section is below, I have removed the sellers ID and page names for animosity.

ebay-shops-custom-pages-overview

eBay Shops Custom Pages Overview

About Me Page

Its also worth noting, you can also have an ‘About Me’ page, these pages are special and are not going to be covered in this article.  You can find out more on this page type on this blog in a week or two’s time or read the help file on eBay here http://pages.ebay.co.uk/help/account/about-me.html

Standard Pages

The customer pages allow you to expand upon points or add content in more depth that what you could possibly do (without scaring people anyway) in a eBay listing. You should also try and keep information about your business to the About Me page, its best kept there and its better to leverage the custom pages for other information.

I would personally suggest that you start with two standard pages, these are:

  • Contact Us
  • Delivery & Returns

The reason for adding these two as pages of their own, because they are there for reassurance purposes. Even if people do not read them, by only their existence people will feel reassured (trust me on this one, I am not going on a bender about the factors that aid websites convert more through visual Talisman’s any further here).

Examples

Actually finding good examples of the custom pages being used was extremely hard, so few sellers use this functionality and its such a shame. However I found a few, which are below and most are poorly done, BUT top marks for using them!

Don’t skimp on the content either, Add Value

Please don’t be tight on the content and always add in some artwork too, don’t be doing a SuperDryStore and see this article for more information Part 3 : SuperDryStore eBay Shop – The Not-So Good Points.

Add value to the person who has clicked on the page by giving them the information they were after in a cleanly laid out format that is in plain English.

Using the Extra Pages

I’m sure without any creative thought you could think of at least three more pages to fill up with topics, however this is not the purpose of the article and would be a waste of what is about to follow.

With the extra pages, you can reinforce your dominance in a category by expanding upon strains of products and information and as I am about to show you, promote products too.

For example, if I was a DVD seller, I could make a couple of genre sections, such as:

  • Drama
  • Comedy
  • TV Programmes
  • Action & Adventure
  • Documentary
  • Horror

Then add some background or more information on popular series etc and maybe what makes a great Drama, great Horror and even add in some personal recommendations too.

You know more about your items than what I do, grab a sheet of paper and brain storm some ideas and use them as a base for the shop pages, you can always go back and alter them later. The next section may help with this task.

eBay Shop Keywords

There are several keywords that can be used in the eBay shop, its also worth noting that they do not work in listings and the About ME page has its own set of ‘tags’ that can be used.

Note: eBay call them tags, I call them keywords, if you see either of these terms, they mean the same thing, they are a special term like {eBayUserID} that can be used in the eBay shop and can be clearly spotted by the curly brackets either side of them. Also to help I will always mention them in a bold font face.

The eBay shop keywords that can be used are:

  • Your User ID
  • Your Feedback
  • Item List
  • Item Showcase
  • Individual Item
  • Item Details
  • Search box
  • Promotion box

I’ll now go through each of these and include where apt a use-case for each of the eBay shop tags

Your User ID

This tag is really handy for including your eBay ID and extra icons into a custom page. It does lack the extra control on choosing to show the different sections, but at least it shows the latest feedback count and the extra icons an ID may be sporting.

Keyword: {eBayUserID}
Example Usage:  My eBay ID is {eBayUserID}
Example Output:

ebay-shop-eBayUserID-tag

An example using the {eBayUserID} shop tag

Your Feedback

This is handy for bringing the latest customer feedback into a a customer services page, its also handy to bring in and then take a screen shot of and use in your listings if you feel you need that extra little boost to them.

There are some extra attributes to this tag, that can change the way it appears, these are:

  • COLOR – Used for the main colour
    eg GRAY
  • ALTERNATECOLOR – The colour used for alternative feedbacks
    eg PLUM
  • BORDER – The border around the table
    ie 1 or 0
  • TABLEWIDTH – I’ve never tried fixed widths, the default is 90%, I usually set this to 100%
  • CELLPADDING – The default is 0, probably best left at 0 too.

You can play around with the different colours that you can use for the table, personally I prefer the simple version, however you could try a mash-up using these colours from http://www.w3schools.com/HTML/html_colornames.asp for the ALTERNATECOLOR and COLOR attributes.

Keyword: {eBayFeedback}
Example Usage: {eBayFeedback SIZE=”5″}
Example Output:

ebay-shop-eBayFeedback-tag

An example of the {eBayFeedback} in use, ID's and times have been blurred, they're not blurred in real life!

Item List

This is one I use a lot, its one of my favourites. The reason why is because you can create  a custom page, say to ‘High Heels’ or even ‘Horror’ using the suggested example and then set the keyword just to bring back ‘Horror’ or ‘High Heels’ items using the KEYWORDS attribute.

As a tip, you can also specify the shop category number too, if you wish to narrow the results even further using the STORECATID attribute.

This keyword is also handy if you are creating a custom shop homepage as well, so you can bring in live items, just like the default store does, but then without hard-coding anything, the latest items can be shown with your filters.

Again there are some extra attributes to this tag, that can change the way it appears, these are:

  • SORT – You can change the order in which the results are returned
    2 – Ending first (default), 4 – Newly listed, 0 – Highest price, 1 – Lowest price
  • DISPLAY – Using this, you can swap between list view and gallery view
    0 – List view, 1 – Gallery view
  • TABLEWIDTH – The default is 100%, I’d suggest you leave it at this value
  • STORECATID – This is a super option, as suggested you can narrow the results down using this option and the next. You can find the eBay shop category ID’s here
  • KEYWORDS – If you can sort by store category ID, then adding a keyword here will focus the results
  • MINPRICE MAXPRICE – When your products are very varied or you have ranges within ranges, then using a minimum or an upper cap with the MAXPRICE option can help you really drill the results.
  • LISTINGFORMAT – The two numbers you may want to abuse here are 1 for auctions only, this is super handy if you create a ‘see all our auctions’ page on the shop and 9 for fixed price listings.

Keyword: {eBayStoresItemList}
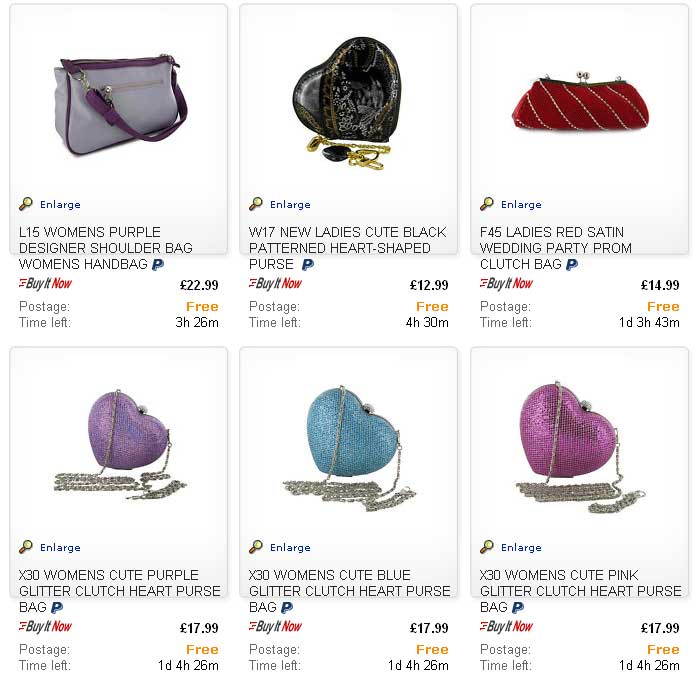
Example Usage: {eBayStoresItemList SORT=”4″ DISPLAY=”1″ TABLEWIDTH=”” KEYWORDS=”bag” LISTINGFORMAT=”9″}
Example Output:

ebay-shops-eBayStoresItemList

An example using the eBayStoresItemList keyword to return just bags on a custom shop page.


Item Showcase

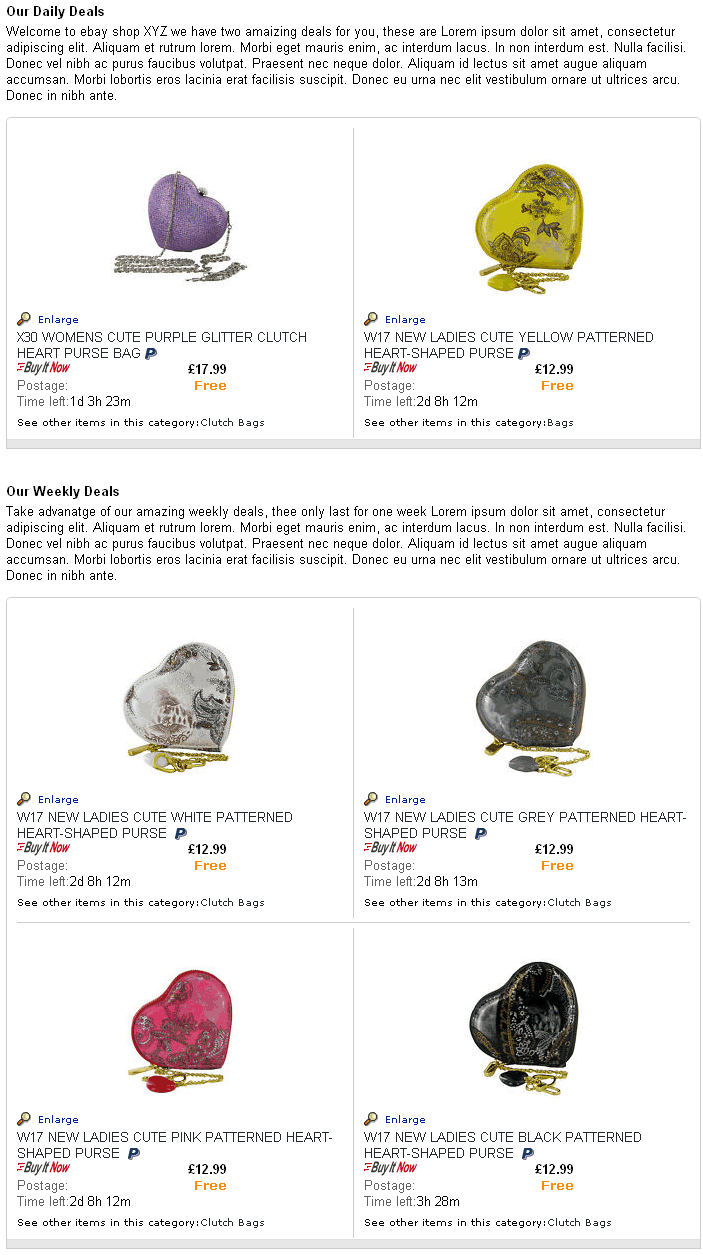
I’m utterly amazed that no-one has caught on to this keyword properly. Why? Because it could so easily be framed as a daily or weekly deal on your eBay shop and needs little to no formatting by yourself.

In the easiest example I’m refering to, pop the item numbers of say three items (max 4) and then it’ll automatically make you a featured item gallery.

eg: {eBayStoresItemShowcase ITEM=”w,x,y,z”}
eg: {eBayStoresItemShowcase ITEM=”280475881234,280475881234280475881234,280475881234″}

I covered this in detail in an earlier article called How to Make Your Own eBay Daily Deals & Weekly Deals check this article out to see a more detailed description.

ebay-shops-daily-deals-example

The Example Code Output with Live eBay Items

Individual Item

This tag is handy for promoting a single item, say within a custom eBay shop page. Just because it brings through just a single item, if you combined several of these together with content, then the page would quickly fill out.

Although to be frankly honest, you’d be better off with the “eBayStoresItemList” keyword to return multiples or the “eBayStoresItemShowcase” tag for bringing through a larger picture.

The attributes for this are limited:

  • ITEM – Specify the eBay item number to be used
  • DISPLAY – Using this, you can swap between list view and gallery view
  • 0 – List view, 1 – Gallery view
  • TABLEWIDTH – The default is 100%, I’d suggest you leave it at this value
  • BORDER – The border around the table
    ie 1 or 0

Keyword: {eBayStoresItem}
Example Usage: {eBayStoresItem ITEM=”01234567890″ DISPLAY=”0″}
Example Output:

eBayStoresItem Example

eBayStoresItem Example

Item Details

This keyword, in the right scenario makes the inclusion of live listing data into a custom page very easy and also very simple for users that want that little extra power when making their eBay store custom pages.

Using the “PROPERTY” attribute you are able to bring in specific attributes of a listing and then format them as you desire. From the listing title, price, picture, prices and direct link to the item. Its the internal components of the larger modules we have been playing with up until now.

Note: If you are after this level of control, then its probably time you looked at making an external application to query the eBay and add the level of control you are probably after. Not that I’m saying this tag is not useful, just that you can gain far more control by other means.

This tag has several attributes as detailed below:

  • PROPERTY=”title” – The item title
  • PROPERTY=”price” – Current price
  • PROPERTY=”binprice” – Buy It Now price.
  • PROPERTY=”time” – Time left
  • PROPERTY=”picture” – Gallery picture.
  • PROPERTY=”URL” – The item’s URL.

Keyword: {eBayStoresItemDetail}
Example Usage: {eBayStoresItemDetail PROPERTY=”title”}
Example Output: This is the Listing Title

eBay Shop Search Box

This is one of the best eBay shop tags there is, as it allows a user to easily add the search box to custom pages.

A prime use of this is if you were making a custom landing page for your eBay shop (You can do this after creating a custom eBay shop page and then setting it as the landing page. I’m really tempted to mention some shockingly poor designs (and probably expensive) that a certain company produces, but I’m not, I’ll just leave this link and leave you to make your own mind up).

Keyword: {eBayStoresSearchBox}
Example Usage: {eBayStoresSearchBox}
Example Output:

eBayStoresSearchBox Tag Example

eBayStoresSearchBox Tag Example


Promotion Boxes

I’ll be quite honest, I never actually got this to work. It didn’t work when it was first introduced and I’ve not used them since. However, when coming back to test them for this article, they’re working and they must have been fixed by eBay in the last 7 or so years :)

The idea is that you can create your own promotion boxes, then using the name you have set for them, bring them into a custom page. This could be handy if you want dynamic data from the promotion boxes on all the custom pages.

Keyword: {eBayPromo}
Example Usage: {eBayPromo ID=”eBay Guided Setup Position 1″}
Example Output:

eBayPromo-Example

eBayPromo-Example


Summary

The eBay shop tags can be very powerful and make adding dynamic content easy-peasy for any level of skill user. Combine this in with the more powerful functions and methods, you have the components at your disposal to create a dynamic and rich custom page experience for your eBay shop.

301 Redirects & Do URL Shorteners Pass Anchor Text?

Do URL shorteners pass anchor text?
This article is a quick one as we’ll be needing a deeper explanation in a few days when I cover how to manage 301 redirects for your website and cleaning up your neighbourhood.

I’m an avid fan of GoogleWebmasterHelp on YouTube and equally a fan of Matt Cutts and his presentation style, something I aspire to.

Back on to topic, recently Matt covered recently whether URL Shorteners such as bit.ly etc… pass anchor text. Below is the video on this and the reason to include this is around the 301 redirects, as mentioned I’m documenting an article on this and crucially, you’ll spot the comment regarding the passing of anchor text and page rank as part of the 301 redirect.

301 Redirects & Do URL Shorteners Pass Anchor Text?