Migrating Magento From one Server to Another With SSH, RSYNC & Navicat
When it comes to moving your Magento site from one server to another, it can be an awkward job. Especially if you haven’t done anything like this before and as I’ve found moving Magento from one server to another is not as straight forwards as one would have hoped.
This guide will walk you through step by step in moving your Magento site from one Linux server to another.
I’m not going to pretend that this is easy or a quick job and it may not work for you, but this has worked for me numerous times and I sincerely it helps you on your way. If you know of a better way or would like to add to this, please improve this guide by adding your comments & suggestions in the comments section at the bottom of this page.
What we’ll be doing
We’ll be performing the following tasks:
- Moving the site files from the “original server” to the “new server”
- Copying the database from the “original server” to the “new server”
- Updating Magento’s config files to use the “new servers” MySQL database
- Changing the file permissions on the “new server” for the transferred files
- Verifying that everything is right & Cleaning up
It should be also noted that you don’t need to use this entire article to move just one part of your site. For example if you’re just interested in moving your database from one server to another, just skip the file transfer part at the beginning.
To be able to quickly and easily move your Magento site from one server to another, we’ll need some tools to help us:
- A text editor such as Notepad++ (free)
- SSH access to both servers
- FTP access to the new server site files where your site is going to be hosted
- Putty.exe for connecting via SSH (free)
- Navicat for transferring the databases (free 30 day trial)
- MySQL login details for the original and new servers
- WinSCP for editing/checking on files (free)
- Depending on the size of your database and site files, approximately 30-60 minutes
There is going to be a big pause later on in this guide while you’re transferring your files, pop the kettle on now, you’ll have some free time shortly and all the tools we’ll be using are either free or have free trials.
Assumptions
To be able to follow this guide, the following assumptions have been made:
- You’ve used SSH before
- The new site directory has been created already using plesk, cpanel, webmin or similar
- You have FTP or SFTP access to the new site
- You have made a full backup of your current site
Getting Started
To be able to migrate your site from one server to another, the easiest and quickest way is using SSH (secure shell) and a really neat command called “rysnch”.
Note: SSH access is a given on Linux dedicated, VPS and hybrid servers, if you’re using shared hosting such as from Vidahost or HeartInternet, you’ll need to ask for access.
To make things clear as we’re dealing with two servers, we are going to have the “original server” which is where you website is hosted right now and the “new server” which is where we are transferring our existing Magento site to.
Assuming we now have SSH access, use Putty to connect to your “original server” via SSH.
Tip: If you’d like a guide into setting up putty and SSH on your windows computer, see this video guide http://www.youtube.com/watch?v=ma6Ln30iP08
Finding the Directory Paths on the “Original Server”
Before we can transfer the sites files from one server to another, we need to find the full directory path to both the “original server” site files where your site is currently being served from and the full directory path on the “new server” where we are moving our website too.
There are two ways of doing this, the first option is more experienced users and the second is much faster for novices. I’ll take you through both of them now.
Option 1 – Using the pwd command
If you’re experienced with the Linux command line and know your server well, this will be the easiest & quickest way for you.
To do this, we just need one very simple command for the Linux command line, it’s called “pwd”. In your putty window, type in “pwd” and in the response we’ll be shown the full path to the folder that we’re in right now.
Now if you already know your configuration, use the “cd” command navigate to a path that is something like this:
cd /var/www/vhosts/<your site name>/httpdocs/
Obviously you’ll want to change “<your site name>” to your sites name.
If you’re not sure which folder your site is in, navigate down to the vhosts folder using “cd /var/www/vhosts/” and then type in “dir” and press enter. This will give you a list of folders, these are normally your hosting domain names and then use “cd yoursitename” to move into that folder. Again enter “dir”, hit enter and look for another folder called either “httpdocs” or “public_html” and use “cd” to move into this folder. If you now enter “dir” again, hit enter, you should be looking at all the files in your websites home directory.
Now that we’ve found the “original server” path, enter “pwd” in the console, hit enter and we now have the full path from which we’ll be transferring the files from.
Copy this down into your text editor as:
FROM PATH: /var/www/vhosts/<your site name>/httpdocs
Option 2 – Using FTP and cheating
This is the cheating method, I say “cheating”, but it just works.
Create a file called “pathchecker.php” in your sites home/root directory and enter the text below.
<?php
echo realpath(dirname(__FILE__)) . "\n";
echo $_SERVER['PHP_SELF'] . "\n";
?>
Tip: You can also download this file here to expedite the process.
Now navigate to http://yourwebsite.com/pathchecker.php
This will spill out the full path to your existing site in your webpage. Cheating eh?
Now copy this path down into your text editor removing the “/pathchecker.php” part at the end as:
FROM PATH: <your path here>
Finding the Directory Paths on the “New Server”
This is a little more tricky than the first as normally we’re unable to cheat as we’ve not moved the DNS settings around yet to point the outside internet at our new server. So instead out best option is to use the Linux command line and navigate to our home directory where our site is going to be hosted.
Again this is going to be something like “/var/www/vhosts/<your site name>/httpdocs”, just use the “cd” and “dir” commands to navigate and look around until you find the sites base directory.
Once you have located the “new server” home folder for our site where we’ll be transferring our existing site over to, jot this down in your text editor as:
NEW SITE: /var/www/vhosts/<your site name>/httpdocs
Transferring the Files using “rsync”
Most Linux systems come with a command called “rsync”. This allows us to transfer files from one server to another and in other cases allows us to only transfer the files that have changed too (which makes it brilliant for backups).
Before we go bashing in the rsync command in willy-nilly we need to have a quick 101 on how this command works and as an example I have put a very similar command to what we’ll be using in a few moments below. If you’d like to read the man page, you can find that here.
rsync -r -t -v --progress -c -l -z root@yourdomain:/home/yoursite/public_html /var/www/vhosts/newsite.co.uk/httpdocs
Looks scary right?
Well actually it’s dead simple and I’ve broken it down into bite sized chunks below:
- “rsync” – The rsync command
- “-r” – This switch says “repeat recursively” or in Matt proof language, “transfer the lot”
- “-t” – This switch preserves the timestamps on the files
- “-v” – This switch makes the command “verbose” or in Matt proof language “you can see what is happening”
- “–progress” – This switch tell rsync to show us the progress during the transfer
- “-c” – This switch tells rsync to make comparisons using checksums, rather than time and size
- “-l” – This switch means that we also copy symlinks as well (this can save a massive headache!)
- “-z” – And this switch means that rsync will compress the files during transfer, thus making it faster
- “root@yourdomain:” – This is the SSH username that you log into your “original server” and the domain name or IP address of the server. Do pay special attention to the “:” character at the end as well
- “/home/yoursite/public_html” – This is the path which we worked out above and is our “FROM PATH” where we will be transferring the files from
- ” ” – This is a space. Extremely important. If you don’t leave a space between the “FROM PATH” and the destination path that follows, this command just won’t work
- “/var/www/vhosts/newsite.co.uk/httpdocs” – And finally this is the path on the “new server” where we will be transferring the files from the “original server”
Saving your bacon
Now before we continue, there is one key combination that has saved my bacon lots of times, it’s the command to stop processes from running in the command line and if you press CTRL and C together, this will stop a process from running.
If it doesn’t look like it’s transferring the right files or you just want to stop the process at any time, hold down the CTRL key and press C on your keyboard. This will stop the rsync command from running and you can investigate if the files are being transferred to the right location or not.
And back to rsync…
Still with me?
Sweet! Because we’re at the cool stage.
Crucial step: Log into to your “new server” via SSH, that’s right the NEW server. We’ll be logging in remotely to your “original server” from the “new server” command line.
Now grab your text editor and copy this into it:
rsync -r -t -v --progress -c -l -z oldserver@yourdomain:FROMPATH NEWPATH
Now swap the following text around:
- “oldserver” to your “original servers” SSH user name
- “yourdomain” to your current domain name or IP address used to log into the “original server” with via SSH
- Make sure you don’t edit out the “:” symbol
- “FROMPATH” to your text for the from path we found earlier
- “NEWPATH” to the path we just found out for where the site is going to be moved to
We should now have something like we had originally like this:
rsync -r -t -v --progress -c -l -z root@yourdomain:/home/yoursite/public_html /var/www/vhosts/newsite.co.uk/httpdocs
Copy and paste this into your “new server” SSH console.
Tip: CTRL+V does not work in putty, press SHIFT+INSERT or right click your mouse and it will paste the text into the command line for you. Cool tip right?
Drum roll….
Before you press enter, just check over what you’ve written 3 times, making sure it looks right, you have the “:” symbol after your original servers login hostname or IP and there is a space between the from path and the new path sections.
Now hit enter.
If all has gone well, you’ll be asked to accept a security key, type “yes” and then for a password. This is the SSH password for the “original server”.
Once accepted and password entered you’ll start to see lots of files wizzing down the screen, this is fantastic, your files are now being transferred from your “old server” to your “new server”. (see note in a moment if this does not happen)
To just double check that they’re being transferred OK, you can hit CTRL + C at any time and check the directory on the new server to see if the files have started to appear.
Note: If you’re using WinSCP or similar SCFTP programs, press F5 or right click and refresh so that you see the new files (I’ve panicked for no reason before as I had just not refreshed the folder I was looking at).
To restart the transfer, just press the up key on your keyboard and hit enter (or paste in the rsync command again).
Transferring Magento site files takes ages, there is something like 28,000 files in a standard Magento installation and if you have lots of products and lots of images, this can easily go to 100,000 files, even with 100Mbps connections between servers this is going to take some time. So make that cup of tea from earlier and read on into the next steps.
OMGWTFBBQ I have an error
If you receive errors when running the command, then something is not right in the command we built.
Double check everything!!!
- Make sure your username is right,
- The hostname/IP address to the original server is right,
- Make sure you’ve not left out the colon “:” between the username/host and the from path
- If your from or to paths have spaces in them, wrap quotes around the whole file paths eg “/home/yoursite/public_html”
- Make sure you’re using forward slashes like this / and not backwards ones like this \
- Make sure the paths are correct by going to each servers SSH/putty window and typing in “cd your/path/here/”
- Oh and a daft one, make sure on your folder paths the last slash “/” is not there!!! (that caught me out a while ago)
- If you get a warning that you’re not allowed to run the command, add “sudo ” at the beginning of the rsync command and you maybe promoted to enter your password. This can sometimes happen when you’re not using a fully loaded account such as “root”
If you’re still stuck, the best suggestion is to ask you new providers technical support to help you. Even if they charge you, this could save you hours of frustration and sometimes just paying to get stuff done is easier.
Correcting File Permissions
This one caught me out twice!

Using WinSCP to show the New File Owner and Group Names
When transferring the files from the “original server” to the “new server” you were probably using root or another user that is not the web server user, so all the files we transferred now belong to root (or similar). That is not good and we need to correct this.
The easiest way of doing this is again by cheating and using a single file, then another cool Linux command called “chown”
I did say this was cheating, but working out what “group” and “owner” we need to be using for web files isn’t straight forwards especially if this is a new server you have moved to and are not 100% with it yet.
So the cheat is to upload a file (and I mean ANY file) using WinSCP or another FTP application using FTP details for the new server and then see which group and owner has been assigned to this file.
Upload a file, whether that be an image, text file it really doesn’t matter, you can delete it anyway in a moment or two once we have found out what permissions we need to set
In WinSCP you can see the group/owner names by right-clicking a file. I’ve included a screenshot of this to the right and in this example, we can see that the group is: “sacln” and the owner is “matthewogborne”.
Now that we know these, jot these down in your text editor.
Command Format:
chown -R OWNER:GROUP PATH*
Command Example:
chown -R matthewogborne:psacln /var/www/vhosts/somedomain.co.uk/httpdocs/*
Triple Check!
Now triple check that the path, group name and owner names are correct and that you have ended your path name with the characters “/*” so that it knows to do the sub folders.
Please do triple check this is correct, I once changed the file permissions on an enter Linux server for every file once and it meant we had to start from scratch, it was messy (that’s why we’re using the full path above).
Run the Command
Now jump back to the putty window that is logged into the “new server” enter in the command below, replacing your Group and Owner names and also the path to where the new site is hosted to and hit enter. This command won’t take too long to run and if you go back to your WinSCP or FTP application and hit refresh we should see that the file permissions have changed to what they should be.
Transferring the Database
This is by far the easy part using a program called Navicat. Navicat is a program for connecting to MySQl databases, viewing tables, running queries blah blah, but it also has one super cool feature called “Data Transfer”.
The Data Transfer feature allows us to copy one database to another very easily and for porting Magento from one server to another compared to what we did above, this is dead easy.
To start, we need to know the MySQL details for the “original server” and the “new server”, this will be the hostname (IP or URL), username and passwords.
Tip: If you don’t know what these are, you can find your current username/password from the file called “local.xml” in the “/app/etc/” directory and for the new server, you can add a database using plesk, cPanel or if you’re hardcore, using the command line and there are guides to do that here
Adding a Connection to Navicat
This is dead simple, just follow the steps below:
- Along the top press File > New Connection
- Name the connection “Original Server” or “New Server” depending which one it is
- Enter the hostname
- Enter the username
- Enter the password
- Press “test Connection” to confirm the details are correct
- Press OK
- Now do that for both of the databases, the original and new servers.
Easy eh?
Now two quick tips for you:
Tip 1: After adding both connections to Navicat, close and reopen it. This means we’ll be able to see both MySQL accounts in the next step.
Tip 2: If you are using cPanel, then the default is not to allow remote hosts to MySQL. This is good practice but will stop us from transferring the current database to the new database.

cPanel Allow Remote MySQL Connections
So on the main page, scroll down until you see the “Remote MySQL” as highlighted in the image above. Click on this and on the next page enter your current IP address and press “Add Host”. If you don’t know what it is go to this website and copy it.
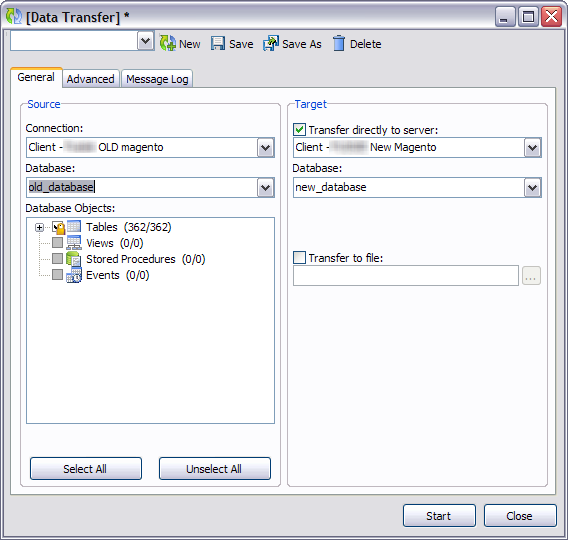
Transferring the Databases
This is so simple you’re going to love it.
Just follow these steps:
- In the left panel of Navicat, double click both of the connections so that they’re connected
- Right click on the “Original Server” connection and from the right click menu select “Data Transfer”
- On the left hand side is where we are transferring data FROM (source), on the right hand-side is where we are transfer data TO (target)
- On the LEFT hand side, dropdown the database box and select your original Magento database
- On the RIGHT hand-side, tick “transfer directly to server”
- Now select the “New Server” connection
- From the database dropdown select the new database where you transfer the data to
- Now press “Start”
A screen shot of this is below:
Again this is going to take a while. Even a new installation can take a few minutes on a slow connection and massive databases, one took 45 minutes to transfer.
Is it time for another tea?
Errors? If it errors at any time, don’t worry, the default settings were to stop on errors. You can change these settings on the advanced tab, but I’ve not had Magento error on a transfer yet, other databases yes.
Tip: If you’re finding the transfer really slow, try delayed inserts or just be patient :) And if your site is super busy, you might want to be doing this at midnight with the site locked down in maintenance mode and also locking the database tables. It’s your call on that.
Post Database & File Transfer
So hopefully, the file transfers went OK and your a couple of cups of tea down. But we need to tell the transferred site to use the new database username and password, plus we need to make sure it’s operational too.
Changing the Database Credentials Over
As we’ve moved servers it’s highly likely that your MySQL username and password has changed for the new server, if this is the case follow these steps:
- Go to “/app/etc/” on the “new server” and open the file called “local.xml”
- Change the values as appropriate for:
- host
- username
- password
- dbname
- Save the file
Seeing the Transferred Site Live
Changing the DNS details over without checking that the site is operational is a little foolish
So instead to see if the new site is actually working or not, we just need to tinker without hosts file on our own computer.
This varies from operating system to operating system, but basically we’re by-passing the internet’s DNS servers and forcing our local machine to go straight to the IP address we set for one or more domain names.
To do this we need to know the “new servers” IP address and to add two new entries to your hosts file. If your new servers IP address is 192.192.192.192 and your websites name is “mydomain.co.uk” then you would add this to your hosts file and then clear the cache:
192.192.192.192 mydomain.co.uk
192.192.192.192 www.mydomain.co.uk
As this is way off topic, I’ve included 3 video’s below that cover windows XP, 7 and Mac OS’s and how to change the hosts file
- Windows 7 – http://www.youtube.com/watch?v=DImy0En1-HI
- Windows XP – http://www.youtube.com/watch?v=qo_QZFQHJ9c
- Mac OS – http://www.youtube.com/watch?v=lu-DUfI3N-o
Once you’ve modified the hosts file and cleared/flushed the DNS cache on your machine, open up a web browser and enter your website URL.
Ta da! Your site should be showing.
Give yourself a pat on the back, but also understand we may not be out of the woods yet.
Tip: Daft point, once testing is over and done with, change the hosts file back again and remove these entries.
Cleaning Up & Verifying
Now before you eagerly go changing the DNS details of the domain over to the new servers details, check everything. Check that you:
- Clear the Magento cache
- Reindex everything,
- View products
- Add products to the cart
- Checkout with an order
- That all backend AND frontend functions are working as expected
Payment Gateways
Payment gateways like SagePay work from specified IP addresses, when you move servers the IP address is going to change, make sure that you update the SagePay admin panel with the new IP address so customers can pay :)
Magento Admin 404 Error
This one has caught me out and I was really concerned when I saw it first time around, but actually the issue is easily solved.
After migrating from one server to another, the settings are going to be incorrect and the indexes can sometimes not be set correctly, this is where this extremely helpful suggestion has helped loads:
You have to delete the following file
app/etc/use_cache.serIf you get an error after that like
Notice: Undefined index: 0 in /srv/www/vhosts/javra.com/htdocs/munchad2/app/code/core/Mage/Core/Model/Mysql4/Config.php on line 92
Then go to your Database Management.
- Open PhpMyAdmin
- Go to your database
- Click SQL
- Run the following SQL Query:
SET FOREIGN_KEY_CHECKS=0;
UPDATE `core_store` SET store_id = 0 WHERE code='admin';
UPDATE `core_store_group` SET group_id = 0 WHERE name='Default';
UPDATE `core_website` SET website_id = 0 WHERE code='admin';
UPDATE `customer_group` SET customer_group_id = 0 WHERE customer_group_code='NOT LOGGED IN';
SET FOREIGN_KEY_CHECKS=1;
If you received this error, it will also be worth checking the settings in the “core_settings” table as I was also caught out once with differing DNS details being set and a site that was previously working on http://storename.co.uk was set to only work from http://www.storename.co.uk and thus the Magento admin and several other parts of the site was not working.
That’s it, Magento Site Migrated!
Well, that was quite a straightforward task when we look at what we’ve just covered. The only tricky parts are around getting the file permissions right and then checking the site after the move. Once you’re 100% sure that everything is OK with the transferred site, update the DNS details and I wish you many happy sales.
If you found this article helpful, please leave me a comment below or perhaps tweet it to let others know and if you think you can help make it better, pop a comment/suggestion at the bottom.
Matt


Hi,
Great article – really nicely laid out. Any idea why the original server might be timing out on the Rsync command?
Thanks,
Rob
Howdy Rob,
Not sure, as it could be an interruption between either of the servers.
Matt
Hi Matt:
After scouring the web for a dozen hours or so, your article provided more insight in one place than any other that I’ve found. Kudos on that!
Now, I wonder if I may ask your opinion / advice. (I wish I’d found this several days ago… hopefully it’s not too late for me to salvage what’s been done).
In a nutshell, my situation is that I decided to change hosts, contacted my now new hosts and had them do a CPanel to Cpanel backup/restore of my site(s). [One Magento store, several WordPress sites]. After a few glitches were ironed out, all seemed to be fine on the Magento site, including SSL pages (checkout, customer login, etc).
But when I cleared the Magento cache from the admin, the site crashed. The error in var/reports is “Invalid URI Supplied” with a slew of code beneath that line. I have set my core_config_data to the correct http & https settings; emptied var/cache, and am still getting that error. If my new hosting folks restore public_html, the site works until I again clear cache (from inside magento admin).
I have read that prior to doing the backup on the original server, I should (have) emptied var/cache, which I didn’t do …
Have you seen this behaviour before, and / or do you have any off-hand suggestions?
Unfortunately, I know very, very little about these back-end workings of servers, php, etc. I’m not a developer by any stretch … just a struggling merchant who hacked a store together in magento 1.72.
I realize I’m asking a lot, esp in a reply to a great post; but I figured it can’t hurt to ask, eh?
Any insight would be greatly appreciated!
Thanks, and happy holidays!
Markz