Magento Powers 26% of the Top eCommerce Websites

It would be easy to guess that a large number of eCommerce sites are using Magento, but what I didn’t realise is that Magento powers 26% of the top 1 million sites ranked on Alexa.

And… where it gets really interesting, is this number increased 12% in only a four months!


Magento Domination February 2013

In the chart below taken from the February 2013 eCommerce survey, Tom Robertshaw identified that Magento accounted for 9063 websites out of the total 34,864 eCommerce sites ranked in the top million sites, coming in at a cool 26.08% domination, outstripping all other eCommerce website platforms by miles.

Magento Usage Statistics Feb 2013

Looking at the chart above, Magento is the clear winner in this, but it’s curious to see that we have Virtuemart, Prestashop, Zen Cart, osCommerce and OpenCart pretty much level-pegging for usage across these sites and the once “stable of eCommerce sites”, X-Cart is literally nowhere to be seen at all nowadays.

12% Jump in Magento Sites Ranked

Seeing Magento topping the list wasn’t really a surprise as we all know how versatile it is, however when we look back at Tom’s earlier survey in October 2012, we see in a window of just 4 months, Magento jump from 8063 sites to 9063 in February or a cool 12% increase of Magento sites appearing in the top million sites.

Curious

The curious thing is, this insight was reported in February and we’re 6 months further on in September, which makes you wonder has Magento has topped the 10,000 sites mark yet?

Let me know what you think in the comments box below.

One Simple Website Mistake Could be Costing You Customers (and Sales)

This one mistake could be costing you website customers & sales and it’s soooo easily checked for and fixed.

In the example I’ll be discussing in a moment, most likely lots (and lots) of good money was paid for a quality website design, support, a full green bar SSL certificate (that’s the best part of £800 a year) and a bunch of Magento extensions to boot, but something so simple is easily overlooked and if the “big boys” can overlook this then the same mistake can be made by us and that’s why I’m sharing this with you.


The Live Example

The best way to show you this is by an example and this morning while looking at the eBay daily deals, I spotted this jacket from Regatta, ever curious to see what they were using for backend software, I opened up one of their images at http://feedback.dare2b.com/altViews/RC_RC/large/MW257_Alt_view_1.jpg and we’re looking ok so far right?

When we strip out the image path keeping the subdomain inplace http://feedback.dare2b.com/ and they’ve done almost the right thing (htaccess or PHP redirect is better) and set a meta redirect on the holding page which then should forward the user onto the main website at http://dare2b.com/ and there, that’s the mistake.

The non www domain dare2b.com is a dead site.

Dead Website As No DNS Settings

Imagine what your customers will think when they see a page like this

Open a new tab in your web browser and type in both the www and non-www versions of your domain name and check that they both work.

If your website displays when you go to both “www.your-domain.com” AND “your-domain.com” then happy days and if your website redirects itself back to one of the version only, send your boss this email and say “Matt O says I’m cool“, if not read on.

In this specific example when the DNS was setup for the domain name “dare2b.com” a CNAME record was added which points to a subdomain of “amazonaws.com” (the DNS settings are shown here http://who.is/dns/dare2b.com) where the mistake lies in that the catch all /wildcard DNS record for the domain name dare2b.com go to a different server to the one where the eCommerce site is actually hosted and it’s not answering web requests so we get a dead page, which is bad.

DNS Mumbo-Jumbo: If I’ve lost you here with talk of “DNS”, think of DNS being a postcode for the internet which helps your browser find the right address to make a delivery to & from.

When you type in “lastdropofink.co.uk” in your browser, your browser goes off and finds the unfriendly IP address 46.183.9.28 using a human-friendly name lastdropofink.co.uk  or “postcode”. I’m sure you’ll agree that “lastdropofink.co.uk” is a lot more easier to remember than “46.183.9.28”.

These “DNS settings” are set by the website domain owner with their domain registrar, companies like Godaddy, One & One or Heart Internet for example.

Keeping it Simple

In the example above for “dare2b.com” this is not a straight forwards fix. The reason being is we know that the domain “feedback.dare2b.com” responds to requests and so does “www.dare2b.com” but “dare2b.com” does not, combine this with their DNS settings and no record for the subdomain “feedback this means that their web server is not configured to answer requests that are sent to “dare2b.com”.

That can get deep really quickly so instead if you website is not responding to both www and non-www requests, the simplest way of handling this is to ask your domain registrar what setting you should enter for your DNS settings so that your website responds to both www and non-www requests and if they can’t help, then ask your web-hosting company.

Tip: If like me you’ve forgotten who you registered the domain with, go to http://who.is/, enter your domain name and look for the “Registrar” entry, this will tell you which site it was registered with and which login details to fig out.

Redirecting WWW to Non-WWW (and Vice-Versa)

I’m not going to cover the ins-and-outs of this here as it’s already been very well documented. The easiest way is with a htaccess file and below are two links that show you how to direct both ways as you desired:

Which version you use doesn’t really matter, what does matter is that the user ends up at the same site for both entries and you don’t have duplicate sites responding on both www and non-www domain names.

Special Note for Magento Users

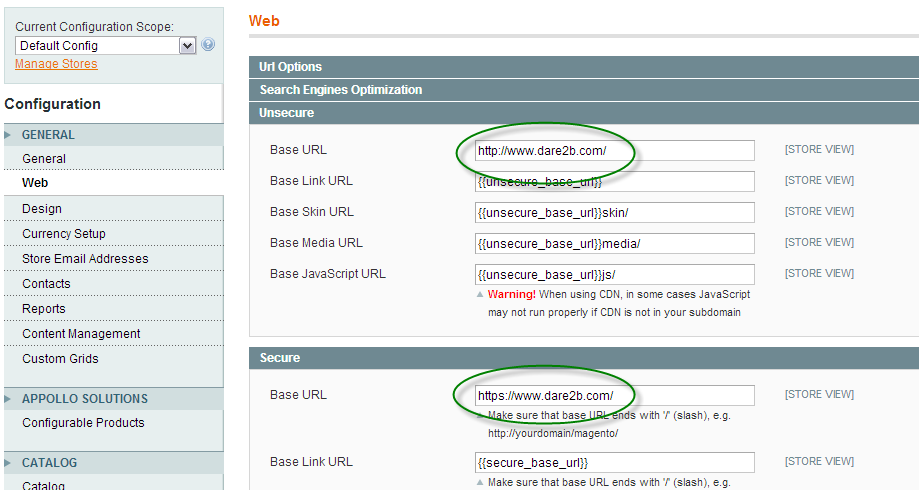
Magento is quite particular in the domain names it responds to and if your site is using Magento as is the dare2b.com website is in our example, then decide which way you are going to go (www or non-www), ensure that the DNS settings are working (this can take a few [up to 72!] hours to kick in) and then make sure that you set you Magento design settings accordingly.

If you don’t and change the DNS settings or add a htaccess rule that says otherwise your site will get caught in a redirect loop and won’t appear at all.

To remedy this, follow the steps below:

  1. Go to Admin > System > Configuration > General > Web
  2. For both the “Base URL”s in the “Unsecure” and “Secure” blocks set the domain name accordingly
  3. Press “Save”
  4. Now check the website is responding correctly

Using the dare2b.com example is in the screenshot below:

magento-domain-settings

Make sure you set the domain name correctly in Magento

In Conclusion

Even the big boys make mistakes and working around this is relatively straightforward,  you just ask your registrar or web hosting company what you should enter, in most cases if you ask, they’ll even change the settings for you too.

I personally prefer the non-www domains, that’s why this site is the non-www version, but if you were to type in “www.lastdropofink.co.uk” in your browser, you end up back here at “lastdropofink.co.uk” and if this was an eCommerce product based site, then I’d not be losing customers and ultimately sales :)

Which version do you prefer? www or non-www? Let me know in the comments box below.

How to Turn on PayPal IPN When Using Magento & PayPal

What I’ve been really surprised by over the past few weeks is the number of sites that don’t actually have this turned on and it’s just not limited to self-builds even the really expensive Magento builds are missing this out this as a step.

Turning on the PayPal Instant Payment Notification (IPN for short) is an excellent idea as means that when a customer pays for an item using PayPal then the payment information will be updated on the Magento order details in the administration panel.

It only takes a few moments to enable and I’ll show you how to enable IPN for your Magento site below. This will mean that when you receive an order via PayPal Express for example, you can actually see the transaction details in Magento and if you’re using eSellerPro and have the eSellerPro Connector enabled for sales order processing, your order & payment details will match up automatically.


How to Enable PayPal IPN

Setting this up won’t take more than a few moments and here are 6 simple steps to do this:

#1 Login to PayPal

#2 Hover on “Profile” and select “My Selling Preferences”

PayPal IPN for Magento Step 1

#3 Halfway down the page, click on “Update” next to “Instant payment notifications”

Paypal IPN for Magento Step 2

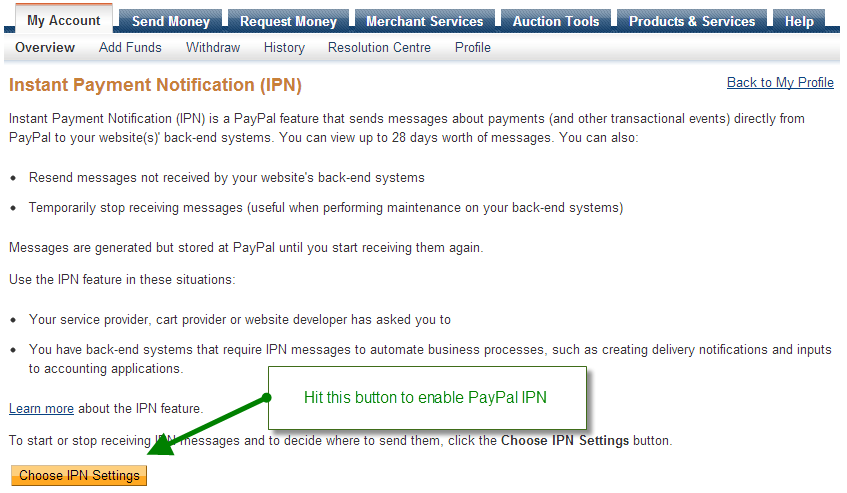
#4 You’ll now be presented with a  page similar to this, press “Choose IPN Settings”

Paypal IPN for Magento Step 3

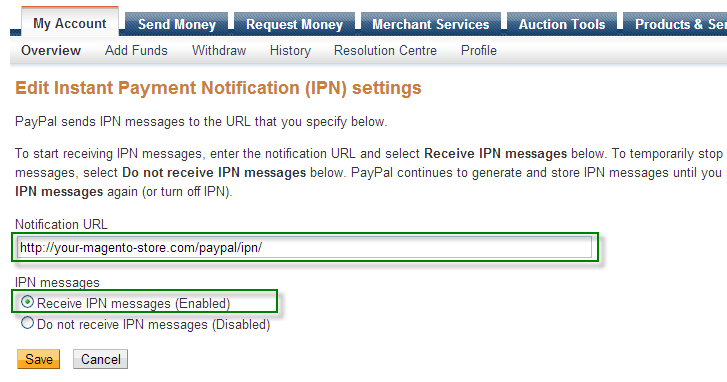
#5 Now enter the following details:

  • Notification URL – This is simply http://your-magento-store.com/paypal/ipn/ replacing “your-magento-store.com” with your website address. <= This is the part that normally trips everyone up as they’re not sure what to enter here.
  • IPN messages – Set this to “Receive IPN messages (Enabled)”

PayPal IPN for Magento Step 4

#6 Press Save

That’s it job done.

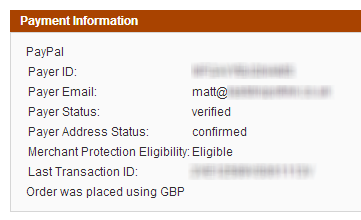
To test whether IPN is working or not is dead simple, just make a test transaction through your website (you will need a secondary PayPal account for this) and a few minutes later, check on the order in your Magento admin panel has been updated with the PayPal transaction details.

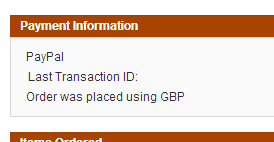
To help you, I have put to images below, the image on the left has no IPN details, the image on the right does.

Paypal IPN Not Working Paypal IPN Has Worked
PayPal - Magento IPN Not Working PayPal - Magento IPN Has Worked

If you’re seeing the extra information similar to the right image, congratulations PayPal Instant Payment Notifications are working for you, yay!

Did your Magento Design Company go the extra Mile?

Anyone can make a pretty website, however, did your design company go the extra mile and suggest you set up Paypal IPN for your site? Or has this caught you out too? Let me know in the comments box below.

How to Enable Order Comments for Magento

If you’re using Magento, then it’s highly likely that you’re using PayPal and other payment methods on your site, the challenge is that by default customers can leave comments at PayPal etc… after the transaction, but those comments are not brought back into Magento and onto your order.

In this article I’ll show you how to add an extension that allows you to accept order comments, turn of comments at PayPal and what to do edit if this extension doesn’t work out of the box for you.

PayPal Express Magento Configuration

Annoying eh? So what can we do?

We’re left with two options, the easy option and the hard option.

Let’s start with the hard option first.

For this option we would need to extend the PayPal extension so it collects the message left by a buyer on the final stage, this is going to need a developer and it’s not something I have done personally, so I don’t have any code for you to do this. This would mean we have a bespoke version of the PayPal extension and also if we want order comments from other payment methods it would mean we’d have to do bespoke work for each of them, not easy to maintain, so we need a easier option, which I’ll show you next.

Now for the easy option

What we’re going to do is disable the ability for buyers to leave comments at PayPal and set up order notes in Magento, then add a free extension that allows order comments from buyers in the checkout.

Note #1: If you’re using another payment method that has a comments section that a buyer can add notes in and these notes don’t come back into Magento after the payment is made, then ask the payment provider for the steps needed to be followed to disable that option.

Note #2: If you’re selling on eBay, this will not affect your eBay transactions.

Disabling PayPal order comments

First let’s disable the ability for buyers to leave comments on PayPal website payments, to do this follow either the steps below or the direct link is here:

  1. Login to PayPal
  2. Along the top click on “Profile”
  3. On the “My Profile” page, select the bottom left option called “My selling preference”
  4. In the second section down, click the “update” link to the right of “Block Payments”
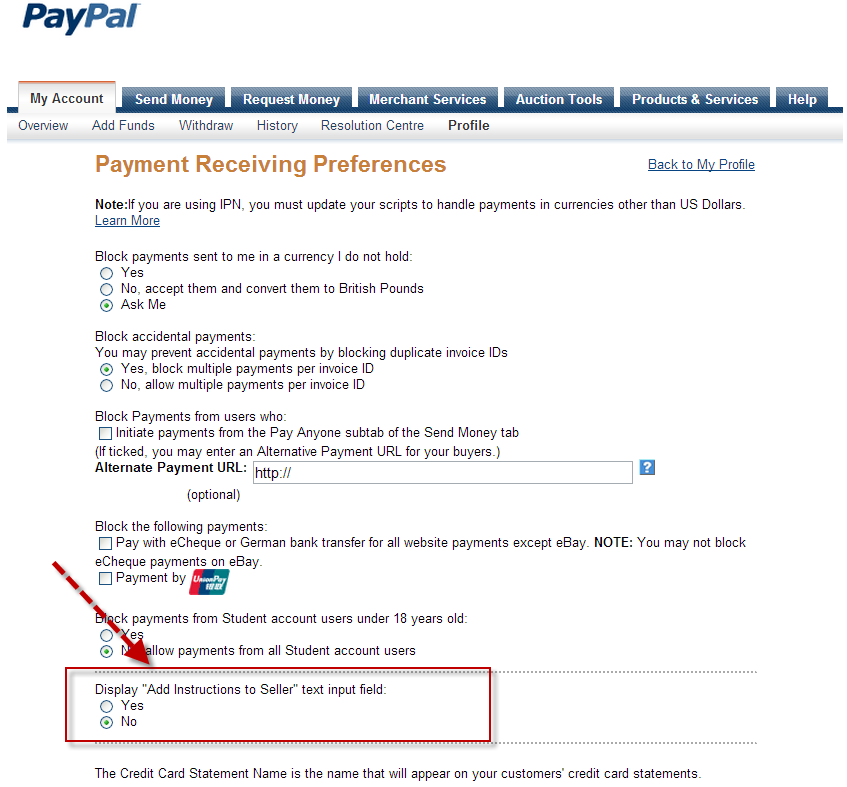
  5. For the option called “Display “Add Instructions to Seller” text input field:” set this to “No”
  6. Press Save

Tip:  While you are on this page, there are several other options that you should consider reviewing, such as the ability to block currencies that you do not hold, stop duplicate payments and also the name that appears on your buyers card statements too.

The image below highlights this option:

PayPal Express Disable Customer instructions to seller

Now what if we want customers to leave us notes on orders?

Well that’s easy, there is a FREE extension that does this for us :)

It appears that Magento doesn’t have the option to accept customer comments or order notes for a whole order, we have gift options (in System > Configuration > Sales > Gift Options)  which is way more complicated, but basic order notes, nope…

So the easiest way of having this is to use a free extension and I’ll show you how to add this extension in the steps below:

  1. Go to this page on Magento Connect:
    http://www.magentocommerce.com/magento-connect/ordercomment-3521.html
  2. Sign in if needed and press the “Install Now” button
  3. Agree to the terms and copy the Magento Connect 2.0 URL
  4. Go to your Magento administration panel
    Special Note: If your Magento is compiled, disable this before continuing. If you have no idea what I just said, ignore this :)
  5. Along the top select “System > Magento Connect > Magento Connect Manager”
  6. You’re likely to be asked to sign in again on this page
  7. Under “Install New Extensions” paste in the URL we just copied from the Magento Connect site:Magento add extenion url
  8. Now press install and in the section that appears, press proceed.magento connect proceed
  9. Leave the extension to install and once you see the message “Cache cleared successfully” we know the extension has been installed as shown below:Magento cache cleared successfully
  10. Go back to the Magento admin panel and log out and login again (good practice after you install any extension)
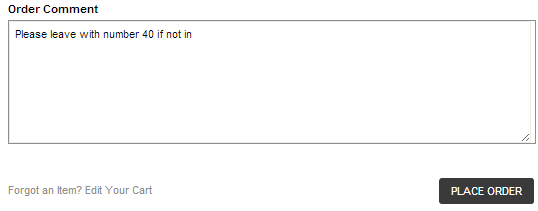
  11. Now create a test order and on the final stage of your checkout called “Order Review” you should have a order comment box like this:

TADA!

Magento order comments in the checkout

If the order comment is not showing in your checkout flow

If we’re not seeing this order comment box at the final stage of the checkout flow before you press the “Place Order” button, then we need to update one of the layout xml files. Sounds scary, but it’s dead easy and the steps are below:

  1. We need to edit one of your theme files called “checkout.xml”.
  2. Open up your favourite FTP program and login, now go to this path:/app/design/frontend/default/<your theme>/layoutReplacing ‘<your theme>’ with the theme that you are using on the site and look for the file called “checkout.xml” and open it.

    Note: If you do not see a “checkout.xml” in this directory, copy the default “checkout.xml” file from the “/app/design/frontend/base/default/layout” directory and put it into your theme directory.

  3. Open up this file and search for “onepage_review_info”Tip: Pressing Ctrl+F in any good text editor will show you the find tool
  4. We should see a block similar to the screen shot below and add in the highlighted line below:

    <block type=”checkout/agreements” name=”checkout.onepage.agreements” as=”agreements” template=”checkout/onepage/agreements.phtml”/>Add line to checkout xml file for order comments

In Summary

I’ve tested this with the current latest version of Magento which is 1.7.0.2 and it works fine and without the need to edit the checkout.xml file. If you’ve followed the instructions above, you now allow customers to leave comments in your checkout process and have no hacked payment extensions. Sweet!

Did you find this article helpful?
If so leave a comment below or press one of the sharing buttons to the left :)

Enjoy,

Matt

The Story Behind the eSellerPro & Magento Integration

I’d like to share with you the story behind the connector that integrates eSellerPro and Magento together, where it came from and where it is today.

It’s been quite a journey and it’s not 100% complete, the fact is it will never be and after throwing countless hours at it, but what is available today is pretty darn fast and as for configurable, well we’ll see how configurable it is as we dig in.


Looking Back

Looking back to the first time around to integrating Magento to eSellerPro it was a nightmare and dog-slow.

Working with the Magento core is relatively straight-forward once you’ve worked out where to look and have spend countless hours digging around what was created worked, but it was slow, maybe taking 17-20 seconds to build a configurable product, this time around we’re talking seconds to create a new or update product record (well 2.6 seconds on average).

The Reason Why

The reason why the connector was built in the first place was because one of the businesses I work with wanted Magento for their website, well even that has a story attached to it. I believed OpenCart was the better approach for them and the owner wanted Magento, so we had a duel of functionality & features, Magento won hands down for them and integrating it was the last challenge.

Keeping eSellerPro as the back-end tool for managing product data, categories, stock levels, reordering and order management was a complete no-brainer. We’re not looking to replace it, what the core of eSellerPro does is amazing (remember I worked there for 3 years, we built way-way-beyond cool stuff and the competing products don’t stand a chance for at least another year while the gain ground), we just wanted the best website technology possible and Magento fits that bill very well.

Matt, just integrate it properly

After us both getting frustrated after being told that Magento was “being” integrated fully into eSellerPro and no time-frame and with version Magento version 1.5 is already supported, but it not support inventory creation, I was just told “Matt, just integrate it properly“, so that’s what I’ve done.

Version 1.5?

Since then I’m working with 3 businesses that are using Magento 1.5 (as recommended to by eSellerPro), the thing is, it wasn’t until version 1.5.1.4 where PayPal Website Payments Pro was properly integrated into Magento, it had it as an option but that only worked if you were in the USA and prior to this version it just didn’t work.

We’re at version 1.7.0.2 today and while the majority of the features are the same or similar, Magento has been through two huge updates since 1.5 which was released almost 2 years ago (it’s so old it’s not even mentioned in their release notes). We’ve had version 1.6 released that had several structural updates made to it in August 2011 and the most recent version 1.7 which was with the 1.7 community edition being released in April 2012 and two minor updates since to bring us up to where we are today.

Note: If you’re looking for a reason on why you should upgrade from 1.5, take a look at this page which is the release notes for Magento version 1.7 and start scrolling. Yes that is 10 feet of page scrolling for fixes in version 1.7 alone!

Anyway, back to being told “Matt, just integrate it properly“, out came the weapon of choice, Notepad++ a text editor. I don’t think of myself as a developer or a coder, I just want to solve the challenges that the people I work with and if that means I have to get in and get dirty with coding, I will do. Since last October,I’ve not stopped working on the integration to Magento in one form or another.

The First Version

The first cut worked, we had orders being collected, orders being marked as shipped or being cancelled, stock and price updates coming through and the first revision of inventory loading working and I even had configurable products working too (that’s “variations” if you’ve not heard the term “configurable products” before).

I’ve done it” I said,
a pause of a few seconds went by…
done what exactly Matt?“,
integrated Magento for you, would you like to see it working?

It wasn’t pretty, but it worked and we could do everything that eSellerPro said they could do in 1.5, but crucially we could create products and update them too. We started to talk more and it turned out what I had written in the first version was perfectly adequate for one part of his business, “that’s amazing Matt, but my business partner who also sells out of our account too, he changes his eBay item specifics all the time, how does it cope with that?

Well, I had skirted around a couple of areas to get this working in under 3 weeks and one of those areas was around attributes or custom fields as you’ll know them by if you’re a user of eSellerPro. They had to be pre-created in Magento for them to be added to from custom fields or other fields from the product data feed from eSellerPro.

Leave it with me, I know what needs to be done. Is two weeks ok?” I said, it was agreed and I dug in.

The Second Version

During those two weeks, Christmas came & went and while taking two days off, the rest was spent on working on the connector. I had also considered that other businesses may want to use it as well, so a good chunk of this time was spent on making it versatile for it to be able to used by multiple businesses with multiple Magento sites.

It actually took me another 3 weeks to get it to the stage where it was intelligent to work out what the state of play was with the data and Magento site it’s connected too and it was able to work out what needed to be done and what had already been done (I’m being a little vague with this to ensure that I have some form of competitive advantage by the time you finish reading this).

Also during this time, I had one of those “Matt’s strange days”, it was a Friday and by the end of the day I had spoken to two other business owners on unrelated topics and they both had pretty much demanded that I also integrate their sites as well. My work over Christmas had paid off as I knew that I could do anything they threw at me and the connector with another 100 hours thrown at it would work amazingly for them.

So where are we today with the Magento connector?

I originally started with 4 user settings, right now as I skim down the config file a rough count is 320 separate options and that’s not including the arrays that are used to tackle the bespoke options that have come along and I’ve made versatile so that they can be used on other installations.

To give you some idea of what these settings do, here is an insight to a handful of them:

  • Decide if categories should be created and if so what statuses they should have as well, whether they should be included in the menu, active when created or set as an anchor category
  • What to do if there are no categories sent with a product
  • How and when to handle product variations
  • Whether we should be generating meta descriptions, keywords and titles and whether these should account for the data not coming from the standard fields in eSellerPro, but from custom fields or outside sources
  • How and when to create attributes and what to do in special circumstances
  • Whether related, upsell or cross-sell products should be created as part of the process
  • To include image labels (alt tags) with images or not and what to use as their labels
  • How to handle custom URL’s for products
  • What to do with tiered and grouped pricing
  • How to manage different variation types and what to do with them while being loaded to Magento
  • Which of the yes/no options for products in eSellerPro and where these options should be mapped to

And we’re not even scratching the surface. I’ve built in extensible arrays that can handle almost anything we throw at it and in short, it’s now at the stage where I can do almost anything we want.

Several key Magento extensions have been catered for now through the connector, my personal favourite is one that allows us to make images swap on colour choices on product detail pages which I’ll be documenting later this week (choose a colour on this item, neat eh?), data feed extensions for feeding out product data to Google Product ads, affiliate networks and also to provide stock & price control updates for external 3rd party just-in-time customers.

Flexible

There have been a couple of delays in the sites going live. Yes we’ve had bugs to iron out and bucket load of features that have been added in along with bespoke requests to handle, but what I’ve found is that while what I’ve written is perfectly capable handling the complexities of the data for getting data in and out of Magento quickly, the servers sat behind the sites have not been. If we combine in the learning curve for the business owners too with Magento and bringing their data up to scratch so that they can handle the functionality and features they really want, it’s been a little too long, hence why I’m working to a questionnaire I’ve put together that covers 41 topics to make them easier each time.

I had no illusions that this was going to be an easy task, multiple Magento versions and the thing is that no one server is like the other. We’ve burnt through 3 hosting providers already with the existing users of the connector, Magento really is a beast and unless we’re throwing quad cores and a minimum of 6Gb of ram at it, then it’s not going to be fast.

both myself and the connector have needed to be flexible

Thankfully I’ve managed moderately high traffic sites before, my UNIX skills are pretty good and the understanding of what needs to be done, can sometimes surpass the businesses own developers. I’m a curious person, it’s just the way I’m wired and I always ask.  This has been a life safer more than once and it’s always nice to be just told & trusted with “Matt here’s the root access details, just make it work” and crucially being able to make it work without screwing up everything in sight.

We ground one server to the floor loading 40,000 products in, we knew it was going to happen it was only a shared server. We didn’t expect the issues we had with running PHP has Fast CGI on the new dedicated server though, that took 5 hours to track down and solve, the last time I checked, the 40,000 products had been re-loaded and an extra 10,000 had be loaded on top.

Flexible is most apt word here, both myself and the connector have needed to be “flexible”. Flexible with the tech that the Magento site is being hosted on, the extensions that are being used and to dig in deep and solve the challenges that have had seasoned professionals stumped. Being an “all-rounder” and knowing eSellerPro inside out has helped to no end, oh and throwing as many hours as it has needed has really helped break the back of the most difficult of challenges.

Sites Going Live

I’m looking forward to sharing some of the stories with you on the move to Magento from the site owners themselves. Most have been through more than one site previously and are looking forward to moving to a super flexible platform, but keeping their sanity by using eSellerPro for all the back-office tasks.

The first site went live over a week ago, we’re already working on their second site and that will be replacing another eSellerPro website with Magento as the front end, but crucially keeping eSellerPro as product data store, stock control and order management tool. I’m expecting at least 3 more to go live in the next two weeks as well.

I have a 3 custom requests that I’m working on currently, but the one that I know you’re label as “oh my god that’s cool” if you’ve got any SEO background.

I’m working on an image renaming option. So that the less-than-SEO-friendly image names that are loaded into eSellerPro are renamed and processed to have delicious naming conventions that make it easy for Google to recognise and also easier for customers too. Cool eh?

In Summary

I didn’t expect for the integration to have gone so deep from the first conversation and being asked to “just integrate it properly“.  Wherever possible features and functionality are tied deeply back into eSellerPro, it’s the right approach as you can handle all the inventory data with ease, stock control & pricing and processing orders are far better off being processed in eSellerPro, but for the website side, Magento just rocks.

Recently I covered both Why You Should Not Use Magento and also Why You Should Use Magento and I can sum these up into one line, if you give it the resources it needs and you want the flexibility of an external website where you can do anything you want, then Magento is worth looking at as an additional or replacement site.

Now that the connector is robust enough, you can have it linked back to eSellerPro and have the best of both worlds. Would you like to know more?

Matt

Why You Should Not Use Magento

Following on from my earlier post on ‘Why You Should Use Magento‘, now for Magento’s negative side.

This is part 2 of a two part series on Magento, in this first part we look at why you should not use Magento for your eCommerce website platform.

Magento is a beast, if its not the depth of the user interface, its hundreds of settings to get used to or just the sheer scale of it. To give you some idea there are 28,000 files for the default installation of Magento (compared to just ~2527  in OpenCart 1.5.5) and that’s not including any media or theme files that you’ll be adding to it as well.

I’ll be completely honest with you, two years ago it took me two or three attempts to get to grips with it, that’s slightly concerning as I would like to think I pick up things fast, very fast. I finally gave in when a client demanded that they needed me to know it, several hours later and many pints of coffee, I felt quite at home.

There is a lot of hype around Magento, for the large part of it, its worthy, but Magento has several other aspects that you need to be aware of:

Development & Design Costs

Because Magento has taken off, developers & designers are charging a premium for the development of custom extensions & themes.

You need to be really careful of this if you need design or coding alterations. I would strongly suggest you document any changes you wish to be made before approaching anyone and get at least three quotes from reputable companies. This will stop you looking inexperienced and open yourself to be over charged.

Expect to pay up to 40% more for the same functionality when compared to platforms.

There has been a very mixed feedback with freelancers, I personally suggest you look at the most downloaded extensions in Magento Connect for each of the categories and locate a company that has completed a similar extension and approach them directly with the specifications.

Magento is quite easy to extend against, but generally it requires a lot more work than other website platforms and expect to pay up to 40% more for the same functionality when compared to platforms.

Update for 2014:
Over the past year I’ve seen quotes from £500 to £20,000 for Magento website designs. The differences are wild and what you get for your money is also wildly different.

If you’re on a budget or would rather spend your website build budget on marketing (which will make you money instead of having to spend it before you can earn it), take a look at the Ultimo Magento website theme, it’s been downloaded over 6,000 times and any bugs in it were ironed out yonks ago. It might not be exactly what you’re looking for, but the disparity between $95 and even the lowest of quotes £500 is huge!

Export/Importing Abilities

This was a shocker, the import and export abilities are astonishing poor. And I mean REALLLLLLLY bad.

I’m used to software products that are highly configurable when it comes to data exports and Magento lacks in every department.

I recently had to hack the core code to get some images in via CSV, it felt soooo bad and its just wrong. There are no category exports and inventory exports are primitive to say the least. There are several import tools for Magento, they vary in their flexibility and cost.

If you’re migrating from another platform, spend a serious amount of time seeing if you can port your data across. This could make or break your decision to use Magento, so trawl the extensions directory Magento calls “Magento Connect” for extensions to migrate from another platform, most of the common platforms have special importers available for them, several examples can be found here for OSCommerce.

Update for 2014:
I got around to documenting and creating the video guides for Magmi as part of the UnderstandingE project, you can find all the video guides here.

Magmi is like the swiss army knife of import tools for Magento, you can pretty do much anything you need to and there are a wealth of plugins available. Those dirty core hacks of Magento are no longer needed, oh and it’s free too.

Indexing in Multiple Website/Store Setups

This is an issue if you are SEF rewrites enabled. Magento wants to have ALL the SEF URL’s (Search Engine Friendly) in a table for each store view for each website for each product for each category.

For single or a small number of stores with a low inventory count this isn’t a big problem. But for big sites of several thousand records (or more) with multiple store views/sites then this becomes a processing issue.

If this is you, then you’ll need to take a look at look at the recommendations on the kit to run Magento and optimisation suggestions; Plus you’l need to take a look at this blog post on a method on how to run the different indexing processes separately because they’ll just never complete on their own.

To give you some idea, one of the sites I recently worked last year, took a minimum of 2 hours and 5 minutes to index. The processes are run in the early hours of the morning, but it does mean new products do not show until they have been ‘indexed’.

Update for 2014:
The quality of web hosting has got better over the past few years and you can get inexpensive, decent Magento focused shared web hosting for £16-30 a month see here (aff link and I use them myself).

While this won’t suit super big sites, you don’t have to overpay or suffer if you’re a smaller business and have lots of inventory. Also SSD disks have come down rapidly in price and seeing as they’re ~10 times faster than traditional disks, there is no real reason for you not to be on SSD disks, especially if MySQL is running off the same server too.

No Bulk Update Tool

This was another shocker, there is no ‘bulk update’ tool. These are taken for granted in other software products I have come across and feel this is a big hole in the Magento platform.

Such tools allow a user to update one or more attributes on many inventory records. The save untold amounts of time, effort, oh and frustration.I did find a plugin that was mildly helpful its called “Related Products Manager” which I covered a few days ago and also its free which helps, but is no substitute.

Server Requirements

Magneto is far from ‘light’ in resource demands. This I hinted at with the indexing requirements I mentioned above. You’ll be lucky to run this on a shared hosting account, it almost demands an entire server to itself and for bigger installations, several with a load balancer to boot.

Expect to be paying good money for the hosting side for Magento, if you skimp here then it’ll bite you in the bum very quickly.

If this does not put you off, then renting or collocating a dedicated server is absolutely suggested for your site. Collocation starts at about £40 + VAT and you supply the kit or a rented dedicated server can be found for around the £85 + VAT mark that should last you a while.

There are also dedicated Magento hosting providers out there, I am unable to comment on them all, one company that suggested that their VPS was “Magento Ready”, when we loaded 14,000 products to it, it was far from capable and moved to a dedicated server with 16Gb of ram and 8 cores instead. Slight overkill, but never had a problem after that “upgrade” :)

TCO – Total Cost of Ownership.

Aptly after the server requirements point, unless you have a technical member of staff or development team, you’ll be better off outsourcing this to a 3rd party and when it comes down to total cost, you may ultimately be better off choosing a hosted solution for Magento or another platform less “resource hungry”.

Update for 2014:
If you’re having to keep to the realms of shared web hosting, then this does come with several benefits, such as regular backups.

Always check with your web hosting provider how often they are made and whether they are off site (desirable) or on site. Trust me there is nothing like the cold sweat of not having a backup to hand and while not to be completely relied upon, this can come in very handy.

It’s Too Good.

Yep this is a negative!

Magento is to deep and offers too much customisation.

Sometimes its better off to get someone else to do a task for you and unless you’re a web designer or a PHP/MySQL developer, you’re better off giving it to someone else.

Stick with the basic functionality and you can’t go wrong.

Working with Magento

Rather than rubbing up against Magento (or anything else for that matter), working with it is always a easier route and here are some suggested resources to read the white paper includes some really good base optimisations for Apache, MySQL & PHP:

  1. Magento for developers (this is an 8 part series by Magento)
  2. A 60 page Designers guide for Magento (provided by Magento)
  3. A 290 page guide for users (also provided by Magento, need to enter some basic details)
  4. System Requirements
  5. White Paper: Methods and Best Practices for High Performance eCommerce with the Magento Enterprise Edition
  6. Book: Mastering Magento (steep at £30, but was helpful as it was similar to the user guide, but easier to understand)
  7. Update for 2014: And UnderstandingE.com, this site has over 100 video guides in Plain English, written & published by myself.

I don’t want to knock Magento, I really, really like Magento, but at times its has been extremely frustrating working with it.

The forums are not the most active places (they suffer from a lot of spam too) and some bugs I have found (well, some, ok most caused) have been a nightmare to resolve to no one really knows what on earth is going on. If I had not been technically competent with a good understanding of PHP/MySQL and what should be happening, then I would have given up on it ages ago.

In Summary

If you’re looking for a simple shopping cart that looks pretty, works well and supports multiple sites (yes other products can do this besides Magento), you may want to look at a personal favourite of mine, OpenCart, but be fully aware that’s not without it’s limitations, especially around multi-variations and stock keeping and no one platform is “perfect”, they never are.

Magento is a beast and from personally experience two years ago, I naively thought it would be quick to learn, how wrong was I… But chuck the resources it needs at it, along with time and you can do wonderful things with Magento.

Why You Should Use Magento

Magento has really taken off in the past few years, especially now eBay own it. But behind the buzz there are some things that really grind my gears and others that make me flutter with excitement.

I wanted to begin by highlighting the pro’s and con’s of Magento, but they were too numerous to list together and in tomorrow’s post I’ll be looking at “Why you should not use Magento” to give this article a more rounded feel to it.

For anyone who has not looked at Magento yet, I think you should do.

It’s a very feature rich platform and sets the standards for others to follow extremely high. Magento can be extended beyond its wide feature set. I’ll be adding a post soon on my top 10 must-have-extensions.

Below is a summary of why I think that Magneto could be the right choice for you:

Multiple Website & Store Support.

This means you can promote your inventory across different domains (this is known as a ‘Website’), then using ‘stores’ create stores that could be differing versions, designs or even languages. When it comes to inventory, you can disable items on different stores, but generally it is assumed that the majority of your inventory base will be used on all the store views.

Widgets & Static Blocks

When you get into playing with Magento, I just love how easily it can be configured, when it comes to widgets, there are some really useful options included by default and you can control these at many levels, product, category etc levels.

Static blocks come in really handy. An example of this is shipping details that are used on a product detail page, within a few lines of code you can add your own static block to your template and then control the content remotely through the Magento CMS section (CMS stands for content management system).

Magento is a configuration-based MVC system.

I have seen people moan about this, but Magento code alignment is in an easy to follow structure called Model View Controller. This in lay-mans terms means it’s really easy to extend or override/adapt Magento’s functions.

A Wide Assortment of Extensions.

Extending Magento is very easily done using the MVC system noted above. The Magento team have an online directory called ‘Magento Connect’ that contains hundreds of extensions, both free and paid for.

Take a look at the extensions directory that Magento call “Magento Connect“, there are hundreds of them, each extending the existing functionality further with some of the best extensions, such as the Fishpig extension to seamlessly integrate WordPress into Magento which is free, bonus!

Loads of Features & Functions Included from the Box

Magento is a feature packed and makes other platforms blush.

Here are a few neat features in absolutely no order:

  • Order reports dashboard,
  • Multi level user control,
  • API Access with configurable levels,
  • Extensible attributes,
  • Several different product types, including variations and digital downloads,
  • A very slick one page checkout process (or several if set),
  • All major payment gateways supported,
  • Multiple image support including a zoom slider,
  • A decent front end for users,
  • Newsletters,
  • Polls,
  • Product tagging,
  • Customer reviews,
    Multiple currencies (with a link for these to be updated via a cron job),
  • Out and in of stock notices,
  • RSS feeds for almost everything, including order status and updates, completely configurable down to website to store view and so on.
  • I’m stopping here, you really need to see the demo or install it yourself.

I did find a decent Magento features list if you’re after a full breakdown of the features and functionality in Magento and I’m sure more has been added since that article was written.

Semi-Decent Content Management System.

The CMS in Magento is pretty good, you’ll go far before needing any extras for this. The variables  button is handy. The only negative is that I do not like the editor, but in true Magento fashion, you can turn this off in the system settings and it also doesn’t trash complex HTML like WordPress does.

Order Process

The order process was a bit weird to get used to, to begin with, but it does make sense and you can process orders in-mass. Documents can be customised and outgoing emails can be altered as desired for each store. There is something like 37 emails that can be edited, but there are just 16 core ones that you would want to edit.

Almost Everything has a ‘Setting’.

No joke, there is a system setting for pretty much everything in Magento.

You can control at a global level and set defaults, then override at a website or even store level.

Note: This is what allows you to change themes & languages between stores/websites and still keep your sanity.

Scalability.

Magento has been designed so that it can be when needed to be run over many servers. This bit can go way over one’s head, but see here for more info.

Stable  & Updated.

Since PayPal was finally sorted out in one of the earlier versions (1.4.1.0 to be precise), today we’re at version 1.7. You’ll be hard-pressed to find any bugs and it’s being developed, so as new features, fixes and functions are added, they are released.

Free ‘Community Edition’.

Yep that’s right there is a fully feature FREE version.

However beware it’s not the easiest of systems to install and its requirements are not light. The Magento platform will not run particularly well on a shared host, it needs its own resources. TCO (Total Cost of Ownership) does need to be looked at if you are seriously considering Magento.

Plenty of Themes.

Unlike bespoke systems, Magento is open source and there are many sites that offer themes for Magento, similarly there are plenty of companies that can give you a bespoke look and feel.

Admin Panel

Within a few minutes of browsing the front and back-end admin section of Magento, you’ll understand the scale.

It is quite a lot to take in, it took me several nights to get through everything from end to end, I take things in fast, it’s been noted many times that it takes a decent amount of time to get used to the system and the knowledge base can be 50/50 at being helpful, but it has got better over the past 2 years or so.

YouTube was a superb resource when learning the back-end of Magento

There are many videos on all aspects of the system. See here on Youtube for a start in the right direction.

That’s enough of me typing, go check-out Magento yourself. Here are links to the Community edition back and front ends: http://www.magentocommerce.com/demo (the Community Edition is at the bottom right).


In Summary

Magento sets the feature and stability bar extremely high, very few products can even try to compare to what you can get for free out of the box with Magento.

Its not without its faults and the learning curve is steep.

I’ll be covering some of Magento’s negative points tomorrow in an article called “Why you should not use Magento” (but even then I’ll be sharing some extremely helpful resources with you, so you can master Magento).

Have you used Magento or are you using Magento for your website?

What do you make of it?

Let me know in the comments box below.

Matt

Showing Available Configurable Options on the List or Grid View in Magento

Do you sell sized products in Magento or have products with colour options and would like to show the available product options on the gallery or list views like the image above?

If so read on, I have some code for you.


Products with Options

The same as variations on eBay or Amazon, when you’ve got products that are the same, but come in different colours, sizes or both, then both eBay and Amazon allow you to make variation listings. You can do the same in Magento with configurable products, but unlike eBay and Amazon where you’re restricted on what you can do, but with your own website you can do whatever you like.

From a customer’s point of view there are probably only looking for a specific colour of dress or if I’m shopping for shoes, I’m a size 10, I don’t really care about any other sizes and for me as the customer having to trawl through umpteen products on a website is plain annoying.

So what can we do about this? Read on.

Showing customers available options in Magento

We can add some simple copy and paste code to our Magento website, that will show which options are available, so when your customer is looking at your category list pages, where you have multiple products being shown, you can clearly show them which sizes or colours are still in stock.

An example of what we’ll be doing is below:

show available sizes in Magento

As we can see from the image above, the available shoe sizes are being shown on each product. If we think back to me being a size 10, I can immediately rule out the products that are not available in my size and just click on the ones that are (not that Women’s shoes are my kind of thing I hasten to add!).

To do this, first I’m going to share the code snippet with you and then explain what it does and how you can extend it further or alter it to your needs.
[php]
<?php
$sizes = array();
$colours = array();
if($_product->isConfigurable()){
$allProducts = $_product->getTypeInstance(true)->getUsedProducts(null, $_product);
foreach ($allProducts as $subproduct) {
if ($subproduct->isSaleable() && floor($subproduct->getStockItem()->getQty()) > 0 ) {
$sizes[] = $subproduct->getAttributeText(‘config_sizes’);
$colours[] = $subproduct->getAttributeText(‘config_colours’);
}
}
if(count($sizes)>0) {
sort($sizes);
?>
<div class=”desc std config_sizes”>
Sizes: <? echo implode(“, “, $sizes); ?>
</div>
<?
}
if(count($colours)>0) {
sort($colours);
?>
<div class=”desc std config_colours”>
Colours: <? echo implode(“, “, $colours); ?>
</div>
<?
}
}
?>
[/php]
This code was originally posted on http://stackoverflow.com/, but lacked the option to show only the options that had stock on them. Adding “&& floor($subproduct->getStockItem()->getQty()) > 0” on line 7 filtered the items without stock on them out.

Code run down:

  • Lines 1 & 2 set up the arrays we’ll be using to show the available options
  • Line 4 makes sure we have a configurable product
  • Lines 5 & 6 grabs all the simple products and starts to go through each of them
  • Line 7 is the cool line, as that line only adds in products that should be added
  • Lines 8 & 9 add values for specific attributes to each array (more on these later)
  • Then lines 12 to 19 and 20 to 27 spill the options out to the website

Tip: If your website is only ever going to have sizes as options, then you can remove lines 3, 9 and 20 to 27 for the colour options or the opposite lines for the sizes if you’re only using colours on your site.

The two fields you must be aware of are in lines 8 & 9.

These are the attribute names for the configurable products. In this case, they are called “config_sizes” & “config_colours” and must match exactly to the attribute code names that are being used for you size and colour options in Magento.

You can find out what yours are called by going to the Magento admin section, Catalog > Attributes > Manage Attributes and then clicking into your configurable attribute(s) and the code name is in the first box.

Pretty cool so far right? Now let’s this to your site.

Adding this code to your site

In the code snippet above, we must update our configurable options on lines 8 & 9 otherwise this won’t work for us.

Also I’m going to assume that you have worked with Magento themes before and understand the structure of theming in Magento and that you should never, ever change the default theme and you’ll make a copy of the list.phtml file to your website theme directory if needed and also a backup of the current file just in case.

Note: If themes are new to you in Magento, then take a read of this article that explains how they work before continuing.

For the sake of example, I am going to assume that your Magento theme directory is called “my-theme”. What we’re looking for is the file called “list.phtml” located in:

app/design/frontend/default/my-theme/template/catalog/product/

If this file is not present, then copy this file from this directory to your theme folder:

app/design/frontend/base/default/template/catalog/product/

Once you have opened the “list.phtml” take note that this file has TWO views in it, both the grid view and the list view and we’ll need to pop this code in twice and then check both views (assuming you have both views enable on your Magento site)

What we’re looking for is the line that looks like this:

[php]
echo $_helper->productAttribute($_product, $_product->getName() , ‘name’);
[/php]

Being careful of other tags that need to be closed first, after this section, we can add in the code snippet above and press save.

Now nip back to your site and view one of your category list pages where you know you have products that have configurable options on them and see if it’s now displaying them. If you see the options and they look right, then you’re left with one more task for the other view and we’ll cover that next.

If the options did not display:
You may need to just empty the Magento cache for them to appear and if it’s still not appearing, then either we have the attribute name(s) we added above entered incorrectly, the page doesn’t have any configurable products with options that are available, we’re looking at a list view which we haven’t done yet (next section) or the theme may be just hiding this section, so check the pages source code to see if you can see the options there.

Now for the List view
Assuming the above went well for you (which it should do as I have tested this on Magento versions 1.7 & 1.6), we have only done half the job which was for the grid view which is at the top of the list.phtml file. If you scroll down this file and look for the section that reads like this:

[php]
<?php // Grid Mode ?>
[/php]

Now look again for the code:

[php]
echo $_helper->productAttribute($_product, $_product->getName() , ‘name’);
[/php]

And add the same snippet above where appropriate.

Styling:
I’ve included css classes on both the size and colour options called “config_sizes” and “config_colours”, you can of course change these to whatever you like, but do keep classes on them as it will make styling them a lot simpler.

In Conclusion

This code snippet allows you to show the available options on your site for both grid & list views.

Showing the available options on the grid or list pages in Magento is just good practice. I know from a personal point of view, I’m normally just looking for one size and from my Wife’s point of view, she just wants one colour and size is a secondary consideration.

show available sizes in Magento

Yes, with pages that have lots of products on this is going to add some extra processing time to the page to load and also you’ll need to style these new options too. If you’re really worried about speed on the grid/list pages, then cutting down the number of items being shown is the biggest win (and also good practice too) and if you’re still concerned, use PHP’s microtime() function to see how long this takes to execute and example 1 on this page will help you loads.

If you get stuck with the above guide, ask your web designer or if you are the web designer or just the store owner wanting to add this, pop a comment at the bottom and I’ll help out if I can.

Enjoy,

Matt

Managing Related & Similar Products in eSellerPro for Magento

In this article I’ll be showing how you can easily manage related & similar products in eSellerPro for use on your Magento website and if that’s too much hard work, at the bottom I’ve included a link to a free Magento extension that will set these up automatically for you and 4 tips you can use too!

I know we’ve had a run of Magento based articles lately, part of of my goal for 2013 is to actually share what I get up to and I added this functionality into the eSellerPro to Magento connector over a month ago and it’s about time I shared it!

What are Related , Cross Sell and UpSell Items in Magento?

Upsell items in Magento

Upsell items in Magento

This is an excellent place to start, because in eSellerPro only two of these are supported and we need to know what the options are in Magento, to make a decision on which ones we should be using.

So… there are three types of cross merchandising options in Magento out of the box, these are as follows:

  • Related Products
    These are items that complement the current product being viewed. This could be a charger or memory card for a digital camera, a power supply for a laptop or maybe a necklace to go with a dress.
  • Up Sell Products
    These are generally products that are of the same type and ideally of higher value. For example if the product being viewed is a pair of shoes, then similar shoes of the same design, again ideally higher in price as well.
  • Cross Sell Products
    These are the items that are shown in the shopping cart when the customer is about to checkout. This could be a memory card for a digital camera or perhaps a warranty.

While setting these up manually in Magento is a straight forwards process for each item, if you have lots and lots of products, then doing this individually would take forever, so we need options and I have three options for you!

Why only two and not all three?

eSellerPro is exceptionally flexible and when building the connector between eSellerPro and Magento, I knew that you might want to be managing the cross merchandising options from within eSellerPro (it makes sense to do this as it is the core base of all your inventory data after all), so the ability to leverage the existing functionality in eSellerPro was considered and you can manage up to two of these options directly within your eSellerPro account.

In eSellerPro you can manage two options for cross promoting products, “Related Items” and “Similar Items”, that;s not the full three options that we can use in Magento, but it’s good enough.

The fantastic thing about this functionality being in eSellerPro is that you can easily manage the related & similar items using an import & export sheet directly in eSellerPro, rather than having to “faff around” setting this up externally (which is a nightmare for large sites) and I’ll get to how you can do that in a few moments.

Oh a quick note, let me know which ones you’d like your products matching to in the eSellerPro to Magento connector.

Which Options to Select?

This really depends on two things, your theme and what you’d like to happen. Different themes handle these 3 cross merchandising options differently and I’d suggest that you manually add a few products to each of these to a product and see how they look on your websites theme.

Generally I would suggest using “related products” and “Cross sell products”.

This means that you’re able to show related products on the product page and leave space for a “You also viewed” module to be shown on the product and category pages, without overwhelming the user with too many options and the cross sell products for the checkout where carefully selected products or services could bring the average order value up.

Managing Cross Merchandising in eSellerPro for Magento

To show you how this works it’s best if we make an example for you and you can follow me along in your eSellerPro account right now. It won’t more than a few minutes to do and once you see the import sheets, you’ll have it licked.

You can follow me along in your eSellerPro account right now

How to manually add related products in eSellerPro

To manually add products as related items to a product in eSellerPro is dead easy, just follow the steps below:

  1. Go to Inventory/Listing and open up “Inventory details”
  2. Pick any product and double click it
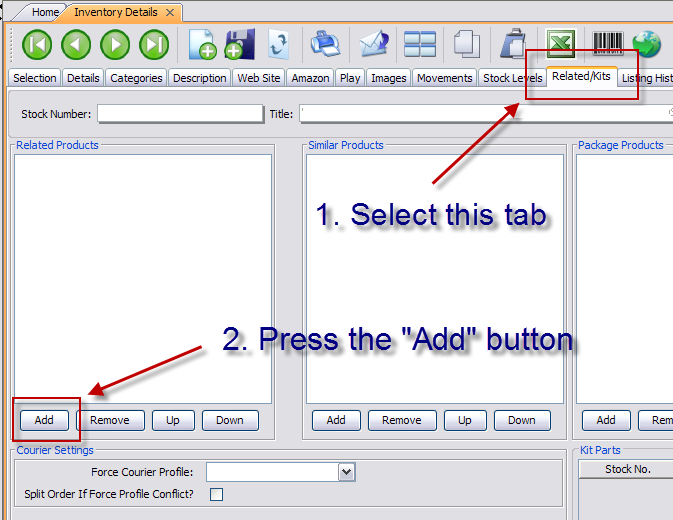
  3. Along the top click on the “Related/Kits” tab
  4. We now have two panels as shown in the screen shot further down
  5. On the left panel for “Related Products” press the “Add” button
  6. A new window will appear and you’ll probably have to resize it. You’ll also recognise it as well, it’s the inventory search screen so you can search for any products you like.
  7. Pick any product(s) you want and on the left put a tick next to it
  8. Press “OK”
  9. That’s it you have added related products to the original product. Easy eh?
How to Add Related Products in eSellerPro

How to Add Related Products in eSellerPro

Important Note:
This tab also allows you to make kits of products. If you are not using kits in eSellerPro stop reading this article immediately and listen to this Podcast. eSellerPro has a a wicked feature called “kits” that allow you to make unique products, unique products are like gold dust in the eCommerce environment and can give you amazing results in little to no time and with hardly any effort on ALL your sales channels.

How to manually add similar products in eSellerPro

To add similar products in eSellerPro, just press the “Add” button on the the similar items panel and follow the same steps as above.

How to import & export related products into eSellerPro

That was the hard way, now for the easy way

I’ve also included some tips for you next as well so that you’re able to do this in mass for all your products too.

You can import and export related and similar products using excel and it’s even easier than manually adding them to each product. To bulk import and export related/similar items just follow these steps:

  1. Go back to the “selection” tab in inventory details
  2. Pick the product we just set the related and similar items on and tick it on the left
  3. Along the top press the “Excel” icon
  4. In the middle there are two options, export on the left and import on the right
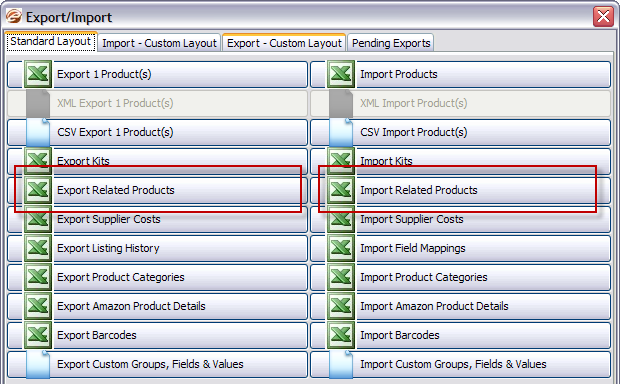
  5. Click on “Export Related Products”
  6. Save the file to your desktop as “Related Products”
Importing and exporting related & similar products in eSellerPro

Importing and exporting related & similar products in eSellerPro

In this file you’ll have two lines, one for the related products and one for the similar products, an example of this is below:

Managing Related & Similar Products in Excel

Managing Related & Similar Products in Excel

Column A – Related?
This is where you set the relationship type. Either “Related” or “Similar”.

Column B – Stock Number?
This is the stock number of the item you are adding the relationships to.

Column C & Beyond – Cross Promotion Stock Numbers
In columns C, D, E etc… this is where you add each stock number you wish to add as a related or similar item to the stock number in column B

You can now make as many edits as you see fit and to import them back in again, just press the “Import Related Products” button and upload the file.

Tips for setting related & similar products in eSellerPro

So now for some tips I’m sure you’ll find useful when setting up related & similar products for use on your website(s <= that’s a plural as Magento supports multiple stores out of the box).

Tip #1 – Limit to 1500 products

The excel xls importer for eSellerPro can slow right down if you give it massive excel files. So limit the number of lines you’re importing to a sensible cap of 1,500 rows.
This only applies to this import type as you are forced to use the xls format, on other imports you can use CSV which is almost unlimited and runs a lot faster!

Tip #2 – Set masters only

There is no need to set stocked sub SKU’s for related or similar items for use in Magento, these are rarely available own their own when in configurable products (as they’re set to “Not visible individually)”, thus just add the master products as then the customer can make their own selection for any variations. You can filter these out from your search results using the “Product Type” button and selecting masters only.

Tip #3 – Use Custom Exports to find matches

Make a custom export with “sku, ProductCategory1, title” and then filter by master SKU’s in the inventory list and export those to work out what should go with each other. You could also use eBay categories or any data that allows you to quickly identify which products complement each other and use this to make the import sheet for importing the related/similar items.

Tip #4 – Give it to one of your staff to do

Send them the link to this article and ask them nicely to do this for you.
If you’re reading this and your boss has given this task to you & you get stuck, just shoot me an email here.

Now for that Magento Extension

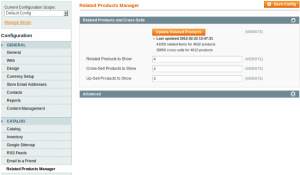
Related products manager for Magento

Related products manager for Magento

The reason why I’m suggesting this extension is because I have used it on numerous sites and I know it works brilliantly. It also helps it’s free, but the main reason why I like it and are suggesting it to you is because you get the best of both worlds.

With this extension you can set up related, cross sell and up sell products automatically, but in the connector between eSellerPro and Magento, if you set any values manually for up to two of these, then the extension will use the values that you’ve set manually first and ignore what it’s worked out for your products.

So that extension… it’s called “Related Products Manager” and you can download it using Magento Connect.

How to install “Related Products Manager”

If you’ve not added an extension before to Magento, it’s dead easy, just follow the steps below:

  1. Go to the Related Products Manager
  2. Press the big blue “Install Now” button
  3. If prompted sign in or press the register button which will take a minute or two to fill out
  4. Tick “I agree” to the terms and conditions
  5. Then click the “Get Extension Key”
  6. Copy the key (this will look like http://connect20.magentocommerce.com/community/extention_name)
  7. Go to your Magento site admin
  8. Along the top go to System > Magento Connect > Magento Connect Manager
  9. You’ll most likely be asked to sign in again, do so
  10. Enter the key we copied from step 6 into the box called “Paste extension key to install”
  11. Now press the “Install” button to the right
  12. A few moments later we should see a new section below telling us a little more about the extension we want to add. If it’s the correct one, press “Proceed”

Extensions normally on take a moment or two to be installed and you’ll be shown the progress at the bottom in the green text area, just leave this section running until you see “Cache cleaned successfully”

Once installed go to System > Configuration > Catalog > Related Products Manager
(If you get a 404 error on this page, just logout and login again)

Then you can set the options as you desire for the number of related, cross sell and up sell items, press save to store these values, then press the “Update Related Products” button for the cross promotions to be automatically worked out for you.

Tip: As with any new extension, run in a development site to make sure it’s compatible with your site and works as you expect.

In Conclusion

We learnt the difference between the cross promotion tools in Magento, related products, which are for products that compliment the item being viewed, up sell products that are best suited to items of a great value and cross sell products which are used in the Magento shopping cart, but depending on the theme you are using, may be shown in different places or have different labels.

We’ve seen how we can manually add products as related or similar products in eSellerPro and also how we can quickly import thousands of them too using the Excel import option for related & similar products. We also saw that eSellerPro has only two options for cross promotions, internally they’re called “Related” and “Similar” products, but that in the connect or Magento, these could be ported to any of the three cross promotion options as needed.

I know that it may be impossible for you to set up cross promotions manually for each product, especially if we consider you may have tens of thousands of products, so we needed a tool or extension to make these for us, which we found and installed called “Related Products Manager”. This extension gives us the best of both worlds, we can manually override the products we want minute control over at product level in eSellerPro, for some products that will be fantastic, but for the rest we can cheat and let that extension work them out for us.

What do you think?

Have you set up and used related products in eSellerPro before and did you find the guide above helpful?

Let me know in the comments box below.

Matt

Migrating Magento From one Server to Another With SSH, RSYNC & Navicat

When it comes to moving your Magento site from one server to another, it can be an awkward job. Especially if you haven’t done anything like this before and as I’ve found moving Magento from one server to another is not as straight forwards as one would have hoped.

This guide will walk you through step by step in moving your Magento site from one Linux server to another.

I’m not going to pretend that this is easy or a quick job and it may not work for you, but this has worked for me numerous times and I sincerely it helps you on your way. If you know of a better way or would like to add to this, please improve this guide by adding your comments & suggestions in the comments section at the bottom of this page.


What we’ll be doing

We’ll be performing the following tasks:

  • Moving the site files from the “original server” to the “new server”
  • Copying the database from the “original server” to the “new server”
  • Updating Magento’s config files to use the “new servers” MySQL database
  • Changing the file permissions on the “new server” for the transferred files
  • Verifying that everything is right & Cleaning up

It should be also noted that you don’t need to use this entire article to move just one part of your site. For example if you’re just interested in moving your database from one server to another, just skip the file transfer part at the beginning.

To be able to quickly and easily move your Magento site from one server to another, we’ll need some tools to help us:

  • A text editor such as Notepad++ (free)
  • SSH access to both servers
  • FTP access to the new server site files where your site is going to be hosted
  • Putty.exe for connecting via SSH (free)
  • Navicat for transferring the databases (free 30 day trial)
  • MySQL login details for the original and new servers
  • WinSCP for editing/checking on files (free)
  • Depending on the size of your database and site files, approximately 30-60 minutes

There is going to be a big pause later on in this guide while you’re transferring your files, pop the kettle on now, you’ll have some free time shortly and all the tools we’ll be using are either free or have free trials.

Assumptions

To be able to follow this guide, the following assumptions have been made:

  • You’ve used SSH before
  • The new site directory has been created already using plesk, cpanel, webmin or similar
  • You have FTP or SFTP access to the new site
  • You have made a full backup of your current site

Getting Started

To be able to migrate your site from one server to another, the easiest and quickest way is using SSH (secure shell) and a really neat command called “rysnch”.

Note: SSH access is a given on Linux dedicated, VPS and hybrid servers, if you’re using shared hosting such as from Vidahost or HeartInternet, you’ll need to ask for access.

To make things clear as we’re dealing with two servers, we are going to have the “original server” which is where you website is hosted right now and the “new server” which is where we are transferring our existing Magento site to.

Assuming we now have SSH access, use Putty to connect to your “original server” via SSH.

Tip: If you’d like a guide into setting up putty and SSH on your windows computer, see this video guide http://www.youtube.com/watch?v=ma6Ln30iP08

Finding the Directory Paths on the Original Server

Before we can transfer the sites files from one server to another, we need to find the full directory path to both the “original server” site files where your site is currently being served from and the full directory path on the “new server” where we are moving our website too.

There are two ways of doing this, the first option is more experienced users and the second is much faster for novices. I’ll take you through both of them now.

Option 1 – Using the pwd command

If you’re experienced with the Linux command line and know your server well, this will be the easiest & quickest way for you.

To do this, we just need one very simple command for the Linux command line, it’s called “pwd”. In your putty window, type in “pwd” and in the response we’ll be shown the full path to the folder that we’re in right now.

Now if you already know your configuration, use the “cd” command navigate to a path that is something like this:

cd /var/www/vhosts/<your site name>/httpdocs/

Obviously you’ll want to change “<your site name>” to your sites name.

If you’re not sure which folder your site is in, navigate down to the vhosts folder using “cd /var/www/vhosts/” and then type in “dir” and press enter. This will give you a list of folders, these are normally your hosting domain names and then use “cd yoursitename” to move into that folder. Again enter “dir”, hit enter and look for another folder called either “httpdocs” or “public_html” and use “cd” to move into this folder. If you now enter “dir” again, hit enter, you should be looking at all the files in your websites home directory.

Now that we’ve found the “original server” path, enter “pwd” in the console, hit enter and we now have the full path from which we’ll be transferring the files from.

Copy this down into your text editor as:

FROM PATH: /var/www/vhosts/<your site name>/httpdocs

Option 2 – Using FTP and cheating

This is the cheating method, I say “cheating”, but it just works.

Create a file called “pathchecker.php” in your sites home/root directory and enter the text below.

<?php
echo realpath(dirname(__FILE__)) . "\n";
echo $_SERVER['PHP_SELF'] . "\n";
?>

Tip: You can also download this file here to expedite the process.

Now navigate to http://yourwebsite.com/pathchecker.php

This will spill out the full path to your existing site in your webpage. Cheating eh?

Now copy this path down into your text editor removing the “/pathchecker.php” part at the end as:

FROM PATH: <your path here>

Finding the Directory Paths on the New Server

This is a little more tricky than the first as normally we’re unable to cheat as we’ve not moved the DNS settings around yet to point the outside internet at our new server. So instead out best option is to use the Linux command line and navigate to our home directory where our site is going to be hosted.

Again this is going to be something like “/var/www/vhosts/<your site name>/httpdocs”, just use the “cd” and “dir” commands to navigate and look around until you find the sites base directory.

Once you have located the “new server” home folder for our site where we’ll be transferring our existing site over to, jot this down in your text editor as:

NEW SITE: /var/www/vhosts/<your site name>/httpdocs

Transferring the Files using rsync

Most Linux systems come with a command called “rsync”. This allows us to transfer files from one server to another and in other cases allows us to only transfer the files that have changed too (which makes it brilliant for backups).

Before we go bashing in the rsync command in willy-nilly we need to have a quick 101 on how this command works and as an example I have put a very similar command to what we’ll be using in a few moments below. If you’d like to read the man page, you can find that here.

rsync -r -t -v --progress -c -l -z root@yourdomain:/home/yoursite/public_html /var/www/vhosts/newsite.co.uk/httpdocs

Looks scary right?

Well actually it’s dead simple and I’ve broken it down into bite sized chunks below:

  • rsync” –  The rsync command
  • -r” – This switch says “repeat recursively” or in Matt proof language, “transfer the lot”
  • -t” – This switch preserves the timestamps on the files
  • -v” – This switch makes the command “verbose” or in Matt proof language “you can see what is happening”
  • –progress” – This switch tell rsync to show us the progress during the transfer
  • -c” – This switch tells rsync to make comparisons using checksums, rather than time and size
  • -l” – This switch means that we also copy symlinks as well (this can save a massive headache!)
  • -z” – And this switch means that rsync will compress the files during transfer, thus making it faster
  • root@yourdomain:” – This is the SSH username that you log into your “original server” and the domain name or IP address of the server. Do pay special attention to the “:” character at the end as well
  • /home/yoursite/public_html” – This is the path which we worked out above and is our “FROM PATH” where we will be transferring the files from
  • ” ” – This is a space. Extremely important. If you don’t leave a space between the “FROM PATH” and the destination path that follows, this command just won’t work
  • /var/www/vhosts/newsite.co.uk/httpdocs” – And finally this is the path on the “new server” where we will be transferring the files from the “original server”

Saving your bacon

Now before we continue, there is one key combination that has saved my bacon lots of times, it’s the command to stop processes from running in the command line and if you press CTRL and C together, this will stop a process from running.

If it doesn’t look like it’s transferring the right files or you just want to stop the process at any time, hold down the CTRL key and press C on your keyboard. This will stop the rsync command from running and you can investigate if the files are being transferred to the right location or not.

And back to rsync…

Still with me?

Sweet! Because we’re at the cool stage.

Crucial step: Log into to your “new server” via SSH, that’s right the NEW server. We’ll be logging in remotely to your “original server” from the “new server” command line.

Now grab your text editor and copy this into it:

rsync -r -t -v --progress -c -l -z oldserver@yourdomain:FROMPATH NEWPATH

Now swap the following text around:

  • oldserver” to your “original servers” SSH user name
  • yourdomain” to your current domain name or IP address used to log into the “original server” with via SSH
  • Make sure you don’t edit out the “:” symbol
  • FROMPATH” to your text for the from path we found earlier
  • NEWPATH” to the path we just found out for where the site is going to be moved to

We should now have something like we had originally like this:

rsync -r -t -v --progress -c -l -z root@yourdomain:/home/yoursite/public_html /var/www/vhosts/newsite.co.uk/httpdocs

Copy and paste this into your “new server” SSH console.

Tip: CTRL+V does not work in putty, press SHIFT+INSERT or right click your mouse and it will paste the text into the command line for you. Cool tip right?

Drum roll….

Before you press enter, just check over what you’ve written 3 times, making sure it looks right, you have the “:” symbol after your original servers login hostname or IP and there is a space between the from path and the new path sections.

Now hit enter.

If all has gone well, you’ll be asked to accept a security key, type “yes” and then for a password. This is the SSH password for the “original server”.

Once accepted and password entered you’ll start to see lots of files wizzing down the screen, this is fantastic, your files are now being transferred from your “old server” to your “new server”. (see note in a moment if this does not happen)

To just double check that they’re being transferred OK, you can hit CTRL + C at any time and check the directory on the new server to see if the files have started to appear.

Note: If you’re using WinSCP or similar SCFTP programs, press F5 or right click and refresh so that you see the new files (I’ve panicked for no reason before as I had just not refreshed the folder I was looking at).

To restart the transfer, just press the up key on your keyboard and hit enter (or paste in the rsync command again).

Transferring Magento site files takes ages, there is something like 28,000 files in a standard Magento installation and if you have lots of products and lots of images, this can easily go to 100,000 files, even with 100Mbps connections between servers this is going to take some time. So make that cup of tea from earlier and read on into the next steps.

OMGWTFBBQ I have an error

If you receive errors when running the command, then something is not right in the command we built.

Double check everything!!!

  • Make sure your username is right,
  • The hostname/IP address to the original server is right,
  • Make sure you’ve not left out the colon “:” between the username/host and the from path
  • If your from or to paths have spaces in them, wrap quotes around the whole file paths eg “/home/yoursite/public_html”
  • Make sure you’re using forward slashes like this / and not backwards ones like this \
  • Make sure the paths are correct by going to each servers SSH/putty window and typing in “cd your/path/here/”
  • Oh and a daft one, make sure on your folder paths the last slash “/” is not there!!! (that caught me out a while ago)
  • If you get a warning that you’re not allowed to run the command, add “sudo ” at the beginning of the rsync command and you maybe promoted to enter your password. This can sometimes happen when you’re not using a fully loaded account such as “root”

If you’re still stuck, the best suggestion is to ask you new providers technical support to help you. Even if they charge you, this could save you hours of frustration and sometimes just paying to get stuff done is easier.

Correcting File Permissions

This one caught me out twice!
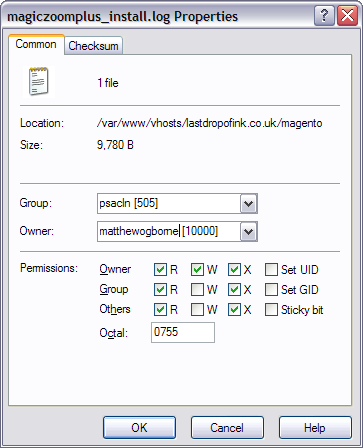
Using WinSCP to show the New File Owner and Group Names

Using WinSCP to show the New File Owner and Group Names

When transferring the files from the “original server” to the “new server” you were probably using root or another user that is not the web server user, so all the files we transferred now belong to root (or similar). That is not good and we need to correct this.

The easiest way of doing this is again by cheating and using a single file, then another cool Linux command called “chown”

I did say this was cheating, but working out what “group” and “owner” we need to be using for web files isn’t straight forwards especially if this is a new server you have moved to and are not 100% with it yet.

So the cheat is to upload a file (and I mean ANY file) using WinSCP or another FTP application using FTP details for the new server and then see which group and owner has been assigned to this file.

Upload a file, whether that be an image, text file it really doesn’t matter, you can delete it anyway in a moment or two once we have found out what permissions we need to set

In WinSCP you can see the group/owner names by right-clicking a file. I’ve included a screenshot of this to the right and in this example, we can see that the group is: “sacln” and the owner is “matthewogborne”.

Now that we know these, jot these down in your text editor.

Command Format:

chown -R OWNER:GROUP PATH*

Command Example:

chown -R matthewogborne:psacln /var/www/vhosts/somedomain.co.uk/httpdocs/*

Triple Check!

Now triple check that the path, group name and owner names are correct and that you have ended your path name with the characters “/*” so that it knows to do the sub folders.

Please do triple check this is correct, I once changed the file permissions on an enter Linux server for every file once and it meant we had to start from scratch, it was messy (that’s why we’re using the full path above).

Run the Command

Now jump back to the putty window that is logged into the “new server” enter in the command below, replacing your Group and Owner names and also the path to where the new site is hosted to and hit enter. This command won’t take too long to run and if you go back to your WinSCP or FTP application and hit refresh we should see that the file permissions have changed to what they should be.

Transferring the Database

This is by far the easy part using a program called Navicat. Navicat is a program for connecting to MySQl databases, viewing tables, running queries blah blah, but it also has one super cool feature called “Data Transfer”.

The Data Transfer feature allows us to copy one database to another very easily and for porting Magento from one server to another compared to what we did above, this is dead easy.

To start, we need to know the MySQL details for the “original server” and the “new server”, this will be the hostname (IP or URL), username and passwords.

Tip: If you don’t know what these are, you can find your current username/password from the file called “local.xml” in the “/app/etc/” directory and for the new server, you can add a database using plesk, cPanel or if you’re hardcore, using the command line and there are guides to do that here

Adding a Connection to Navicat

This is dead simple, just follow the steps below:

  1. Along the top press File > New Connection
  2. Name the connection “Original Server” or “New Server” depending which one it is
  3. Enter the hostname
  4. Enter the username
  5. Enter the password
  6. Press “test Connection” to confirm the details are correct
  7. Press OK
  8. Now do that for both of the databases, the original and new servers.

Easy eh?

Now two quick tips for you:

Tip 1: After adding both connections to Navicat, close and reopen it. This means we’ll be able to see both MySQL accounts in the next step.

Tip 2: If you are using cPanel, then the default is not to allow remote hosts to MySQL. This is good practice but will stop us from transferring the current database to the new database.

cPanel Allow Remote MySQL Connections

cPanel Allow Remote MySQL Connections

So on the main page, scroll down until you see the “Remote MySQL” as highlighted in the image above. Click on this and on the next page enter your current IP address and press “Add Host”. If you don’t know what it is go to this website and copy it.

Transferring the Databases

This is so simple you’re going to love it.

Just follow these steps:

  1. In the left panel of Navicat, double click both of the connections so that they’re connected
  2. Right click on the “Original Server” connection and from the right click menu select “Data Transfer”
  3. On the left hand side is where we are transferring data FROM (source), on the right hand-side is where we are transfer data TO (target)
  4. On the LEFT hand side, dropdown the database box and select your original Magento database
  5. On the RIGHT hand-side, tick “transfer directly to server”
  6. Now select the “New Server” connection
  7. From the database dropdown select the new database where you transfer the data to
  8. Now press “Start”

A screen shot of this is below:
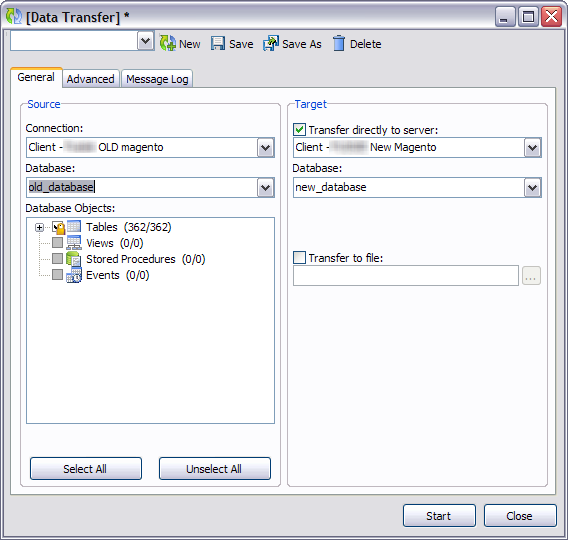
Magento database transfer with navicat

Again this is going to take a while. Even a new installation can take a few minutes on a slow connection and massive databases, one took 45 minutes to transfer.

Is it time for another tea?

Errors? If it errors at any time, don’t worry, the default settings were to stop on errors. You can change these settings on the advanced tab, but I’ve not had Magento error on a transfer yet, other databases yes.

Tip: If you’re finding the transfer really slow, try delayed inserts or just be patient :) And if your site is super busy, you might want to be doing this at midnight with the site locked down in maintenance mode and also locking the database tables. It’s your call on that.

Post Database & File Transfer

So hopefully, the file transfers went OK and your a couple of cups of tea down. But we need to tell the transferred site to use the new database username and password, plus we need to make sure it’s operational too.

Changing the Database Credentials Over

As we’ve moved servers it’s highly likely that your MySQL username and password has changed for the new server, if this is the case follow these steps:

  1. Go to “/app/etc/” on the “new server” and open the file called “local.xml”
  2. Change the values as appropriate for:
  3. host
  4. username
  5. password
  6. dbname
  7. Save the file

Seeing the Transferred Site Live

Changing the DNS details over without checking that the site is operational is a little foolish

So instead to see if the new site is actually working or not, we just need to tinker without hosts file on our own computer.

This varies from operating system to operating system, but basically we’re by-passing the internet’s DNS servers and forcing our local machine to go straight to the IP address we set for one or more domain names.

To do this we need to know the “new servers” IP address and to add two new entries to your hosts file. If your new servers IP address is 192.192.192.192 and your websites name is “mydomain.co.uk” then you would add this to your hosts file and then clear the cache:

192.192.192.192 mydomain.co.uk
192.192.192.192 www.mydomain.co.uk

As this is way off topic, I’ve included 3 video’s below that cover windows XP, 7 and Mac OS’s and how to change the hosts file

Once you’ve modified the hosts file and cleared/flushed the DNS cache on your machine, open up a web browser and enter your website URL.

Ta da! Your site should be showing.

Give yourself a pat on the back, but also understand we may not be out of the woods yet.

Tip: Daft point, once testing is over and done with, change the hosts file back again and remove these entries.

Cleaning Up & Verifying

Now before you eagerly go changing the DNS details of the domain over to the new servers details, check everything. Check that you:

  • Clear the Magento cache
  • Reindex everything,
  • View products
  • Add products to the cart
  • Checkout with an order
  • That all backend AND frontend functions are working as expected

Payment Gateways

Payment gateways like SagePay work from specified IP addresses, when you move servers the IP address is going to change, make sure that you update the SagePay admin panel with the new IP address so customers can pay :)

Magento Admin 404 Error

This one has caught me out and I was really concerned when I saw it first time around, but actually the issue is easily solved.

After migrating from one server to another, the settings are going to be incorrect and the indexes can sometimes not be set correctly, this is where this extremely helpful suggestion has helped loads:

You have to delete the following file

app/etc/use_cache.ser

If you get an error after that like

Notice: Undefined index: 0 in /srv/www/vhosts/javra.com/htdocs/munchad2/app/code/core/Mage/Core/Model/Mysql4/Config.php on line 92

Then go to your Database Management.

  • Open PhpMyAdmin
  • Go to your database
  • Click SQL
  • Run the following SQL Query:
SET FOREIGN_KEY_CHECKS=0;
UPDATE `core_store` SET store_id = 0 WHERE code='admin';
UPDATE `core_store_group` SET group_id = 0 WHERE name='Default';
UPDATE `core_website` SET website_id = 0 WHERE code='admin';
UPDATE `customer_group` SET customer_group_id = 0 WHERE customer_group_code='NOT LOGGED IN';
SET FOREIGN_KEY_CHECKS=1;

If you received this error, it will also be worth checking the settings in the “core_settings” table as I was also caught out once with differing DNS details being set and a site that was previously working on http://storename.co.uk was set to only work from http://www.storename.co.uk and thus the Magento admin and several other parts of the site was not working.

That’s it, Magento Site Migrated!

Well, that was quite a straightforward task when we look at what we’ve just covered. The only tricky parts are around getting the file permissions right and then checking the site after the move. Once you’re 100% sure that everything is OK with the transferred site, update the DNS details and I wish you many happy sales.

If you found this article helpful, please leave me a comment below or perhaps tweet it to let others know and if you think you can help make it better, pop a comment/suggestion at the bottom.

Matt
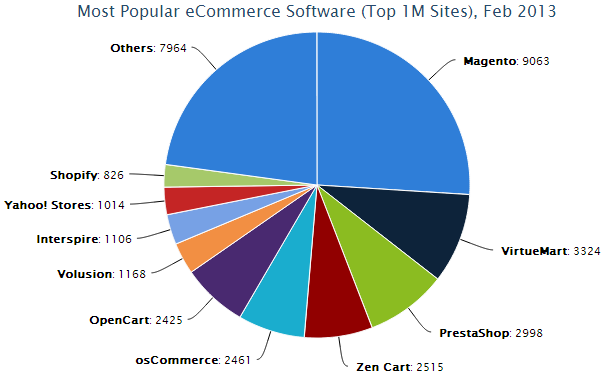
Bulk Deleting Attributes in Magento with iMacros

Very quickly when testing with Magento you can end up with lots and lots attributes in Magento that you don’t need any more.

Deleting an attribute is easy, deleting lots is a pain and it can be so easily be scripted, because we all hate doing something more than once right?

So that’s what the video below shows you and the code snippet is just below the video for you.


Quickly & easily bulk delete attributes in Magento

The iMacro Code

To make this work for you, you’ll need the macro code below:

VERSION BUILD=7500718 RECORDER=FX
TAB T=1
TAG POS=1 TYPE=TD ATTR=TXT:No
ONDIALOG POS=1 BUTTON=OK CONTENT=
TAG POS=1 TYPE=BUTTON ATTR=CLASS:scalable<SP>delete

How to add this to your iMacro list

To add this to your iMacros follow these steps:

  1. In your iMacros side bar, click on the #Current.iim macro
  2. At the bottom panel press the “Edit” tab
  3. Press “Edit Macro”
  4. Paste the code in from above
  5. Press File > Save As and save it as “bulk delete attributes.iim”
  6. For this new macro to show in the list, on the same edit tab in the left panel, press “Refresh macro list”
  7. Use as you desire

If you don’t have FireFox you can download it for free here and the iMacros extension for Firefox is also free and you can download that here.

Daft point…

Use your common sense when deleting attributes or using any form of automated script.

Make sure you know what it’s doing, have faith in you have a restricted search made and watch it, just in case you delete system attributes (while sipping tea and with the feet on the desk).

Enjoy,

Matt

How to Disable the Magento WYSIWYG Editor

Magento comes with a lot of features out of the box, one of those is a HTML editor to allow easy adding and editing of HTML in almost all content areas.

However for advanced users, it’s more of a nuisance and you can disable it if you prefer, in this video I show you how.

There it’s that easy and super handy for HTML editing in Magento for advanced users.